
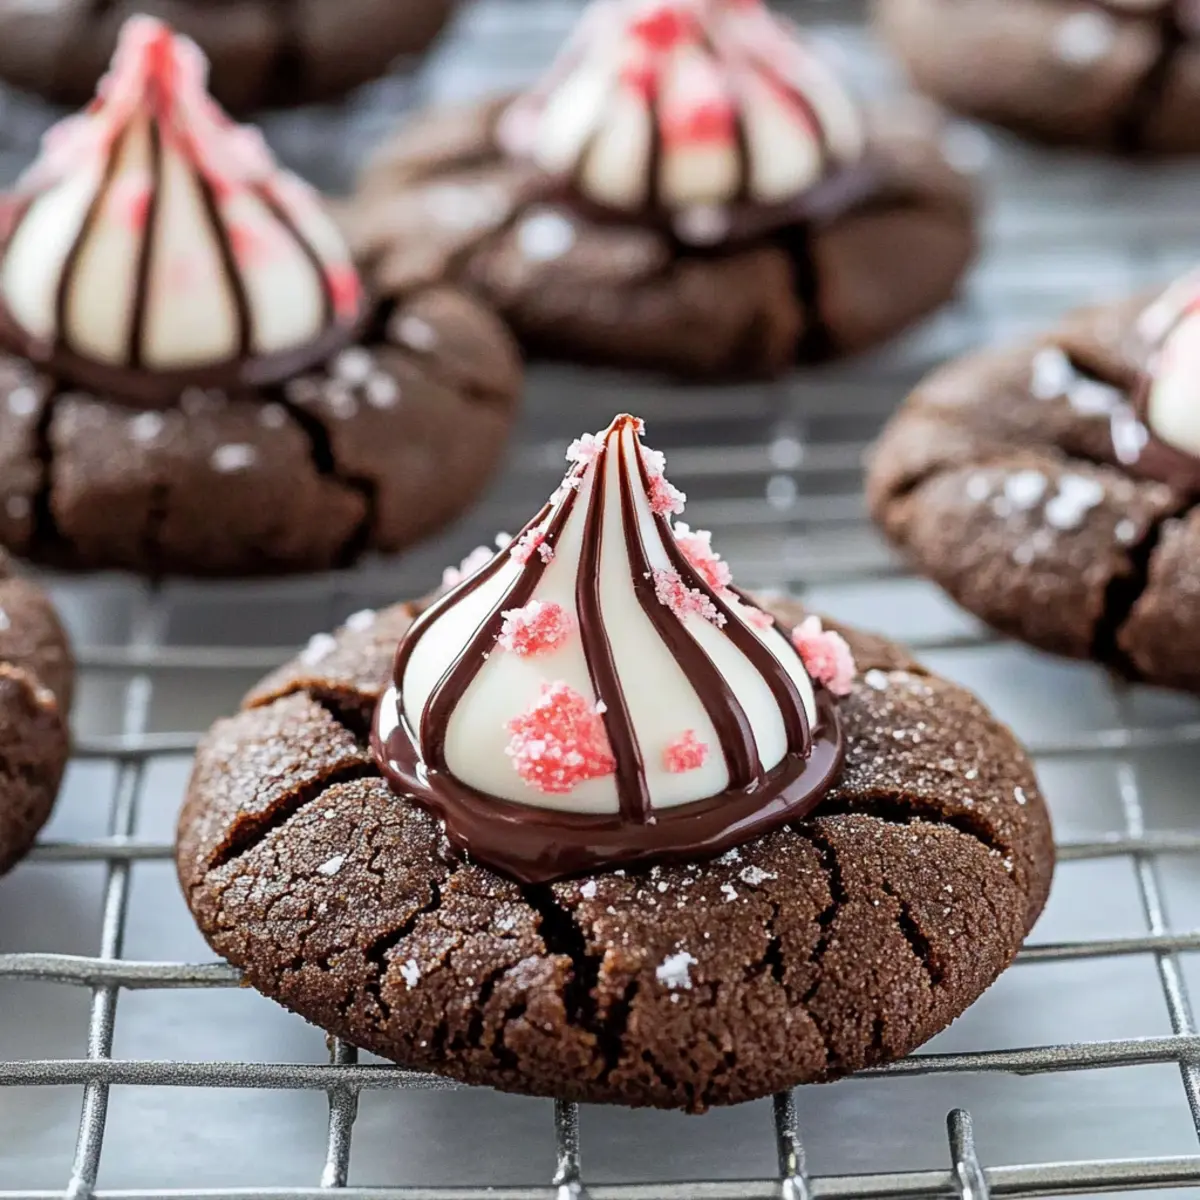
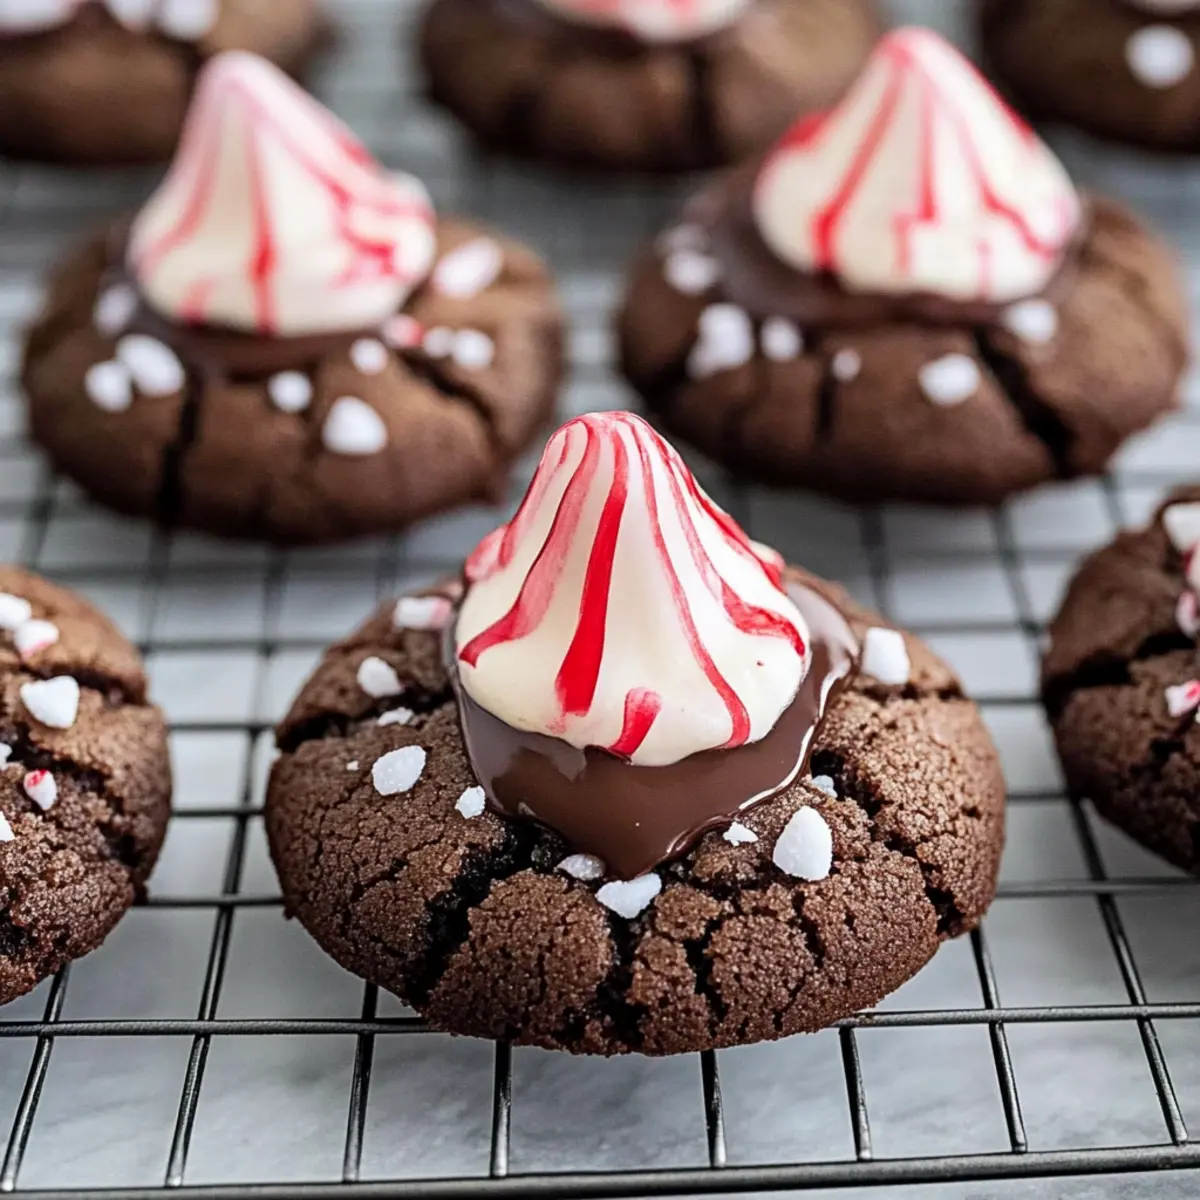
As the holiday season rolls in, the scent of peppermint and chocolate fills the air, evoking memories of cozy evenings and warm gatherings. That’s exactly the magic behind my Peppermint Chocolate Blossom Cookies! These festive delights offer a scrumptious twist on a classic favorite, featuring a soft cocoa base topped with a melty chocolate kiss and a sprinkle of crushed peppermint candies. Not only are they a breeze to whip up, but they’re also crowd-pleasers perfect for cookie exchanges or a cozy night in by the fire. Whether you’re preparing for a party or simply treating yourself, these cookies are sure to spread some holiday cheer. Ready to get baking? Let’s dive into this sweet adventure together!

Why Are These Cookies a Holiday Must?
Irresistible Flavor: The combination of rich chocolate and refreshing peppermint brings joyous holiday vibes to your taste buds.
Quick and Easy: With straightforward steps, even novice bakers will find success, ensuring everyone can enjoy these treats.
Perfect for Sharing: These cookies are a hit at gatherings and cookie exchanges; they disappear in no time!
Versatile Variations: Feel free to experiment with mini chocolate chips or different flavored kisses to match your taste.
Let these Peppermint Chocolate Blossom Cookies become a delightful tradition in your holiday baking scene, just like the beloved Twix Cookies Chewy or Oreo Cheesecake Cookies that celebrate wonderful flavors together.
Peppermint Chocolate Blossom Cookies Ingredients
Here’s what you need to get started on these festive delights!
For the Cookies
- All-purpose flour – Provides structure; substitute with almond flour for a nuttier texture or whole wheat for a denser cookie.
- Unsweetened cocoa powder – Adds rich chocolate flavor; ensure it’s unsweetened for the right balance.
- Baking soda – Helps cookies rise for that perfect texture.
- Salt – Enhances flavor and balances sweetness.
- Unsalted butter (softened) – Adds moisture and richness; ensure it’s soft but firm to keep cookies from flattening.
- Granulated sugar – Provides sweetness and helps with cookie spread.
- Brown sugar (packed) – Adds moisture and a hint of caramel flavor for an extra layer of delight.
- Large egg – Binds ingredients and boosts moisture in your Peppermint Chocolate Blossom Cookies.
- Vanilla extract – Enhances the overall flavor profile beautifully.
- Milk – Adds moisture; can be replaced with plant-based milk for a dairy-free treat.
Optional Add-ins
- Mini chocolate chips – For extra chocolate richness, these are optional but highly recommended!
- Crushed peppermint candies or candy canes – Sprinkle over warm cookies for a festive touch and delightful crunch.
For the Topping
- Peppermint-striped chocolate kisses – The star decoration that melts slightly when baking, adding a creamy, chocolaty center.
Gather these ingredients and get ready to bake a magical batch of Peppermint Chocolate Blossom Cookies!
Step‑by‑Step Instructions for Peppermint Chocolate Blossom Cookies
Step 1: Prepare the Baking Sheets
Preheat your oven to 350°F (175°C) and line two baking sheets with parchment paper. The parchment will prevent sticking and ensure even baking. A smooth surface is essential for your Peppermint Chocolate Blossom Cookies! While the oven heats, you can prepare your cookie dough, ensuring everything is ready for the next steps.
Step 2: Mix the Dry Ingredients
In a medium bowl, whisk together 1 cup of all-purpose flour, 1/2 cup of unsweetened cocoa powder, 1/2 teaspoon of baking soda, and a pinch of salt. This combination adds structure and depth to your cookies. Make sure there are no lumps in the cocoa powder—this is crucial for achieving that rich chocolate flavor. Set aside your dry mixture and get ready to mix the wet ingredients.
Step 3: Cream Butter and Sugars
In a large mixing bowl, beat together 1/2 cup of softened unsalted butter, 1/4 cup granulated sugar, and 1/4 cup packed brown sugar. Mix with an electric mixer on medium speed for about 2-3 minutes until the mixture is light and fluffy. The air incorporated into the butter will help create chewy Peppermint Chocolate Blossom Cookies that melt in your mouth.
Step 4: Combine Wet and Dry Ingredients
Add 1 large egg, 1 teaspoon of vanilla extract, and 1 tablespoon of milk to the butter and sugar mixture. Mix until well combined. Gradually incorporate your dry ingredients into the wet mixture using a spatula, stirring until just smooth. Be careful not to overmix, as this can result in dense cookies. You can now add any optional mini chocolate chips for even more chocolatey goodness!
Step 5: Shape the Cookies
Using a cookie scoop or spoon, portion out the dough into 1-inch balls. Place them about 2 inches apart on your prepared baking sheets—this allows for spreading during baking. The dough will be soft and slightly sticky, so wetting your hands can help with shaping. Rely on your instincts and let your creativity shine as you arrange your Peppermint Chocolate Blossom Cookies!
Step 6: Bake the Cookies
Insert the baking sheets into your preheated oven and bake for 8-10 minutes. The edges should appear set, while the centers remain soft and slightly underbaked. This contrast is key to achieving that desired chewy texture. Keep an eye on them to ensure they don’t overbake, as they will continue to firm up after removal from the oven.
Step 7: Add the Chocolate Kisses
Once out of the oven, carefully press a peppermint-striped chocolate kiss into the center of each warm cookie. The heat will cause the chocolate to melt slightly, creating a delightful, gooey center. This step adds both visual appeal and a burst of flavor to your Peppermint Chocolate Blossom Cookies.
Step 8: Finish with Crushed Peppermint
While the cookies are still warm, sprinkle each one generously with crushed peppermint candies for a festive finish. This adds a lovely crunch and extra holiday flair. Allow the cookies to cool on the baking sheets for a few moments before transferring them to a wire rack to cool completely. Enjoy the inviting aroma that fills your kitchen!

How to Store and Freeze Peppermint Chocolate Blossom Cookies
Room Temperature: Store the cookies in an airtight container at room temperature for up to one week to maintain their freshness and flavor.
Fridge: If you prefer them chilled, keep the cookies in an airtight container in the fridge for up to two weeks. This may slightly alter the texture but will keep them delicious.
Freezer: Freeze the cookies in layers separated by parchment paper in an airtight container for up to three months. Thaw at room temperature or microwave for a few seconds before serving.
Reheating: To enjoy warm cookies later, simply reheat them in the oven at 350°F (175°C) for about 5-7 minutes, allowing that melty chocolate kiss to come back to life!
Expert Tips for Peppermint Chocolate Blossom Cookies
-
Chill the Dough: Refrigerating the dough for 20-30 minutes helps prevent flat cookies and enhances their texture.
-
Butter Consistency is Key: Make sure the butter is softened but not overly soft. This balance prevents cookies from flattening too much during baking.
-
Monitor Oven Temperature: If your cookies spread too much, check that your oven is properly calibrated—consider using an oven thermometer for accuracy.
-
Use Frozen Kisses: To maintain the shape of the chocolate kisses while baking, try using frozen ones; this will help them keep their form.
-
Mix Carefully: When combining the wet and dry ingredients, mix just until smooth. Overmixing can lead to tough, dense Peppermint Chocolate Blossom Cookies.
-
Sprinkle While Warm: For the best adherence, sprinkle crushed peppermint candies on the cookies while they’re still warm; this ensures they stick beautifully to the melted chocolate.
Peppermint Chocolate Blossom Cookies Variations
Feel free to let your creativity shine and customize these delightful cookies to fit your cravings!
-
Whole Wheat: Substitute all-purpose flour with whole wheat for a healthier, heartier cookie. You’ll still enjoy the festive flavors with a nutty twist.
-
Oat Flour: Use oat flour instead of all-purpose flour for a chewier texture. These cookies will bring a new dimension of flavor to your holiday baking!
-
Flavored Kisses: Experiment with different flavored chocolate kisses, like caramel or raspberry, to surprise your taste buds. Each bite will be a delightful surprise!
-
Chili Chocolate: Add a pinch of cayenne pepper to the cookie dough for a mild heat that perfectly complements the peppermint. This twist will make your cookies unforgettable.
-
Nutty Addition: Fold in some finely chopped walnuts or pecans into the dough for an added crunch. The contrasting textures make these cookies even more enjoyable.
-
Mini Chocolate Chips: Toss in mini chocolate chips for an extra chocolatey experience. These little bits of joy add richness and balance the minty flavor beautifully.
-
Seasonal Sprinkles: Swap out the crushed peppermint for colorful seasonal sprinkles to give the cookies a festive look and a sweet crunch. It’s a fun way to celebrate the holidays!
-
Mint Extract: For a more intense peppermint flavor, replace half of the vanilla extract with mint extract. The cookies will really pack a minty punch!
Let your imagination run wild! These Peppermint Chocolate Blossom Cookies are just begging to be adapted, just like the beloved Peanut Butter Spider Cookies that offer a creative twist and scrumptious taste. Enjoy experimenting!
What to Serve with Peppermint Chocolate Blossom Cookies?
Elevate your holiday baking experience by presenting a delightful array of sides that harmonize beautifully with these festive treats!
-
Creamy Hot Cocoa: The warm, velvety texture of hot cocoa enhances the chocolate flavors in the cookies while adding a comforting element. It’s like sharing a cozy hug in a mug!
-
Peppermint Bark: This classic holiday treat pairs perfectly with the cookies, echoing the peppermint flavors while adding a delightful crunch with its chocolate layers.
-
Gingerbread Cookies: For a traditional twist, serve these spiced delights alongside your Peppermint Chocolate Blossom Cookies to provide a delightful flavor contrast. Each bite offers a nostalgic taste of the season!
-
Christmas Fruitcake: The sweet and fruity notes of a moist fruitcake bring a festive flair to the table, balancing the richness of chocolate and mint with natural sweetness.
-
Roasted Chestnuts: For a savory touch, the warm, nutty flavors of roasted chestnuts create a sophisticated palate that complements the sweetness of the cookies beautifully.
-
Festive Fruit Salad: A colorful blend of seasonal fruits with refreshing citrus notes offers a bright contrast to the cookies, ensuring a refreshing end to your dessert experience.
-
Eggnog: Rich and creamy, this classic holiday beverage offers a luxurious pairing with the cookies, enhancing the flavors with its spiced undertones while keeping the festive spirit alive!
Make Ahead Options
These Peppermint Chocolate Blossom Cookies are perfect for meal prep, allowing you to enjoy holiday baking without the last-minute rush! You can prepare the cookie dough up to 24 hours in advance; just refrigerate it in an airtight container. If you want to get even further ahead, you can freeze the formed cookie balls for up to 3 months—simply place them in a single layer on a baking sheet to freeze before transferring them to a freezer bag. When you’re ready to bake, simply add a few extra minutes to the baking time for frozen dough. This way, you’ll have delicious, freshly baked cookies with minimal effort, all while ensuring they stay just as scrumptious as the day they were made!
Peppermint Chocolate Blossom Cookies Recipe FAQs
What type of flour should I use for these cookies?
All-purpose flour is ideal for these Peppermint Chocolate Blossom Cookies, providing the perfect structure. However, if you prefer a nuttier texture, almond flour is a great substitute, while whole wheat flour can give a denser cookie. Just keep in mind that this may slightly change the flavor and texture!
How should I store leftover cookies?
To store your Peppermint Chocolate Blossom Cookies, place them in an airtight container at room temperature for up to one week. If you’re looking for a longer shelf life, you can refrigerate them for up to two weeks in a sealed container. This method might alter their texture a bit but will keep them delicious.
Can I freeze these cookies?
Absolutely! To freeze your cookies, simply layer them in an airtight container with parchment paper between each layer to prevent sticking. They can be stored this way for up to three months. To thaw, just leave them at room temperature for a while, or pop them in the microwave for a few seconds to enjoy that gooey chocolate kiss again!
Why are my cookies flat?
If your Peppermint Chocolate Blossom Cookies turn out flat, it may be due to over-creaming the butter and sugars or using butter that’s too warm. I recommend chilling your dough for 20-30 minutes before baking to help maintain the shape. Also, checking the accuracy of your oven temperature can help; if it’s too hot, your cookies will spread too quickly.
Are there any dietary considerations for these cookies?
Yes! If you have dietary restrictions, you can easily make these cookies dairy-free by substituting the milk with a plant-based option like almond or oat milk. Additionally, check the labels on your chocolate kisses and peppermint candies for any allergens, as some brands may contain nuts or dairy.
How can I make these cookies more festive?
For a festive twist, consider adding colored sugar sprinkles on top along with or instead of crushed peppermint. You might also switch up the chocolate kisses for different flavored varieties or seasonal shapes during the holidays to give your Peppermint Chocolate Blossom Cookies a unique flair!
Peppermint Chocolate Blossom Cookies for Festive Joy
Ingredients
Equipment
Method
- Preheat your oven to 350°F (175°C) and line two baking sheets with parchment paper.
- In a medium bowl, whisk together flour, cocoa powder, baking soda, and salt.
- In a large bowl, beat together butter, granulated sugar, and brown sugar until light and fluffy.
- Add egg, vanilla, and milk to the butter mixture. Mix until well combined, then add dry ingredients gradually.
- Using a cookie scoop or spoon, portion dough into 1-inch balls and place on baking sheets.
- Bake for 8-10 minutes, until edges are set but centers remain soft.
- Press a chocolate kiss into the center of each cookie after removing from oven.
- Sprinkle with crushed peppermint while still warm, then let cool on a wire rack.