
The kitchen filled with giggles and gooeyness as I set out to create the perfect Halloween treats. If you’re looking to elevate your spooky celebration with deliciously fun bites, these Peanut Butter Spider Cookies are just the trick! Not only are they a delightful crowd-pleaser, but they also come together in no time, making them a breeze for busy home chefs juggling festive preparations. With a perfect blend of creamy peanut butter and just the right amount of sweetness, these cookies are sure to charm both kids and adults alike. So, are you ready to whip up some spooky magic and impress your guests this Halloween? Let’s dive in!
Why Make Peanut Butter Spider Cookies?
Simplicity in preparation makes these cookies a go-to for any Halloween gathering. Gooey goodness from creamy peanut butter creates an irresistible flavor that everyone will love. Eye-catching designs transform ordinary cookies into spooky treats that kids will adore, making them a hit at festive parties. Pair them with other fun snacks like Cheesecake Stuffed Cookies for a memorable spread. Quick baking times mean you can whip these up in a flash, allowing you to spend more time enjoying the spooky festivities!
Peanut Butter Spider Cookies Ingredients
For the Cookies
• All-Purpose Flour – This forms the base of the cookies, giving them structure and chewiness.
• Creamy Peanut Butter – The star of the show, adding rich flavor and a soft texture; crunchy peanut butter can also be used for added texture.
• Granulated Sugar – Sweetens the cookies perfectly, making them tempting for young trick-or-treaters and adults alike.
• Brown Sugar – Contributes moisture and a hint of caramel flavor, creating a lovely depth in every bite.
• Egg – Binds the ingredients together, ensuring the cookies are soft and chewy; for a vegan option, use a flax egg.
• Baking Soda – Helps the cookies rise for that perfect softness.
• Vanilla Extract – Enhances the flavor, making your cookies irresistibly aromatic.
For the Spiders
• Chocolate Chips – Melted to create the body of the spiders; feel free to switch to dairy-free chocolate for a vegan twist.
• Candy Eyes – Adds a whimsical touch that makes these Peanut Butter Spider Cookies truly festive—kids will love them!
• Pretzel Sticks – Used for spider legs, creating a crunchy contrast to the soft cookie.
Optional Toppings
• Drizzled Chocolate – Add a creative swirl on top for extra decadence; dark chocolate enhances the spooky vibe!
These Peanut Butter Spider Cookies promise a delightful balance of flavor and fun, making your Halloween celebration even more memorable!
Step‑by‑Step Instructions for PEANUT BUTTER SPIDER COOKIES
Step 1: Preheat the Oven
Begin by preheating your oven to 350°F (175°C). This is crucial for ensuring your Peanut Butter Spider Cookies bake evenly. While the oven heats, line a baking sheet with parchment paper to prevent sticking and make cleanup a breeze. You’ll want to keep an eye on the temperature, as a well-timed preheat sets the stage for delicious cookies!
Step 2: Mix the Cookie Dough
In a large mixing bowl, combine 1 cup of creamy peanut butter, ½ cup of granulated sugar, and ½ cup of brown sugar. Use a hand mixer or wooden spoon to blend until the mixture is smooth and creamy. Then, add one egg and 1 teaspoon of vanilla extract, mixing well until combined. Finally, sprinkle in 1 teaspoon of baking soda and 1 ½ cups of all-purpose flour, stirring until a soft dough forms.
Step 3: Shape the Cookies
Using a tablespoon, scoop out portions of the cookie dough and roll them into balls, placing them on the prepared baking sheet about 2 inches apart. You can expect to fit around 12 to 15 cookies per sheet. Flatten each ball slightly using the back of a fork, creating a crisscross pattern, which enhances the texture of your Peanut Butter Spider Cookies and helps them bake evenly.
Step 4: Bake and Cool
Slide the baking sheet into the preheated oven and bake for 10 to 12 minutes, or until the edges are golden and the center appears set. Once baked, remove them from the oven and let the cookies cool on the baking sheet for about 5 minutes, allowing them to firm up slightly before transferring them to a wire rack.
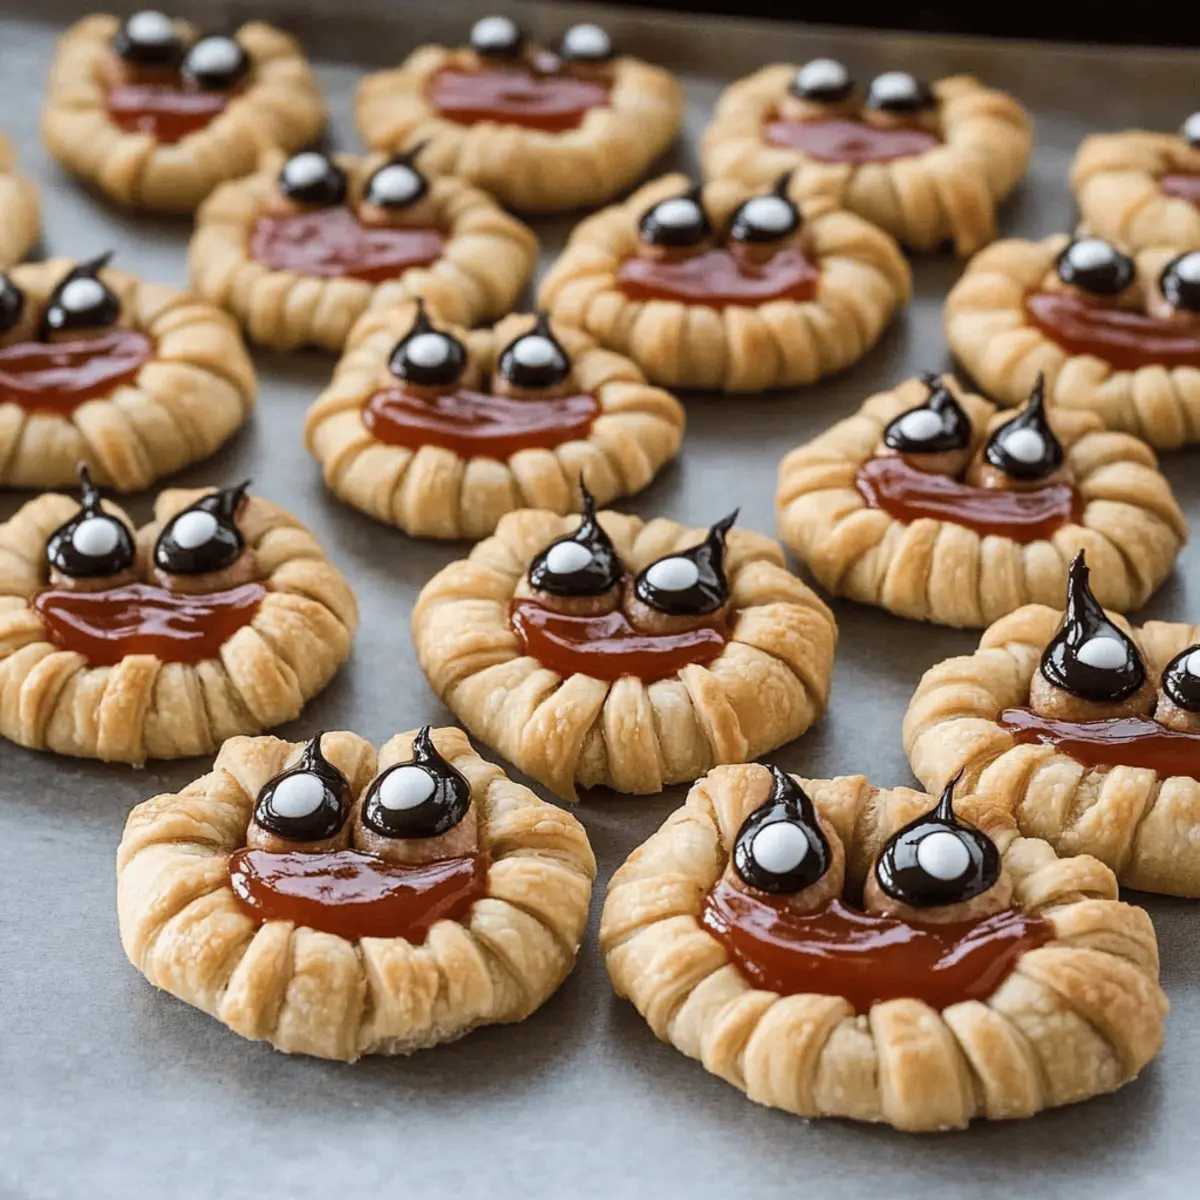
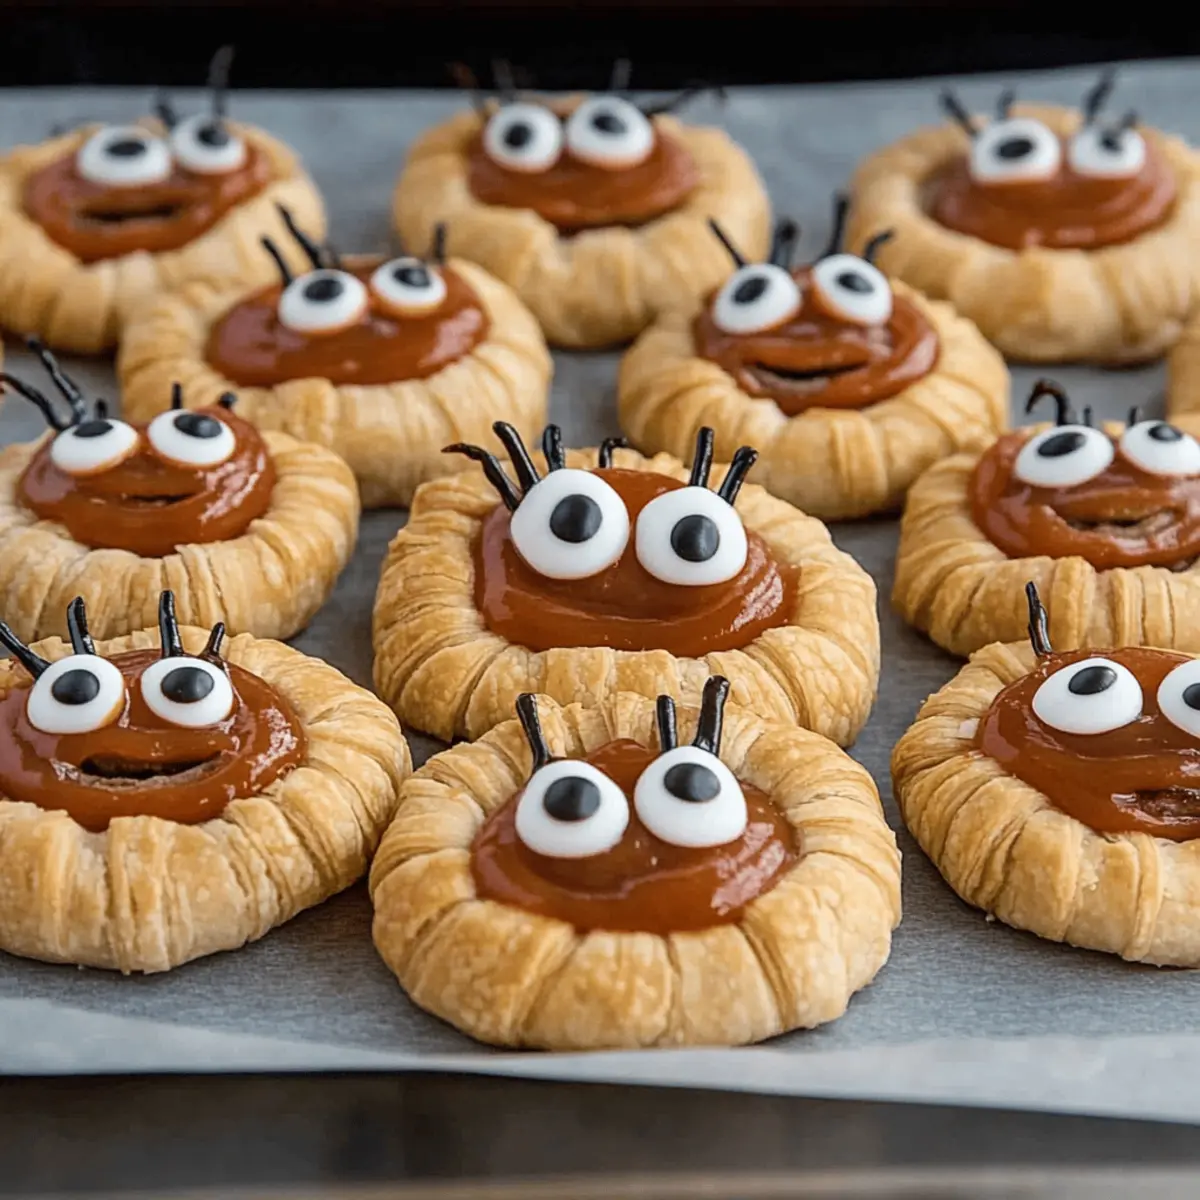
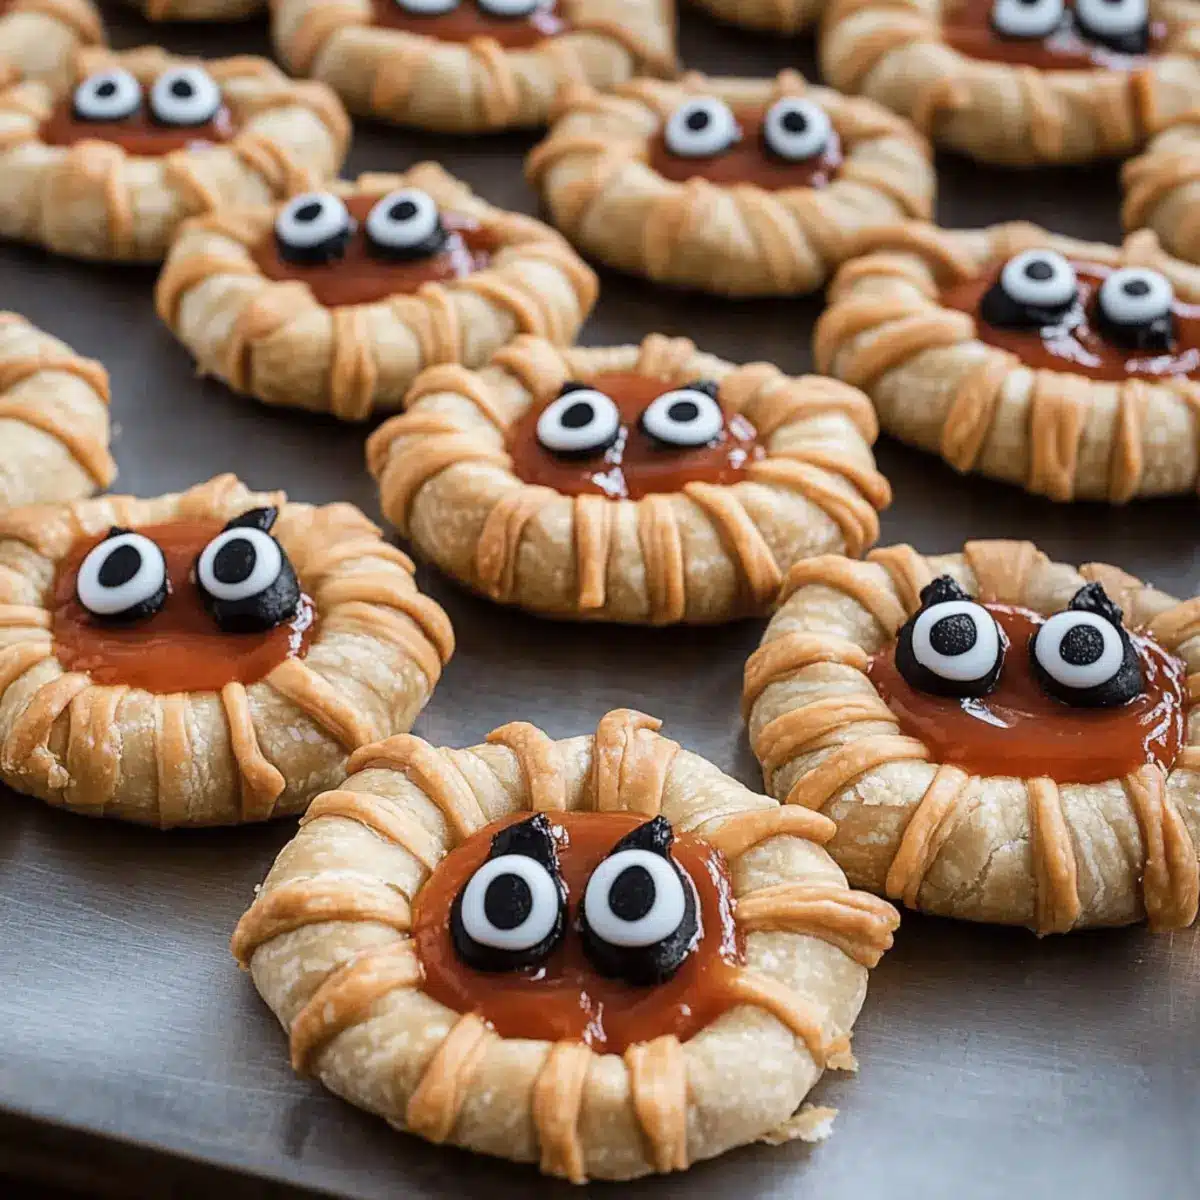
Step 5: Create the Spiders
While the cookies cool, melt half a cup of chocolate chips in a microwave-safe bowl, heating them in 30-second intervals until smooth. Once melted, use a toothpick or piping bag to create a circle of chocolate on top of each cookie, forming the spider bodies. You can drizzle some extra chocolate for artistic flair!
Step 6: Add the Legs and Eyes
To finish decorating your Peanut Butter Spider Cookies, press four pretzel sticks into either side of each melted chocolate circle for spider legs. Then, gently place two candy eyes on each spider using a bit of melted chocolate to secure them in place. This makes your spooky treats come alive and adds a playful touch to your Halloween spread.
Step 7: Let Set and Serve
Allow the chocolate to set completely, which should take about 10 to 15 minutes at room temperature. Once the chocolate has hardened, your Peanut Butter Spider Cookies are ready to serve! Assemble them on a festive platter, and enjoy the smiles from friends and family as they delight in these fun and delicious Halloween treats.

Make Ahead Options
These Peanut Butter Spider Cookies are perfect for busy home cooks looking to save time during the hectic Halloween season! You can prepare the cookie dough up to 24 hours in advance by mixing all the ingredients and storing the dough in an airtight container in the refrigerator. This helps maintain their freshness and flavor. When you’re ready to bake, simply scoop and shape the cookies, then pop them into the oven. Additionally, you can melt the chocolate and assemble the spider decorations in advance, keeping them in the fridge until you’re ready to add them to the cookies. This way, you’ll have these spooky treats ready to impress your guests with minimal effort!
What to Serve with Peanut Butter Spider Cookies?
Indulging in spooky delights doesn’t stop with cookies; pair these playful treats with scrumptious sides that will enchant everyone at your Halloween gathering.
-
Creamy Pumpkin Soup: A warm, velvety bisque that mirrors the season’s essence and balances the sweetness of the cookies.
-
Ghoulish Green Salad: Fresh greens topped with creepy-crawly gummy worms and festive pumpkin seeds for crunch—perfect for adding a refreshing element to your spread.
-
Crisp Apple Slices with Caramel Dip: Juicy apple slices paired with sweet caramel enhance the sweet-and-salty peanut butter flavor, creating a delightful contrast.
-
Witch’s Brew Punch: A fizzy drink with vibrant colors and spooky garnishes like floating eyeballs (lychee with blueberries), elevates your party’s fun atmosphere.
-
Chocolate-Covered Pretzels: These salty-sweet snacks offer a delightful crunch, perfectly complementing the soft texture of the cookies while enhancing the Halloween theme.
-
Spooky Cheese Board: Arrange a variety of cheeses, crackers, and eerie touches like ghost-shaped cheese slices; it’s a crowd-pleaser that pairs well with the cookies.
-
Flavored Popcorn: Create a mix of caramel and chocolate popcorn that adds a crunchy snack element—it’s both festive and easy for guests to munch on!
-
Creepy Cupcakes: Decorate with spooky icing and sprinkles; these will match the cookie aesthetics and leave everyone wanting more.
Hosting this Halloween season? These pairings not only enhance your Peanut Butter Spider Cookies but ensure a balanced, flavorful feast that dazzles your guests.
How to Store and Freeze Peanut Butter Spider Cookies
Room Temperature: Store your cookies in an airtight container for up to 5 days. This keeps them soft and prevents them from drying out, allowing you to savor their deliciousness.
Fridge: For longer freshness, keep them in the fridge where they can last up to 10 days. Just be sure to allow them to come to room temperature before serving for the best flavor.
Freezer: Freeze your Peanut Butter Spider Cookies for up to 3 months. Place them in a single layer in a freezer-safe container, separated by parchment paper, for easy access later.
Reheating: To enjoy them warm, simply microwave each cookie for about 10-15 seconds. This revives the gooey peanut butter and melts the chocolate slightly for delightful bites!
Helpful Tricks for Peanut Butter Spider Cookies
• Choose the Right Peanut Butter: Opt for creamy peanut butter for a smooth texture; crunchy is a tasty alternative if you prefer a bit of bite.
• Perfectly Measure Ingredients: Be precise with flour measurements; too much can lead to dry cookies. Use the scoop and level method for accuracy.
• Chill the Dough: If your cookie dough feels too soft, chill it briefly in the refrigerator. This helps maintain shape and prevents spreading.
• Watch Baking Time: Every oven is different! Start checking your cookies at the 10-minute mark to prevent overbaking and keep them soft.
• Decorating Fun: Feel free to get creative with the spider designs! Use different candies for eyes or add drizzled chocolate for extra flair.
• Store with Care: To keep cookies fresh, store them in an airtight container. They also freeze well, so consider making a double batch for later!
Peanut Butter Spider Cookies Variations
Feel free to let your creativity shine with these fun twists and substitutions for your Peanut Butter Spider Cookies!
-
Dairy-Free Options: Use dairy-free chocolate chips and flax egg as a substitute for the regular egg to cater to vegan friends.
-
Crunchy Texture: Swap creamy peanut butter for crunchy for extra texture. This will add delightful little bites in every morsel.
-
Nut-Free Alternative: Try sunflower seed butter instead of peanut butter for a nut-free version that still boasts creamy goodness.
-
Flavor Boost: Mix in ½ cup of mini chocolate chips or butterscotch chips into the dough for a surprise flavor twist in every cookie.
-
Halloween Colors: Incorporate orange or purple sprinkles into the dough for a festive pop of color, or sprinkle them on top before the chocolate sets.
-
Unique Legs: Use candy-coated pretzel sticks as legs for a festive flair and make them extra enjoyable to eat.
-
Spicy Twist: Add a pinch of cayenne pepper or a dash of cinnamon into the cookie dough for an unexpected spicy flavor that nicely complements the sweetness.
-
Chocolate-Covered Spiders: Instead of just chocolate circles, dip the entire top of the cookie in melted chocolate for a gooey, delicious effect.
These variations will ensure your Peanut Butter Spider Cookies are a hit at the Halloween gathering! Pair them with treats like Twix Cookies Chewy or serve with Oatmeal Peanut Butter for a balanced dessert table that delights everyone!
Peanut Butter Spider Cookies Recipe FAQs
What type of peanut butter should I use?
Absolutely! For these Peanut Butter Spider Cookies, creamy peanut butter is the best choice as it provides a smooth texture and rich flavor. If you’re in the mood for a little crunch, feel free to substitute with crunchy peanut butter for added texture.
How do I store leftover cookies, and how long will they last?
To keep your cookies fresh, store them in an airtight container at room temperature for up to 5 days. Ideally, they should remain soft and delicious. If you’d like them to last longer, you can refrigerate them for up to 10 days—just be sure to let them come to room temperature before serving.
Can I freeze Peanut Butter Spider Cookies?
Yes, you can! Freeze your Peanut Butter Spider Cookies for up to 3 months. Make sure to place them in a single layer in a freezer-safe container, with parchment paper between layers to prevent sticking. When you’re ready to enjoy, just thaw them in the fridge or on the counter.
What if my cookie dough is too soft?
Very! If you find your cookie dough is too soft and difficult to work with, it’s a good idea to chill it in the refrigerator for about 30 minutes. This helps the dough firm up, which in turn enables you to roll it into balls more easily without it spreading too much while baking.
Are there any allergy considerations for these cookies?
Definitely! Since these cookies main ingredient is peanut butter, be cautious if serving to anyone with nut allergies. For a nut-free version, you could experiment with sunbutter or another alternative spread. Additionally, ensure that chocolate and other ingredients are allergy-friendly if needed.
How can I enhance the spooky design of the cookies?
The more the merrier! Consider drizzling additional melted chocolate over the cookies or incorporating colorful sprinkles to enhance the festive atmosphere. You can even use different candies for the eyes or add edible glitter for a more whimsical look!
Peanut Butter Spider Cookies: Spooky Treats for Halloween Fun
Ingredients
Equipment
Method
- Preheat your oven to 350°F (175°C) and line a baking sheet with parchment paper.
- In a large mixing bowl, combine peanut butter, granulated sugar, brown sugar, egg, and vanilla, mixing until smooth. Add baking soda and flour and stir until a soft dough forms.
- Scoop cookie dough into balls and place them on the prepared baking sheet, slightly flattening each with a fork.
- Bake for 10 to 12 minutes until golden at the edges. Let cool for 5 minutes before transferring to a wire rack.
- Melt chocolate chips in a microwave-safe bowl and use to create chocolate circles on top of each cookie for spider bodies.
- Press pretzel sticks into the sides of the melted chocolate for legs and add candy eyes secured with more chocolate.
- Allow chocolate to set at room temperature for 10 to 15 minutes before serving.