
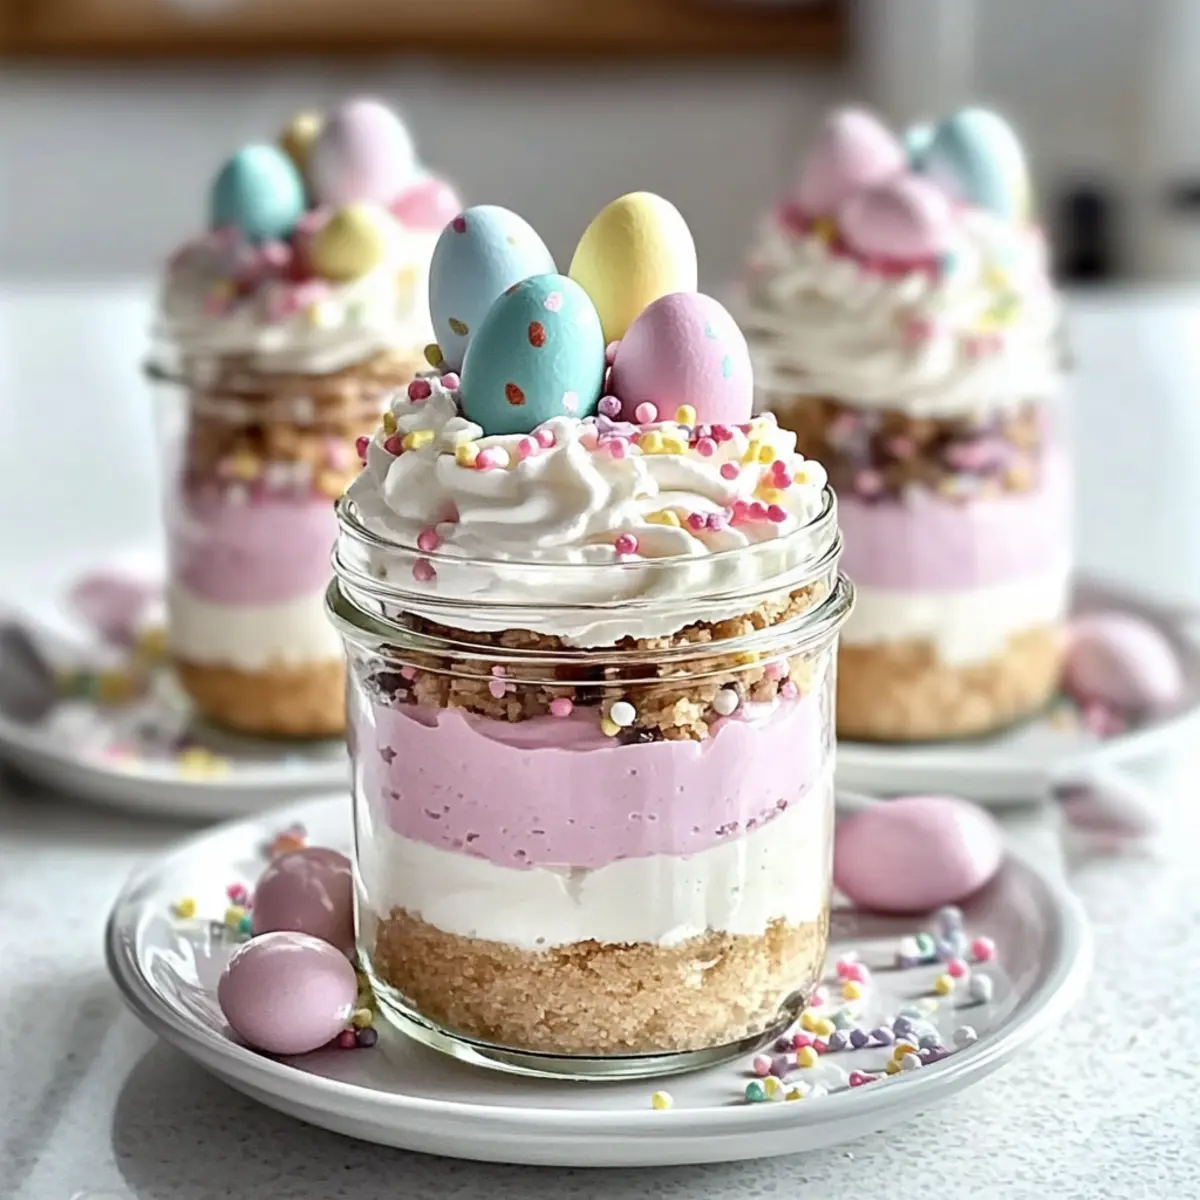
As I prepped for our annual spring brunch, I found myself nurturing a sweet craving for something colorful and cheerful. That’s when the idea of creating vibrant Easter Egg Cheesecake Jars struck me. This no-bake dessert effortlessly combines creamy, airy cheesecake with a buttery graham cracker crust, offering a delightful treat that feels as festive as it looks. Not only are these jars simple and quick to prepare, but they also allow for endless customization with colors and toppings, making them perfect for celebrating the season. Whether you’re hosting a family gathering or looking to brighten someone’s day, these delightful desserts will make a charming centerpiece. Curious about how to create these springtime delights? Let’s dive into the recipe!
Why Make Easter Egg Cheesecake Jars?
Vibrant, Festive Appearance: These jars are a feast for the eyes, with colorful layers that will brighten up any table.
No-Bake Simplicity: Perfect for busy days, this recipe cuts out the oven time, letting you whip up dessert in a flash!
Customizable Fun: Personalize with your favorite colors and toppings; try adding a lemon zest twist for a refreshing change!
Perfect Party Treat: These individual servings make them easy to share at gatherings, ensuring everyone gets a delightful bite.
Make Ahead Convenience: Prepare these jars a day in advance, allowing the cheesecake to set, so you can focus on enjoying the celebration!
For more delicious cheesecake ideas, explore Sugar Free Cheesecake or our playful Oreo Cheesecake Cookies.
Easter Egg Cheesecake Jars Ingredients
• Dive into the delightful layers of this no-bake treat!
For the Crust
- Graham Crackers – Provides the crust’s structure. Substitution: Crushed Oreos or shortbread cookies can be used for variety.
- Granulated Sugar – Sweetens the crust. Prep Note: Ensure it is well mixed with the crust ingredients.
- Unsalted Butter – Binds graham cracker crumbs for the crust. Prep Note: Must be melted for easy mixing.
For the Cheesecake Filling
- Cream Cheese – Main filling element for a rich, creamy texture. Notes: Use full-fat for best results; ensure it’s at room temperature for smooth blending.
- Powdered Sugar – Adds sweetness and aids in achieving a fluffy consistency in the cheesecake layer.
- Vanilla Extract – Enhances overall flavor.
- Heavy Cream – Whipped to stiff peaks to create a light and airy cheesecake filling.
- Pink Gel Food Coloring (optional) – Adds a festive touch to the cheesecake. Substitution: Use freeze-dried strawberry powder for natural coloring.
For the Toppings
- Whipped Cream – For topping, contributing to the dessert’s luxurious feel.
- Pastel Candy Eggs – Decorative topping that signifies Easter and adds a playful element.
- Rainbow or Pastel Sprinkles – Finishing touch for a celebratory look.
Step‑by‑Step Instructions for Easter Egg Cheesecake Jars
Step 1: Prepare the crust
In a mixing bowl, combine crushed graham crackers, granulated sugar, and melted unsalted butter until the mixture resembles damp sand. Using the back of a spoon or your fingers, firmly pack this crust into the bottom of your jars, creating an even layer. This will serve as a sturdy base for your delightful Easter Egg Cheesecake Jars.
Step 2: Make the cheesecake filling
In a large bowl, beat the softened cream cheese with an electric mixer on medium speed until smooth and creamy. Gradually add the powdered sugar and vanilla extract, mixing until everything is well combined. This luscious cheesecake filling should be free of lumps, creating a rich texture that perfectly complements the graham cracker crust.
Step 3: Whip the cream
In a separate bowl, whip the heavy cream with a handheld mixer until stiff peaks form, about 3-5 minutes. Be careful not to over-whip, as it can become grainy. Gently fold the whipped cream into the cheesecake mixture using a spatula, aiming to maintain the airy texture. This step is crucial to achieve the light and fluffy layers of the Easter Egg Cheesecake Jars.
Step 4: Color the cheesecake (optional)
Divide the cheesecake filling into two separate bowls. If you choose to use food coloring, add a few drops of pink gel food coloring to one bowl and mix until you achieve your desired color. For a natural option, use freeze-dried strawberry powder. This colorful layer will add a lovely touch to your Easter Egg Cheesecake Jars.
Step 5: Assemble the jars
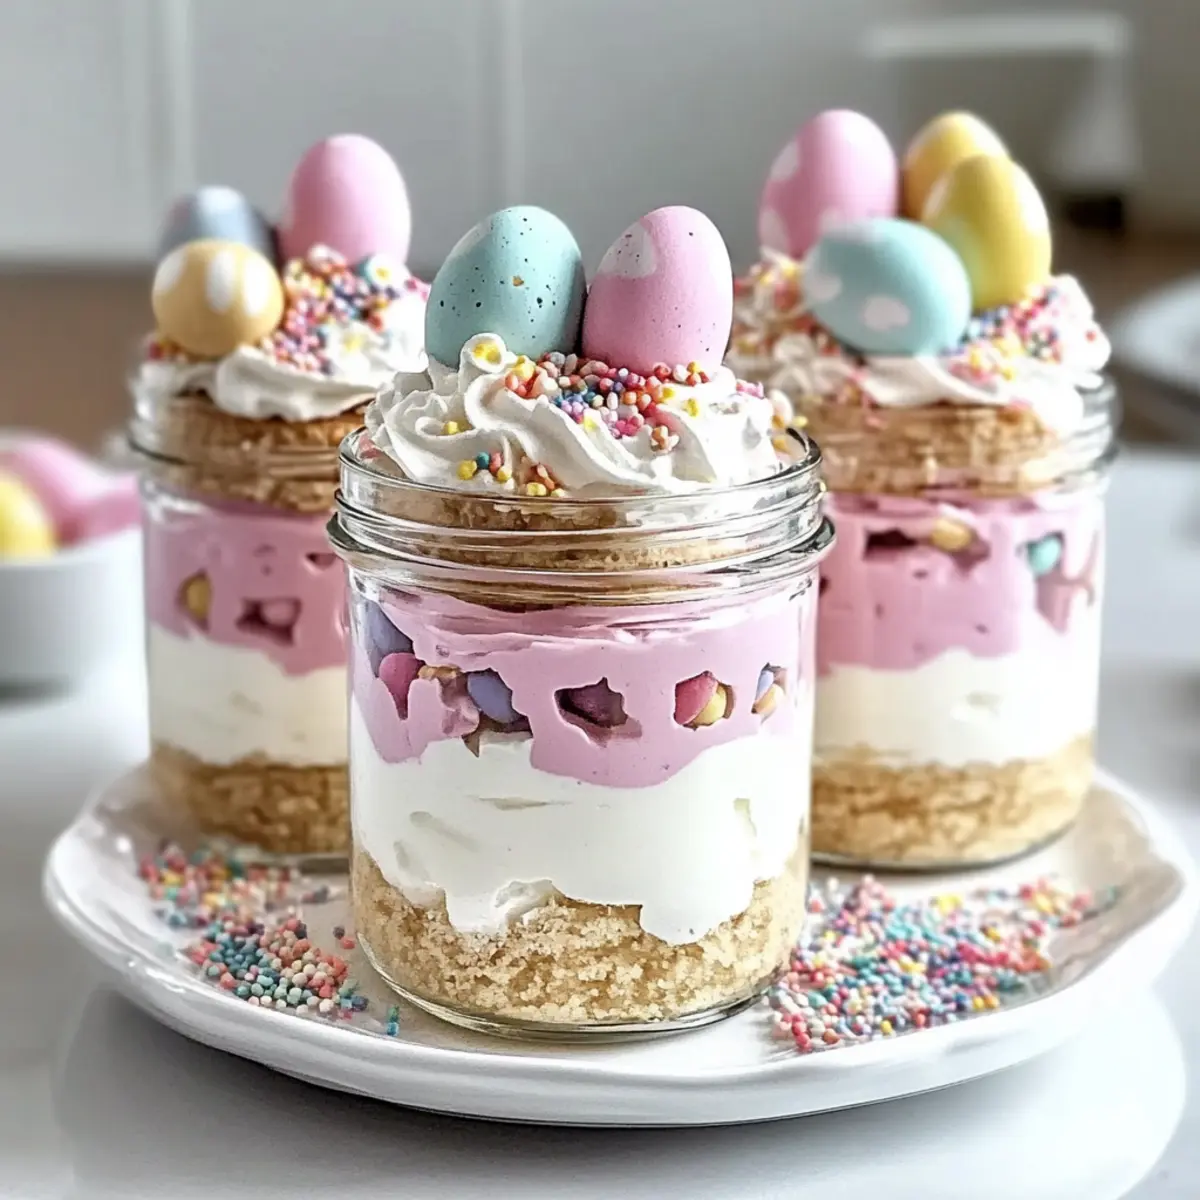
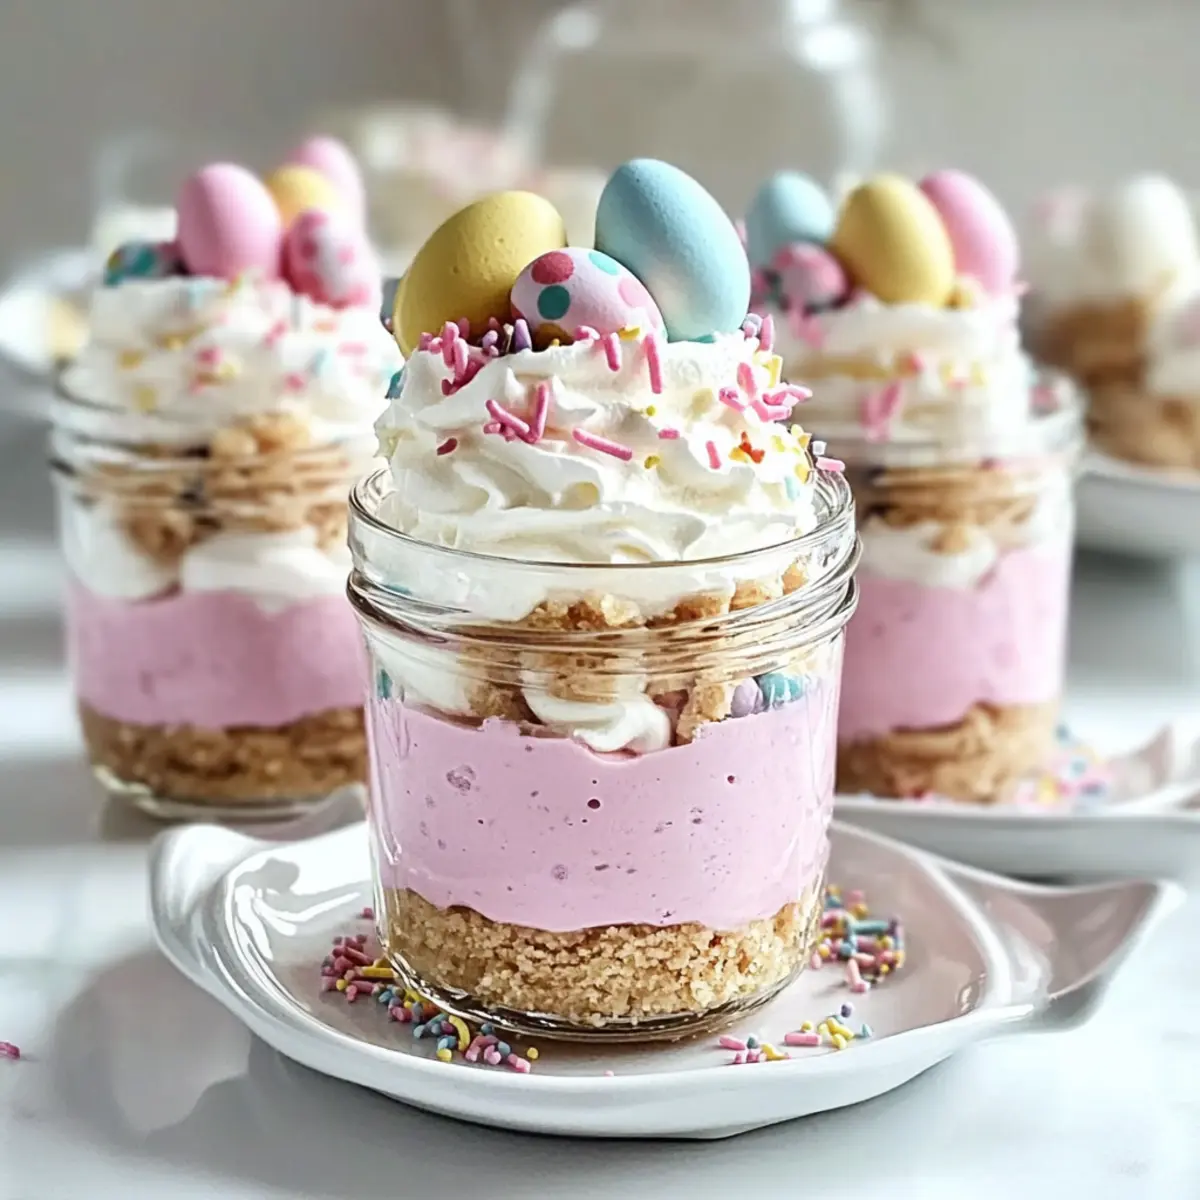
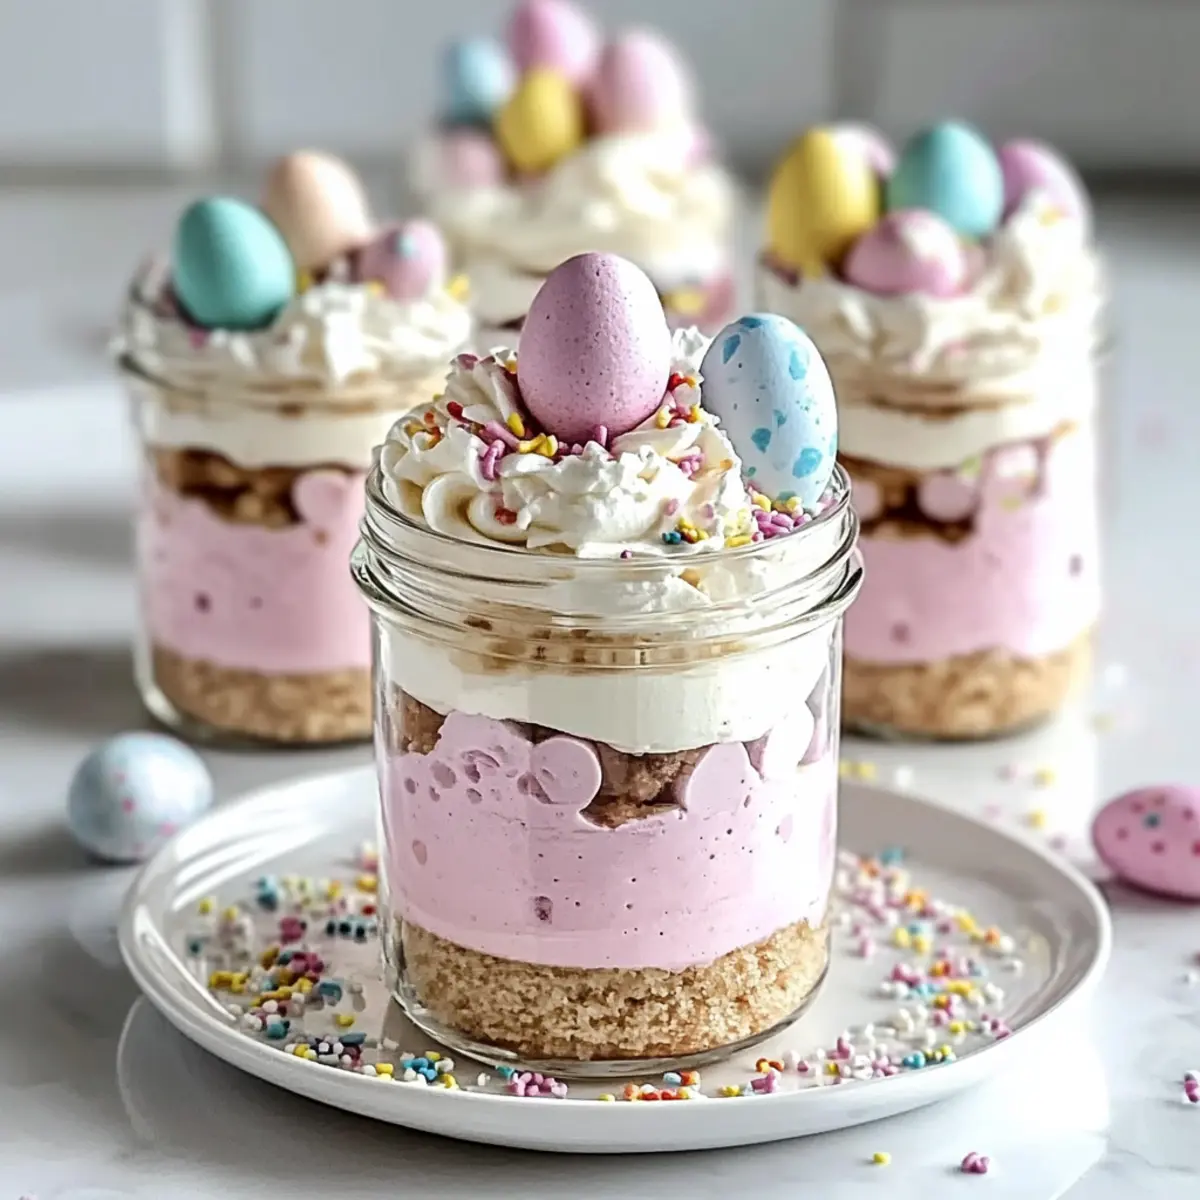
Using a piping bag, layer the pink cheesecake filling into each jar, followed by the plain cheesecake filling. This method helps create a beautiful, defined layer effect as you fill the jars. Repeat this process until the jars are nearly full, leaving some space at the top for whipped cream and decorations.
Step 6: Top and chill
Pipe a generous swirl of whipped cream on top of each jar for a delightful finish. Decorate with pastel candy eggs and rainbow or pastel sprinkles, making your Easter Egg Cheesecake Jars festive and inviting. Cover the jars and refrigerate for at least 2 hours, allowing the cheesecake to set perfectly for a delightful spring treat.
Make Ahead Options
These Easter Egg Cheesecake Jars are fantastic for meal prep! You can prepare them up to 24 hours in advance, ensuring that they’re ready to wow your guests. Start by making the graham cracker crust and layering the cheesecake filling in the jars, but skip the toppings during the initial prep. Cover the jars tightly and refrigerate them to keep them fresh and maintain their delightful creamy texture. When it’s time to serve, simply pipe on the whipped cream and add the pastel candy eggs and sprinkles right before enjoying. This way, you’ll have a stunning dessert that’s just as delicious, saving you valuable time on the day of your celebration!
How to Store and Freeze Easter Egg Cheesecake Jars
Fridge: Store your Easter Egg Cheesecake Jars in the refrigerator for up to 3 days. Cover them tightly with plastic wrap or a lid to keep them fresh and prevent absorption of odors.
Freezer: If you need to store them longer, place the jars in the freezer for up to 1 month. Make sure to leave some space at the top of each jar for expansion and cover tightly with a lid.
Thawing: When ready to enjoy, thaw the jars in the fridge overnight. Avoid microwaving, as this can alter the creamy texture of the cheesecake.
Final Touch: Add any toppings or whipped cream just before serving for the best presentation and flavor!
Expert Tips for Easter Egg Cheesecake Jars
- Chill Time Matters: Ensure you refrigerate the jars for at least 2 hours before serving; this helps the cheesecake set properly and enhances the texture.
- Piping Perfection: Use a piping bag for filling the jars; it adds elegance and allows for clean, defined layers of cheesecake, making your jars picture-perfect!
- Color It Right: When using food coloring, start with a tiny drop to avoid overpowering the cheesecake; a little goes a long way in making your Easter Egg Cheesecake Jars vibrant.
- Room Temperature Cream Cheese: Always let cream cheese sit out until it reaches room temperature to ensure a smooth mixture and prevent lumps in your cheesecake filling.
- Keep It Light: Gently fold in whipped cream to maintain the airy texture; avoid vigorous stirring to keep the cheesecake filling fluffy.
Easter Egg Cheesecake Jars Variations
Feel free to get creative with these delightful twists to make your Easter Egg Cheesecake Jars even more special!
-
Citrus Zest: Add lemon or orange zest to the cheesecake filling for a refreshing citrusy flair. It brightens the flavors wonderfully and complements the sweetness.
-
Chocolate Crust: Swap graham crackers for crushed chocolate cookies like Oreos for a decadent chocolatey crust. This simple change adds depth and richness that chocolate lovers will adore!
-
Nutty Twist: Incorporate finely chopped nuts such as almonds or pecans into the crust for an extra crunch. This adds texture and a delicious nutty flavor that pairs beautifully with the creamy filling.
-
Berry Bliss: Add pureed strawberries or raspberries to the cheesecake filling for a fruity essence. Not only does this bring a pop of color, but it also introduces a delicious, fresh bite that contrasts nicely with the sweetness.
-
Dairy-Free: Use dairy-free cream cheese and coconut whipped cream to create a vegan version of these jars. It’s perfect for guests with dietary restrictions while still being creamy and satisfying.
-
Spiced Delights: For a hint of warmth, sprinkle cinnamon or nutmeg into the cheesecake mixture. It adds an inviting fall twist that reminds us of cozy gatherings.
-
Gourmet Toppings: Elevate the presentation with edible flowers or gold leaf. These small touches can turn your jars into stunning showpieces for spring celebrations that will wow your guests.
-
Make It Mini: Instead of large jars, use shot glasses or small cups for bite-sized portions. They’re perfect for small gatherings and pair wonderfully with Cheesecake Stuffed Chocolate bites for a unique dessert table!
Get started with your favorite variations, and experience the joy and creativity of customizing your Easter Egg Cheesecake Jars!
What to Serve with Easter Egg Cheesecake Jars?
Pair your colorful Easter Egg Cheesecake Jars with delightful sides and treats that create a memorable spring celebration.
- Fresh Fruit Salad: The bright, juicy flavors of a medley of seasonal fruits perfectly balance the rich cheesecake, adding a refreshing touch to each bite.
- Spring Vegetable Platter: Crisp raw veggies like carrots, bell peppers, and radishes offer a crunchy contrast and lightness against the creamy dessert. Perfect for adding color to your table!
- Homemade Lemonade: A zesty, refreshing drink that echoes the cheerful spirit of spring, complementing the sweetness of the cheesecake jars while keeping guests hydrated.
- Mini Quiches: Savory, bite-sized quiches filled with fresh veggies or cheese are perfect for brunch, providing a hearty contrast to the sweet cheesecake.
- Pistachio Muffins: Moist, nutty muffins add a touch of earthy flavor that enhances the dessert experience while keeping the celebration festive. Perfect as a brunch side!
- Coffee or Tea: A warm beverage brings balance to the sweetness with its comforting notes, ideal for winding down after a delightful meal.
- Chocolate-Covered Strawberries: These elegant treats add a sophisticated touch, creating a sweet pairing that will leave everyone wanting more.
- Carrot Cake Bites: A nod to traditional Easter treats, these sweet bites will add a wonderful nostalgic flavor to your dessert table and complement the creamy cheesecake beautifully.
- Whipped Cream Topping: Serve extra whipped cream on the side for those who crave a little more indulgence with their dessert!
Easter Egg Cheesecake Jars Recipe FAQs
How do I select ripe ingredients for Easter Egg Cheesecake Jars?
Absolutely! Use fresh, high-quality ingredients for the best flavor. When choosing cream cheese, look for products labeled as “full-fat” for the creamiest texture. For gel food coloring, select colors that are vibrant, and for whipped cream, choose heavy cream that’s well within its expiration date for optimal whipping results.
What is the best way to store Easter Egg Cheesecake Jars?
You can store your Easter Egg Cheesecake Jars in the refrigerator for up to 3 days. Make sure to cover each jar tightly with plastic wrap or a lid. This helps maintain their freshness and prevents them from absorbing any fridge odors.
Can I freeze Easter Egg Cheesecake Jars?
Yes, you can freeze them for up to 1 month! To do so, place the jars in the freezer after covering them tightly with a lid, ensuring there’s some space at the top for the cheesecake to expand.
How do I thaw frozen Easter Egg Cheesecake Jars?
When you’re ready to enjoy your jars, simply move them from the freezer to the refrigerator and allow them to thaw overnight. This gradual process preserves the creamy texture. Avoid thawing in the microwave, as this can cause the cheesecake to lose its luscious consistency.
What are some common troubleshooting tips for making the cheesecake filling?
Very! If your cheesecake filling turns out lumpy, it’s usually due to not letting the cream cheese come to room temperature. To avoid this situation, always allow your cream cheese to sit out for about 30 minutes before mixing. If you accidentally over-whip the heavy cream, consider adding a tablespoon of fresh cream and gently folding it in to restore some creaminess.
Are there any dietary considerations for Easter Egg Cheesecake Jars?
Of course! If you have allergies, ensure that you check the labels of your ingredients, especially for gluten in graham crackers or dairy in cream cheese. For a gluten-free version, consider using gluten-free cookies for the crust. Always be mindful of any guest allergies before serving!
Easter Egg Cheesecake Jars: A Bright No-Bake Spring Treat
Ingredients
Equipment
Method
- Prepare the crust: Combine crushed graham crackers, granulated sugar, and melted butter until it resembles damp sand. Pack into the bottom of jars.
- Make the cheesecake filling: Beat cream cheese until smooth. Gradually add powdered sugar and vanilla extract, mixing until well combined.
- Whip the cream: Whip heavy cream until stiff peaks form. Gently fold into the cheesecake mixture.
- Color the cheesecake (optional): Divide the mixture into bowls, add food coloring to one, and mix.
- Assemble the jars: Layer pink cheesecake followed by plain cheesecake, filling jars nearly full.
- Top and chill: Pipe whipped cream on top, decorate with candy eggs and sprinkles. Refrigerate for at least 2 hours.