
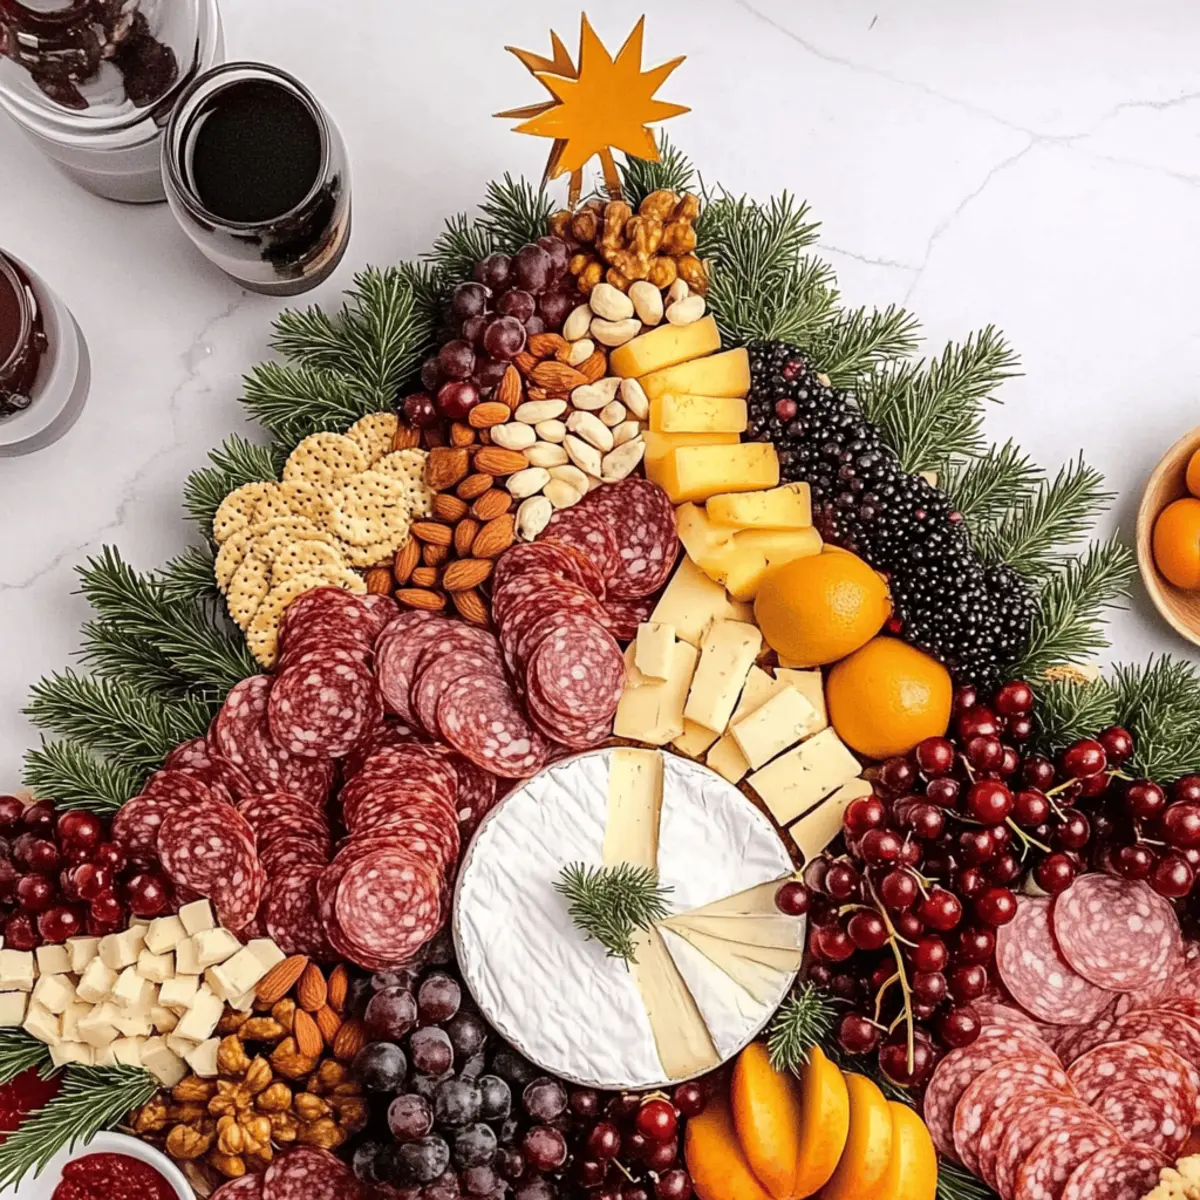
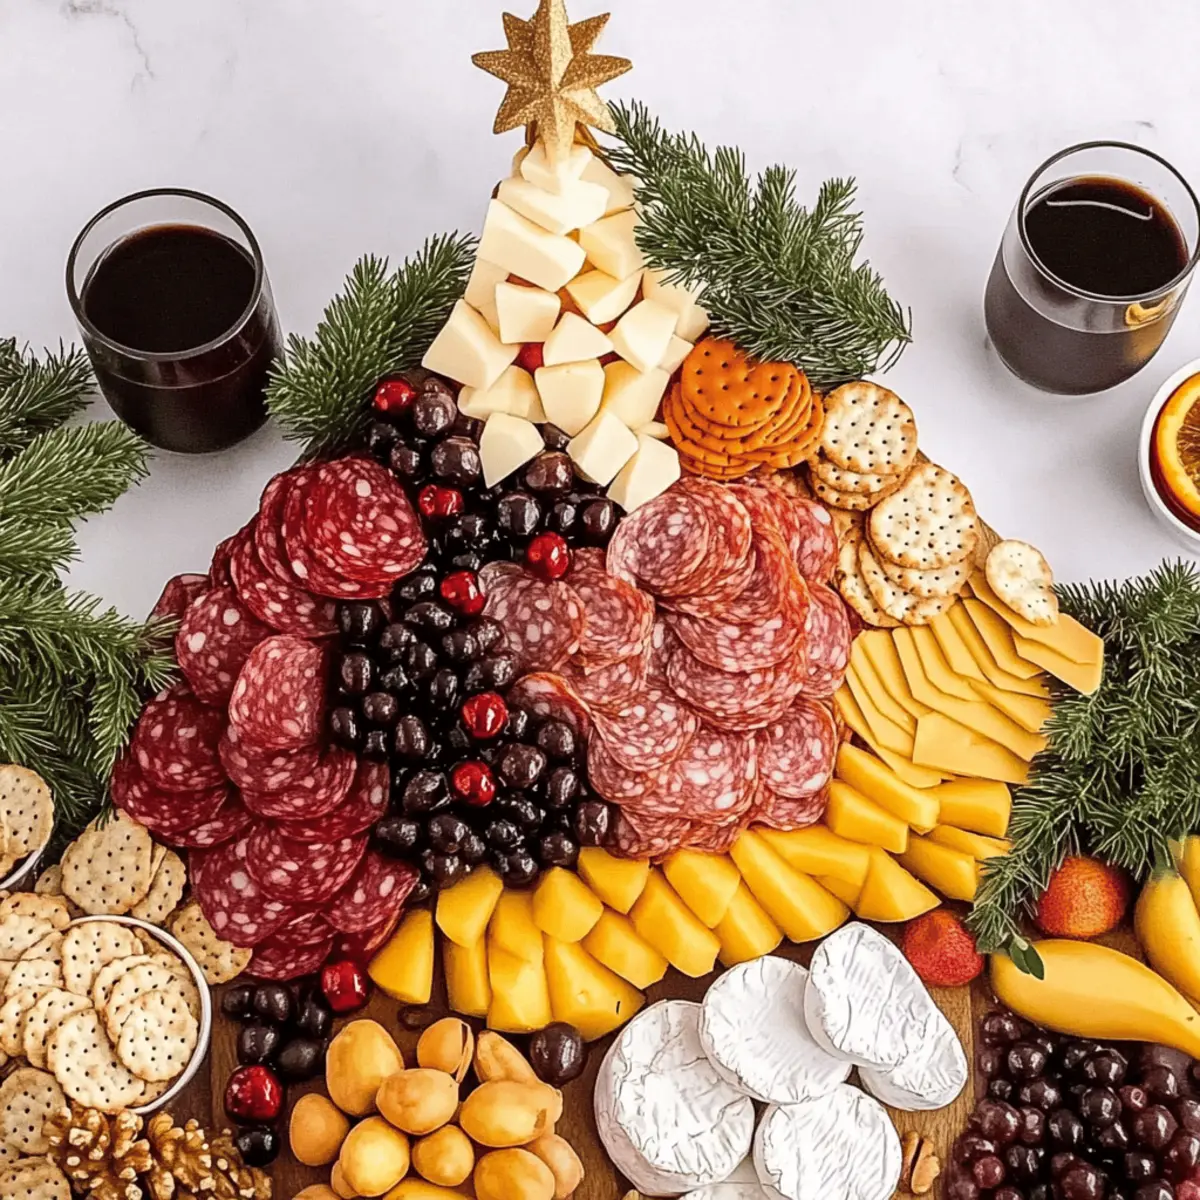
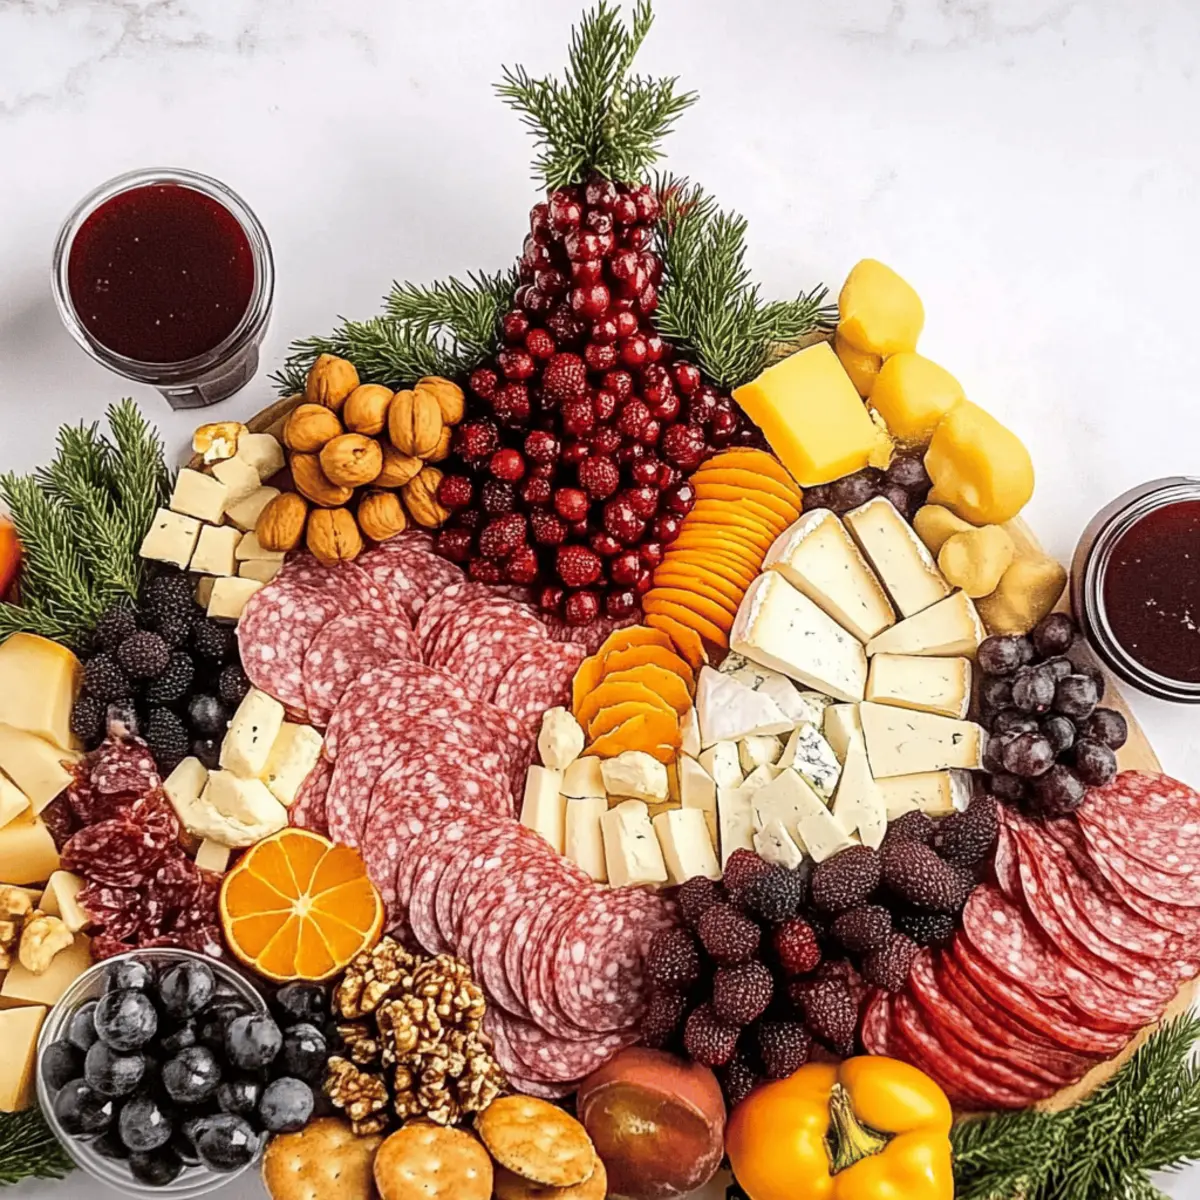
The air is crisp, and the holiday spirit is alive! As I started planning my festive gatherings this year, I knew I had to create something that would dazzle my guests and make my heart sing. Enter the Christmas Tree Charcuterie Board—a delightful masterpiece that brings joy and an impressive flair to any table. Not only is this board easy to assemble with your choice of meats, cheeses, and fruits, but it also offers a customizable experience that caters to everyone’s tastes. Imagine the smiles as family and friends gather around this vibrant centerpiece, ready to nibble on colorful treats while sipping on warm drinks. This recipe is not just about aesthetics; it’s a fun and interactive way to share delicious flavors without the stress. Are you ready to elevate your festive spread with a little creativity and a lot of taste? Let’s dive in!
Why is this charcuterie board special?
Festive Flair: The unique Christmas tree shape instantly elevates your holiday gatherings, becoming a conversation starter.
Customizable Ingredients: Use your favorite cheeses and meats to match personal tastes, ensuring everyone finds something to enjoy.
Easy Assembly: Simple steps make this board a breeze to create, perfect for novice and experienced chefs alike.
Vibrant Presentation: With colorful layers of fruits and nuts, it’s not just a dish; it’s a stunning centerpiece that delights the eyes.
Family Fun: Gather friends and family to create their own portions, making it an interactive and joyous holiday experience.
This adaptable board even complements a cozy gathering with the Street Corn Chicken for extra deliciousness!
Christmas Tree Charcuterie Board Ingredients
• Perfect for festive gatherings, here’s what you need:
For the Meats
- Salami – Provides meaty goodness; select a robust variety for a flavor boost.
- Prosciutto – Adds a rich, salty kick; consider prosciutto-wrapped mozzarella for a fun twist.
For the Cheeses
- Boursin Cheese – Creamy and herb-flavored; substitute with any soft cheese for a similar taste.
- Colby Jack Cheese – Delivers a mild flavor; feel free to use your favorite cheese cubed into 1-inch pieces.
- Mozzarella Balls – Offer a chewy texture; marinated ones can enhance the overall taste.
- Brie Cheese – A decadent addition, especially slow-baked with jam for a delightful surprise.
For the Crunch
- Crackers – Add some crunch; assorted round types pair well, and gluten-free varieties are also an option.
- Pretzel Rods – Create the tree trunk with added crunch; cut them in half to suit your design.
For the Sweetness
- Honey/Jam – Drizzle over cheese or fill your Brie for an extra touch; substitute with cranberry sauce for a tart flavor.
- Fresh Fruits (e.g., apples, grapes, berries) – Provide a pop of color and sweetness; dip apples in lemon juice to keep them fresh.
For the Garnish
- Olives – For a briny touch, select stuffed manzanilla or pitted black olives.
- Fresh Rosemary – Use as a garnish, mimicking the look of Christmas tree branches.
- Nuts/Dried Fruits – Optional fillers that add texture and creativity to your board.
This delightful Christmas Tree Charcuterie Board is sure to impress your guests and is effortlessly customizable, allowing everyone to partake in your holiday feast!
Step‑by‑Step Instructions for Christmas Tree Charcuterie Board
Step 1: Prepare the Brie
Start by placing your Brie cheese block on a cutting board. Use a sharp knife to carefully cut out a star shape from the top of the Brie, making sure to reserve the cut-out piece. Fill the star cavity with honey or jam, creating a sweet surprise at the top of your Christmas Tree Charcuterie Board.
Step 2: Create the Tree Trunk
Take pretzel rods and cut them in half to achieve a suitable height for your tree trunk. Lay them aside, ensuring you have enough pieces to create a sturdy base. These crunchy pretzels will later be stacked to form the trunk, adding both height and a delicious crunch to the festive display.
Step 3: Make Salami Roses
To add a lovely decorative touch, take slices of salami and layer them slightly overlapping. Roll the slices tightly to form roses, and secure each with a toothpick to hold their shape. These delightful salami roses will bring both elegance and flavor to your Christmas Tree Charcuterie Board.
Step 4: Outline the Tree Shape
Lay out a generous piece of grazing table paper or a large platter to assemble your board. Using fresh rosemary sprigs, create an outline of a Christmas tree shape as a guide. This fragrant herb will not only enhance the aesthetics of your board but also introduce a delightful aroma to your festive setup.
Step 5: Assemble the Tree Trunk
Next, stack the halved pretzel rods vertically at the bottom of your outlined tree to create the trunk. You can secure them with a bit of melted cheese or simply press them into the paper for stability. This charming trunk provides a solid base for your tree while complementing the overall theme of the Christmas Tree Charcuterie Board.
Step 6: Position the Brie Star
Carefully place the Brie star at the top of your Christmas tree. Make sure the honey or jam-filled star is prominently displayed, inviting guests to take a slice. This beautiful centerpiece draws the eye and adds a classic touch to your festive appetizer spread.
Step 7: Zigzag the Boursin and Meats
Begin arranging the Boursin cheese and sliced meats down the tree, zigzagging them creatively. Use small dollops of the Boursin to add soft, creamy accents amongst the meats. Keep the arrangement playful and inviting as you fill in gaps and create a lush, layered effect on your Christmas Tree Charcuterie Board.
Step 8: Fill with Cheese and Olives
Add cheese cubes, mozzarella balls, and olives throughout the tree, focusing on filling in any empty spaces. Choose colorful varieties for visual appeal, and place them near the salami roses for contrast. This step enhances the textural variety and brings a delightful assortment of flavors to your board.
Step 9: Add Fresh and Dried Fruits
Incorporate fresh fruits like apples, grapes, and berries, distributing them evenly across the tree. For a festive touch, consider adding dried fruits as well. Adjust the arrangement for aesthetic appeal, ensuring the vibrant colors shine through, while also providing sweet nibbles that balance your Christmas Tree Charcuterie Board.
Step 10: Serve with Extra Condiments
Finally, offer extra honey and jam on the side in small bowls, inviting guests to drizzle over their cheese or to accompany their bites. Arrange these condiments near the board for easy access. Your stunning Christmas Tree Charcuterie Board is now complete and ready to be the highlight of your festive gathering!

Christmas Tree Charcuterie Board Variations
Feel free to make this vibrant charcuterie board your own with these delightful twists!
-
Cheese Swap:
Consider using goat cheese or cheddar for a different flavor profile. Each brings a unique taste that’ll surprise your guests! -
Alternative Meats:
Replace salami and prosciutto with turkey or chicken slices for a lighter option. A great way to accommodate those who might prefer milder flavors. -
Candy Decoration:
Use colorful wrapped candies as ornaments on your tree for a sweet surprise! Kids and adults alike will have fun spotting their favorites among the savory treats. -
Veggie Addition:
Add carrot sticks or cherry tomatoes for a fresh, colorful pop. These veggies provide crunch and nutrition while beautifully complementing the sweet and savory elements. -
Gluten-Free Options:
Swap out regular crackers for gluten-free varieties. It ensures everyone can enjoy without worry, making your board inclusive! -
Spice it Up:
Add a sprinkle of red pepper flakes or jalapeños for a hint of heat. This touch can elevate the flavors and add interest to your tree. -
Herb Infusion:
Mix fresh basil or thyme into your cheese selection for aromatic variety. This not only enhances flavor, but also adds a beautiful, fresh element. -
Nuts and Dried Fruit Boost:
Scatter mixed nuts or dried fruits throughout for added texture and sweetness. This twist keeps guests nibbling and complements the favorites on the board.
Feel inspired to create your own version of this festive masterpiece! And while you’re at it, consider serving it alongside a dish like Street Corn Chicken for an extra delicious celebration.
What to Serve with Christmas Tree Charcuterie Board?
Elevate your festive gatherings by pairing your stunning creation with delightful side dishes and drinks that enhance the flavors and ambiance of the evening.
-
Savory Breads: Freshly baked baguette slices offer a soft, chewy contrast that complements the richness of cheeses, making every bite a delight.
-
Crispy Salad: A light arugula salad with lemon vinaigrette introduces a refreshing crunch, balancing the heaviness of meats and cheeses while inviting guests to indulge in a lighter bite.
-
Dipping Sauces: Serve a trio of dips such as tangy mustard, zesty hummus, or a herbed yogurt dip to add unexpected flavors that elevate the charcuterie experience and invite exploration.
-
Mulled Wine: A steaming cup of mulled wine filled with warm spices, citrus, and a hint of sweetness will cozy up your gathering, turning the evening into a heartwarming celebration.
-
Chocolate-Covered Fruits: Decadent chocolate-dipped strawberries or apples add a sweet finish, perfectly rounding out your guests’ palates after indulging in savory bites.
-
Spiced Nuts: A bowl of rosemary or cinnamon-spiced nuts provides a crunchy element that’s easy to munch on, complementing both the savory and sweet components of your charcuterie board.
Creating a merry atmosphere with these pairings will assure everyone leaves with fond memories and satisfied appetites!
Storage Tips for Christmas Tree Charcuterie Board
Fridge: Store leftovers in airtight containers for up to 2-3 days to maintain freshness and flavor.
Room Temperature: If you’re serving, let the board sit out for no more than 2 hours to ensure food safety; keep an eye on warmer cheeses especially.
Reheating: Reheating isn’t necessary for this Christmas Tree Charcuterie Board, as it’s best enjoyed cold; simply refresh the presentation before serving.
Freezing: Freezing is not recommended for this dish, as it could alter the textures of the meats, cheeses, and fresh fruits.
Expert Tips for the Christmas Tree Charcuterie Board
-
Layout Planning: Sketch your design before starting to visualize the arrangement better and create a stunning Christmas Tree Charcuterie Board.
-
Ingredient Freshness: Add fresh fruits and veggies right before serving to ensure they stay crisp and vibrant. This keeps your board looking its best!
-
Cheese Selection: Try combining different cheeses for depth. Experiment with flavors by choosing both sweet and savory options to appeal to all tastes.
-
Avoid Overcrowding: Don’t overfill your board! Leave some space between ingredients to make each element stand out beautifully and allow guests to serve themselves easily.
-
Interactive Fun: Encourage guests to customize their bites. Set out extra toppings and garnishes, making the experience enjoyable and engaging for everyone!
Make Ahead Options
These Christmas Tree Charcuterie Boards are perfect for meal prep enthusiasts looking to save time during the hectic holiday season! You can prepare many components up to 24 hours in advance. Start by slicing the cheeses and meats, and assembling the salami roses; store them in airtight containers in the refrigerator to maintain their freshness. Additionally, you can cut the pretzel rods and prepare the Brie with honey or jam, but add fresh fruits and delicate garnishes like rosemary just before serving to ensure they remain vibrant. When it’s time to impress your guests, simply arrange everything according to your envisioned design, and you’ll have a stunning centerpiece ready to enjoy!
Christmas Tree Charcuterie Board Recipe FAQs
What type of salami is best for my Christmas Tree Charcuterie Board?
Absolutely! I recommend varieties like Fiorucci Hard Salami or Genoa Salami for a robust flavor. Choose a salami that you enjoy, and feel free to mix and match! A good tip is to make sure it is fresh with no dark spots, as they can affect the taste.
How should I store leftovers from the Christmas Tree Charcuterie Board?
Leftovers should be stored in airtight containers in the fridge and are best consumed within 2-3 days. Make sure the board is well-sealed to maintain freshness. Avoid storing any items that look wilting or dried out, as they can spoil quickly.
Can I freeze items from the charcuterie board?
Freezing is not recommended for this Christmas Tree Charcuterie Board. The textures of meats and cheeses can change significantly when frozen and thawed, leading to a less enjoyable experience. It’s best enjoyed fresh, so keep your ingredients handy for the next gathering instead!
What if I have guests with dietary restrictions?
Very! To accommodate gluten-free guests, simply select gluten-free crackers and pretzels. You can also substitute the meats with lighter proteins like turkey slices or add extra veggie sticks to diversify your options. Always keep an eye out for specific allergies and label the items accordingly.
How can I prevent my apples from browning on the board?
A great way to keep your apple slices looking fresh is to dip them in a mixture of water and lemon juice for a couple of minutes. The acidity in the lemon will help maintain their beautiful color. Just be sure to dry them off before arranging them on your Christmas Tree Charcuterie Board!
What can I do if I have leftover cheese and meats?
If you have extra products, store them in separate airtight containers in the fridge. Meats typically last about 3-5 days and cheeses about a week. Use them in sandwiches, salads, or omelets for a delicious re-use!
Create a Stunning Christmas Tree Charcuterie Board Today
Ingredients
Equipment
Method
- Step 1: Prepare the Brie. Cut out a star shape from the top and fill with honey or jam.
- Step 2: Create the Tree Trunk. Cut pretzel rods in half and lay aside.
- Step 3: Make Salami Roses. Layer and roll salami slices into roses, securing them with toothpicks.
- Step 4: Outline the Tree Shape. Use fresh rosemary to outline a Christmas tree shape on your serving platter.
- Step 5: Assemble the Tree Trunk. Stack pretzel rods vertically at the bottom.
- Step 6: Position the Brie Star. Place the Brie star at the top.
- Step 7: Zigzag the Boursin and Meats. Arrange Boursin and meats creatively down the tree.
- Step 8: Fill with Cheese and Olives. Add cheese cubes, mozzarella balls, and olives.
- Step 9: Add Fresh and Dried Fruits. Distribute fresh fruits across the tree.
- Step 10: Serve with Extra Condiments. Offer extra honey and jam on the side.