
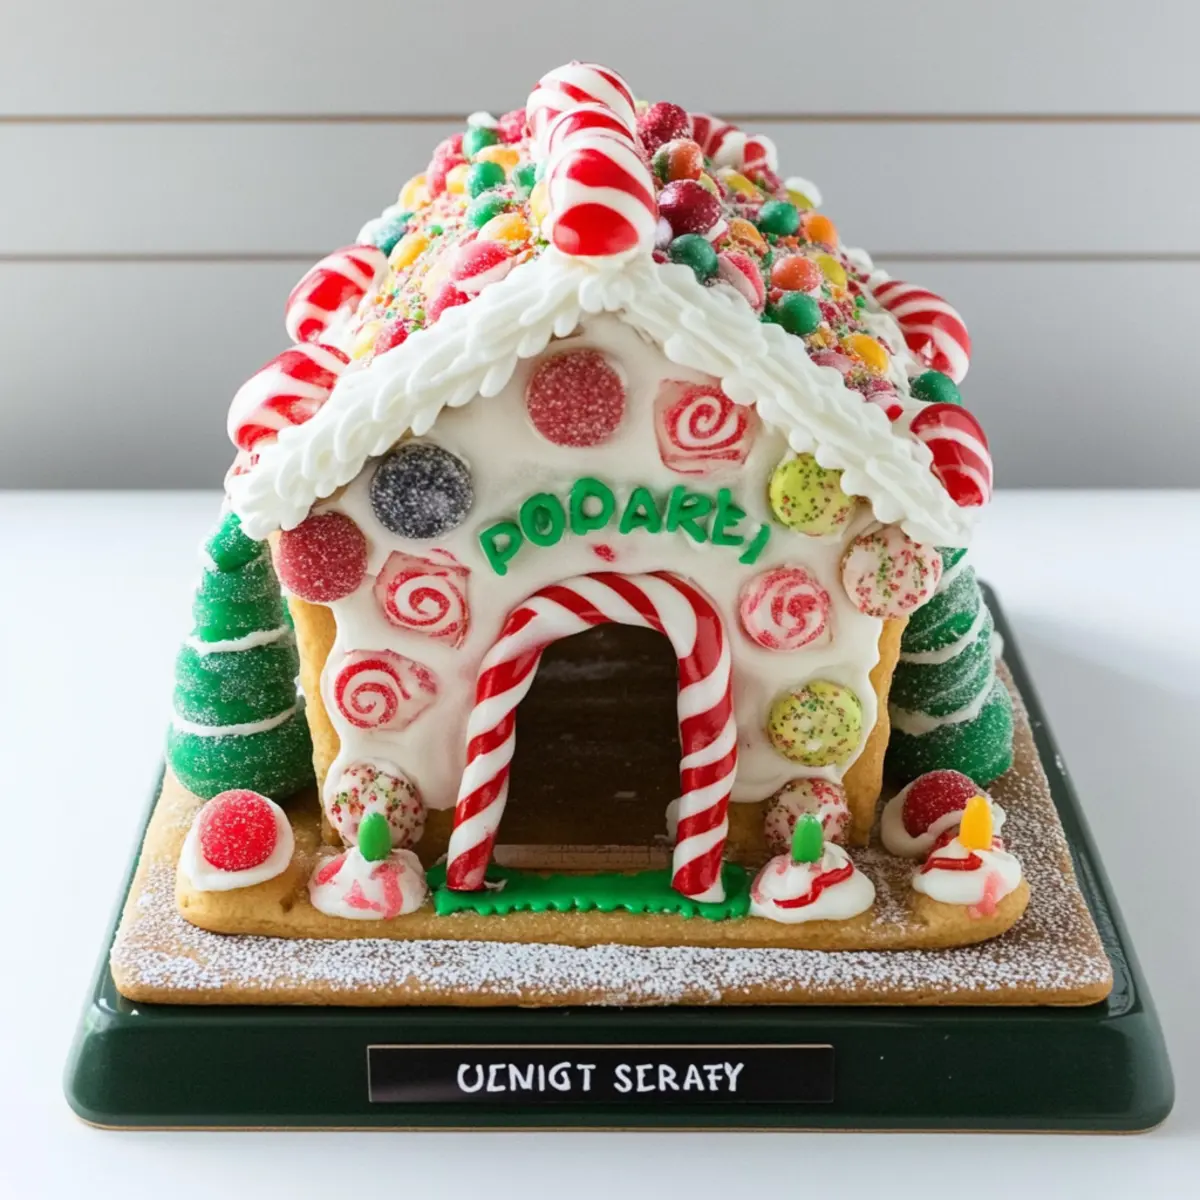
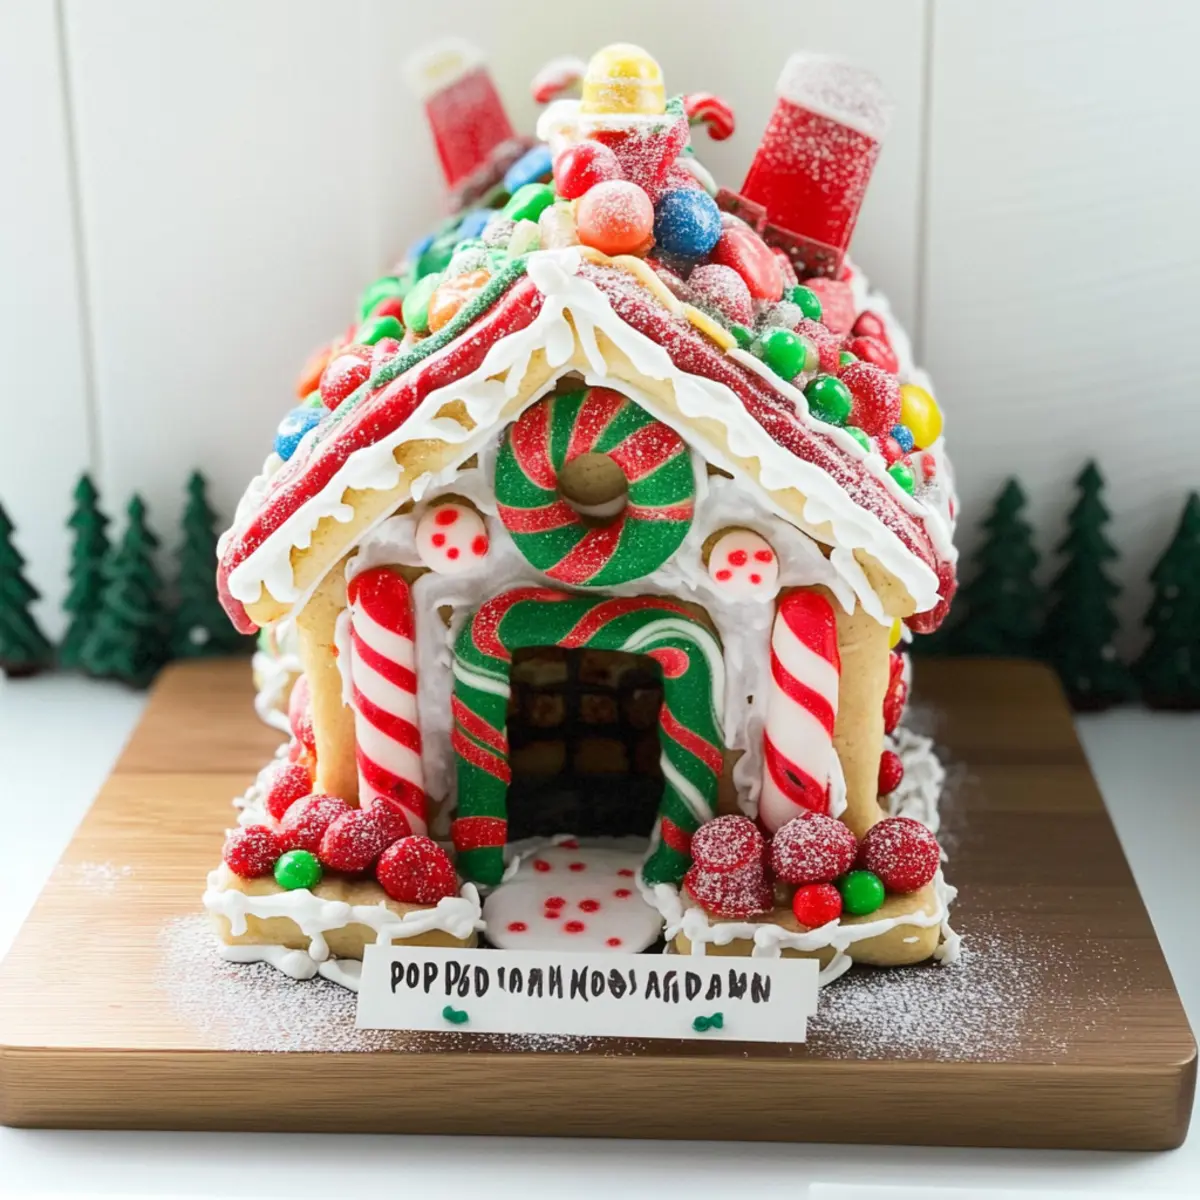
The air is filled with laughter and a delightful sprinkle of chaos as families gather for a festive activity that turns snacks into art. The star of the show? A whimsical Pop Tart Gingerbread House! This no-bake wonder is not only a breeze to assemble but also a fantastic way to get everyone involved in the spirit of creativity during the holiday season. Imagine sinking your teeth into sweet Strawberry Pop Tarts, adorned with a riot of colorful Christmas candy that evokes the joy of the season. Plus, the quick prep allows you to spend less time in the kitchen and more time creating merry memories. Ready to build a sugary masterpiece that doubles as holiday décor? Let’s get crafting!

Why is this recipe so delightful?
Simplicity at Its Finest: No baking required, making this a stress-free project for all ages!
Creativity Unleashed: Personalize your Pop Tart Gingerbread House with your favorite candies for a unique touch.
Family Fun: Gather friends and family for an enjoyable afternoon filled with laughter and creativity.
Festive Vibes: The vibrant colors and charming design are sure to bring holiday cheer to any gathering!
Taste and Texture: Sweet Strawberry Pop Tarts paired with crunchy candies create a delectable dessert that looks as good as it tastes.
Why not also explore how to combine this with your favorite breakfasts like an Avocado Breakfast Quesadilla? You’ll find tasty ideas to elevate your holiday celebrations!
Pop Tart Gingerbread House Ingredients
For the House Structure
• Strawberry Pop Tarts – the vibrant color adds a festive touch, but feel free to choose any flavor you love!
For the Adhesive
• Decorating Icing – use tube icing for ease; royal icing is sturdier, perfect for holding your Pop Tart Gingerbread House together.
For the Décor
• Christmas Candy – get creative! Choose gumdrops, candy canes, or M&Ms to bring your Pop Tart Gingerbread House to life with color and cheer.
Step‑by‑Step Instructions for Pop Tart Gingerbread House
Step 1: Prepare Your Workspace
Start by laying out a clean piece of parchment paper on your work surface to catch any icing drips and keep things tidy. This will serve as your building station for the Pop Tart Gingerbread House. Ensure you have all ingredients and tools, like a small serrated knife and decorating icing, within reach for a smooth crafting experience.
Step 2: Assemble the House Frame
Position one Strawberry Pop Tart vertically in the center of the parchment paper, then place two more horizontally on either side as walls. Align them closely, ensuring they create a solid base for your Pop Tart Gingerbread House. Visualize the house structure, as this forms the main support that will hold everything together when you apply icing next.
Step 3: Create the Roof
Carefully cut the top center of the vertical Pop Tart to match the width of the horizontal pieces, creating a peak for your roof. Next, trim the top of another Pop Tart to match the shape and fit snugly over the vertical Pop Tart. This step is crucial, as a well-shaped roof enhances the overall aesthetic, adding to the charm of your festive creation.
Step 4: Assemble the Walls
Now, use the decorating icing to ‘glue’ the vertical and horizontal Pop Tarts together, ensuring they are secure. Apply a generous amount of icing at the seams where the walls meet; this will keep your Pop Tart Gingerbread House stable and ready for the roof. Let the icing set for about 10 minutes, allowing the structure to solidify before proceeding.
Step 5: Attach the Roof
Once the walls are secure, carefully place the trimmed Pop Tart roof pieces on top, securing them with more icing. Take a moment to ensure everything sticks well, adjusting as necessary. This process is essential, as a stable roof provides the perfect foundation for decorating your Pop Tart Gingerbread House.
Step 6: Decorate the House
After the icing has dried thoroughly—about 30 minutes for best results—it’s time to let your creativity shine! Adorn your Pop Tart Gingerbread House with an array of colorful Christmas candy. Use the decorating icing as glue to secure candy canes, gumdrops, and M&Ms creatively around the house, ensuring each piece is securely attached to withstand the festive excitement.
Step 7: Final Touches and Display
Once you’ve finished decorating, allow the icing to set completely. This typically takes about an hour. Once dried, find a lovely spot to display your Pop Tart Gingerbread House, showcasing your delightful creation for family and friends. Get ready for compliments, and enjoy the joy of crafting and sharing this unique holiday treat!
Make Ahead Options
These delightful Pop Tart Gingerbread Houses are perfect for busy home cooks looking to save time during the holiday season. You can assemble the basic structure of the house up to 24 hours in advance, simply piping the icing to hold the walls and roof together without decorating. When ready to finish your creation, let the assembled house sit for about 10 minutes to ensure stability. For the best quality, store the house in an airtight container at room temperature to prevent moisture from softening the Pop Tarts. Finally, decorate your Pop Tart Gingerbread House with candies just before serving to keep everything fresh and colorful!
Pop Tart Gingerbread House Variations
Feel free to unleash your creativity by customizing your Pop Tart Gingerbread House with these fun variations!
-
Flavor Twist: Swap Strawberry Pop Tarts for brown sugar cinnamon or hot fudge sundae for a different taste. Each option adds its own delicious flair!
-
Candy Alternatives: Use chocolate-covered pretzels for roof shingles or gummy bears for a pop of color. The combination of textures makes for a delightful surprise!
-
Icing Styles: Experiment with fondant or whipped cream instead of icing for an alternative look. Fondant adds elegance, while whipped cream enhances the festive fun!
-
Gluten-Free: Search for gluten-free Pop Tarts to accommodate dietary needs while still enjoying this festive craft. Everyone can join in on the holiday fun!
-
Spicy Kick: Add crushed peppermint or cinnamon candy to your icing for a dash of heat. A little spice makes the sweet even more special!
-
Interactive Decor: Host a decorating contest with friends or family, assigning themes like winter wonderland or candy castle. The laughter will fill your home with holiday cheer!
-
Alternative Shapes: Instead of a house, try building a Pop Tart gingerbread tree or a festive car! This adds a playful twist to your holiday decorating adventures.
-
Include Savory Elements: Consider adding pretzel sticks or cheese crackers as unique structural elements. The contrast will surely intrigue your taste buds!
To continue the festive vibes, why not indulge in a cheerful breakfast with an Avocado Breakfast Quesadilla? Both recipes pair beautifully to create a joyful holiday experience!
Expert Tips for Pop Tart Gingerbread House
-
Icing Consistency: Ensure the icing is thick enough to hold pieces together but smooth enough for easy application. This balance is key for a sturdy Pop Tart Gingerbread House.
-
Cut with Care: Use a serrated knife for clean cuts through the Pop Tarts. Avoid tearing the edges to maintain a neat appearance when assembling.
-
Stability Matters: Allow each layer of icing to dry before adding more decorations. This prevents collapsing and ensures your house holds its festive shape.
-
Candy Choices: Opt for heavier candies at the base for stability, while lighter ones can go on the roof for a whimsical look. Ensure a well-balanced distribution for a charming design.
-
Interactive Decor: Turn decorating into a fun competition with family or friends to see who can create the most unique design. It’s a delightful way to bond while making your Pop Tart Gingerbread House!
Storage Tips for Pop Tart Gingerbread House
Room Temperature: Keep your Pop Tart Gingerbread House in a cool, dry place, away from direct sunlight to avoid melting the icing or candy decorations.
Fridge: If needed, refrigerate for up to 3 days, but note that this may cause the icing to become less vibrant. Wrap loosely to avoid moisture buildup.
Freezer: Freezing is not recommended, as it can affect the texture and appearance of the Pop Tart and candies.
Reheating: If you want to enjoy any leftovers, simply remove the house from storage and allow it to come to room temperature before serving. Enjoy your festive treat!
What to Serve with Pop Tart Gingerbread House
Transform your festive gathering into a delightful feast with these fun and flavorful pairings that will enchant your guests.
-
Warm Spiced Apple Cider: This comforting drink enhances the holiday spirit while balancing the sweetness of the gingerbread house.
-
Vanilla Ice Cream: A scoop of creamy vanilla ice cream is a perfect contrast to the crunchy Pop Tarts, adding richness to the experience.
-
Gingerbread Cookies: Continue the theme with soft and spiced gingerbread cookies that echo the flavors of your Pop Tart creation, making for a delicious dessert spread.
-
Chocolate Fondue: Set up a chocolate fondue station for extra festive fun! Guests can dip fruits and marshmallows into warm, melted chocolate alongside the gingerbread house.
-
Fruit and Nut Platter: A fresh platter of fruits like apples, oranges, and nuts will add crispness and balance the sweet treats beautifully.
-
Sparkling Water with Lime: Refresh your palate with sparkling water garnished with lime. This bubbly drink cleanses the taste buds between bites of your sugary masterpiece.
-
Chocolate Milkshake: Rich and decadent, a chocolate milkshake will be a hit among both kids and adults, enhancing the playful mood of the party.
-
Peppermint Hot Chocolate: Cozy up with peppermint-infused hot chocolate that mirrors the festive vibe, perfect for warming up during holiday gatherings.
Each of these pairings brings a unique blend of textures and flavors, ensuring a well-rounded and enchanting meal around your edible masterpiece.
Pop Tart Gingerbread House Recipe FAQs
What type of Pop Tarts work best for the Gingerbread House?
While any flavor of Pop Tarts can be used, I highly recommend Strawberry for a festive flair! The bright color adds a delightful touch to your holiday creation, but feel free to pick your favorite flavor for a more personalized house.
How should I store my Pop Tart Gingerbread House?
Store your Pop Tart Gingerbread House at room temperature in a cool, dry place to keep it fresh. Make sure to shield it from direct sunlight to prevent the icing and candies from melting. If needed, a fridge can be used for up to 3 days, though this may dull the icing’s vibrancy.
Can I freeze my Pop Tart Gingerbread House?
Freezing is not recommended for your Pop Tart Gingerbread House. The texture and sweet crunch of the Pop Tarts can change, and the colorful candies may not look as appealing once thawed. Enjoy it fresh instead for the best experience!
What if my icing isn’t holding the pieces together?
No problem! If your icing isn’t holding well, check its consistency. It should be thick enough to act as a glue. If it’s too runny, add some powdered sugar to thicken it, or let it sit for a few minutes to firm up. Additionally, ensure the layers are dry before adding more, which can help reinforce the structure.
Are there any dietary considerations for the candies used?
Absolutely! If you’re accommodating allergies, read the ingredient labels of your chosen candies. Many contain common allergens like nuts, dairy, or gluten. Opt for allergy-friendly candies where necessary. If you’re entertaining pets, keep the house out of reach, as certain candies (like chocolate) can be harmful to them.
How long does it take for the icing to dry completely?
After assembling and decorating, allow the icing to dry thoroughly. This usually takes about 30 minutes to an hour, depending on humidity levels. It’s crucial to let the icing set to ensure the structure remains stable for display and enjoyment—trust me, your hard work deserves this time!

Craft Your Own Fun Pop Tart Gingerbread House Delight!
Ingredients
Equipment
Method
- Prepare Your Workspace by laying out a clean piece of parchment paper on your work surface.
- Assemble the House Frame by positioning one Strawberry Pop Tart vertically in the center and two horizontally as walls.
- Create the Roof by cutting the top center of the vertical Pop Tart to create a peak.
- Assemble the Walls using decorating icing to ‘glue’ the pieces together.
- Attach the Roof by placing the trimmed Pop Tart roof pieces and securing them with icing.
- Decorate the House with an array of colorful Christmas candy.
- Final Touches and Display after allowing the icing to set completely.