
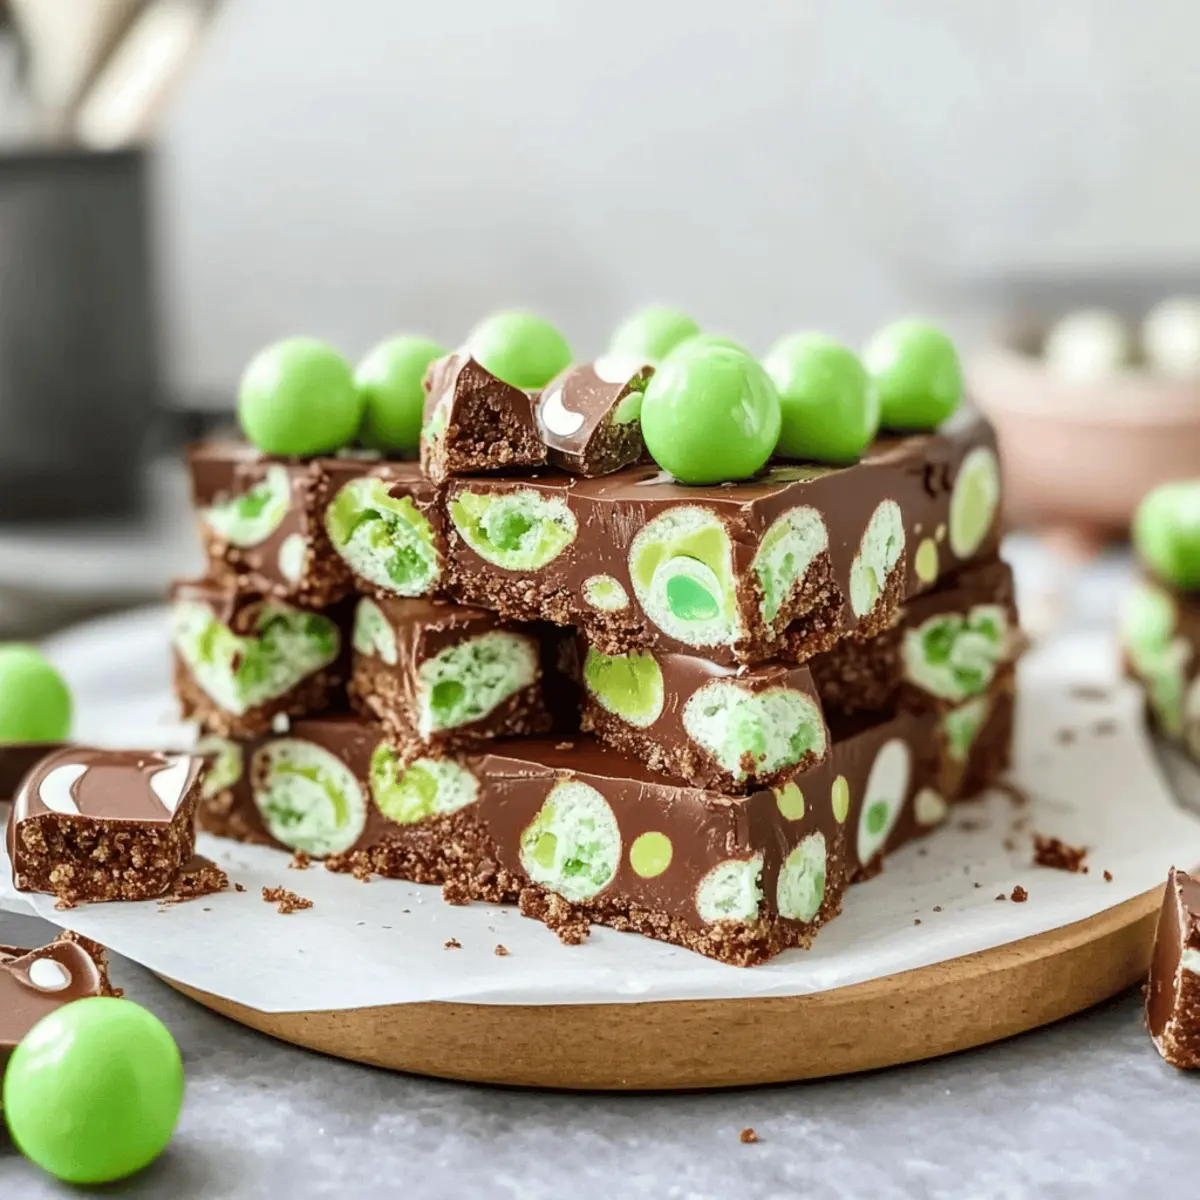
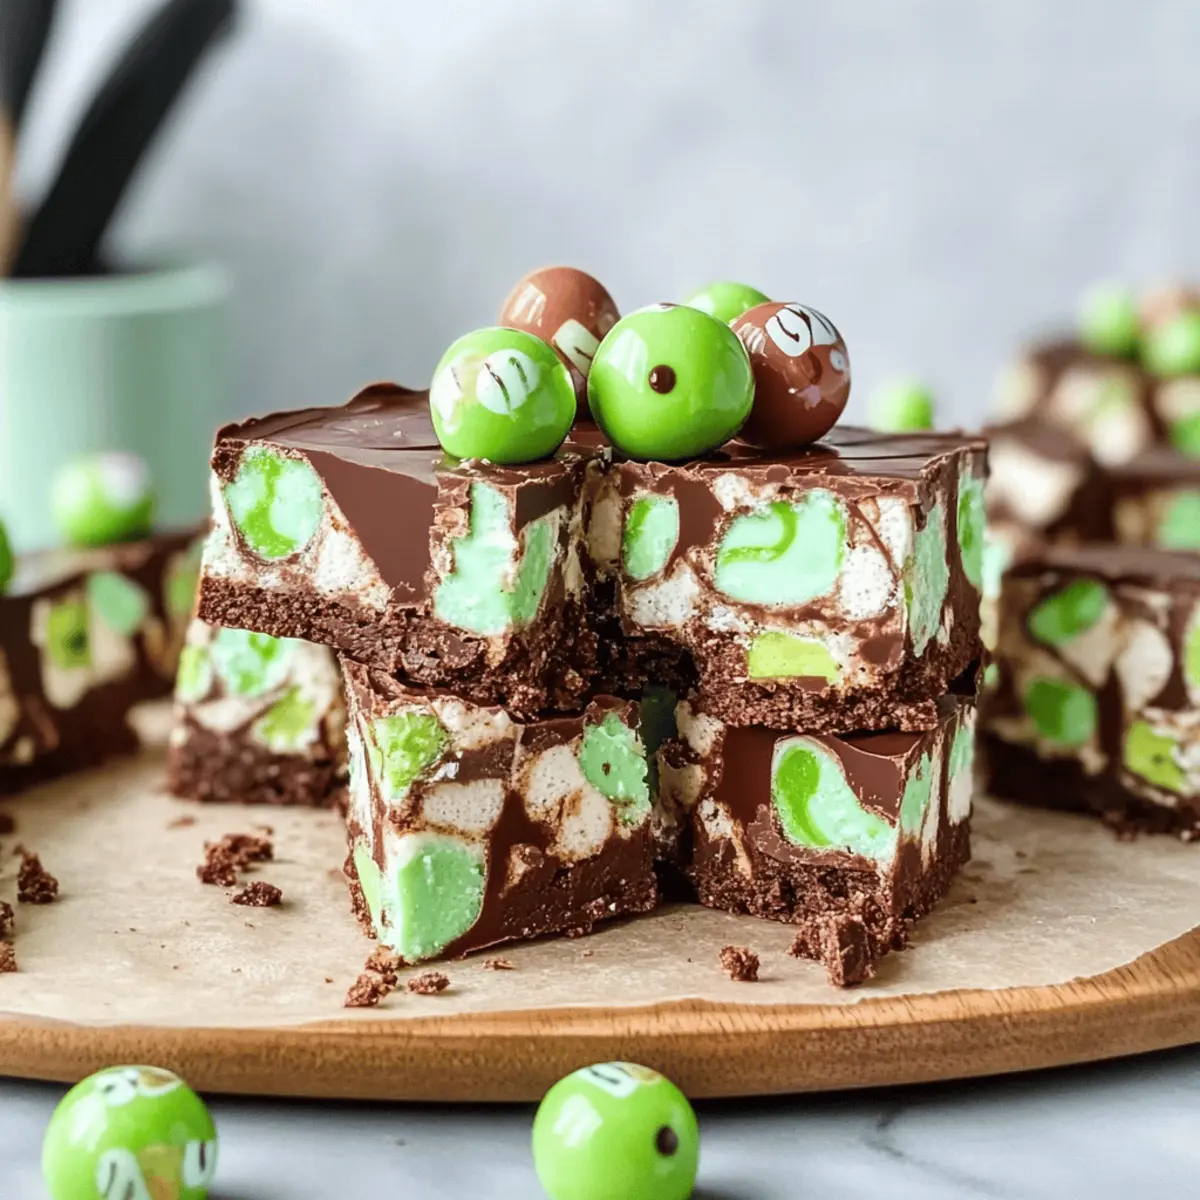
As I stood in my kitchen, the sweet scent of melting chocolate wafted through the air, transporting me to childhood days where minty delights were the highlight of any treat. This Easy No-Bake Mint Aero Traybake is a nostalgic nod to those moments, combining a luscious, fudgy base with the refreshing kick of mint. What I love most about this recipe is how effortlessly it comes together—no baking required and simple enough for anyone to whip up after a long day. Plus, it’s perfect for sharing with friends or family, making it a crowd-pleaser for any occasion. Ready to indulge in this mint chocolate masterpiece? Let’s dive into the details of this delightful treat!
Why is this traybake a must-try?
Effortless Preparation: This no-bake delight is not only simple but also eliminates the need for an oven, making it accessible for everyone, from novice cooks to experienced chefs.
Irresistible Flavor Combination: The marriage of mint and chocolate creates a refreshing taste explosion that’s sure to tantalize your taste buds.
Versatile Variations: Feel free to customize with different Aero flavors or adjust the mint intensity to fit your personal preference.
Perfect for Sharing: This traybake is ideal for gatherings—cut it into squares and watch it disappear at parties, just like my Bake Blueberry Cheesecake bars!
Quick Chill Time: With a 2-hour chill time, you can satisfy your sweet tooth without hours of waiting.
Texture that Delights: Expect a delightful contrast between the fudgy base and creamy topping that will leave you craving more!
No-Bake Mint Aero Traybake Ingredients
For the Base
• Digestive Biscuits – This sturdy base holds everything together; graham crackers can work as a sweet alternative.
• Butter – Adds richness and binds the ingredients; swap with dairy-free options for a vegan treat.
• Golden Syrup – Imparts sweetness and helps set the base; light corn syrup or honey can be used as substitutes (note: honey isn’t vegan).
For the Chocolate Layers
• Dark Chocolate – Gives depth to the flavor; feel free to replace it with semi-sweet chocolate for a sweeter bite.
• Milk Chocolate – Creates a sweet and creamy topping; try white chocolate for a unique twist.
• Mint Aero Bars or Bubbles – The signature elements that define this treat; using Milk Chocolate Aero can give a new taste experience.
For Decoration
• Green Food Coloring – Optional for that festive touch; if you prefer a natural option, spirulina powder works well too.
With these key ingredients, you’ll be just minutes away from creating your own No-Bake Mint Aero Traybake that’s sure to impress!
Step‑by‑Step Instructions for No-Bake Mint Aero Traybake
Step 1: Prepare the Tin
Begin by greasing and lining an 8×8” square baking tin with baking paper, ensuring the edges hang over for easy removal later. This initial step is crucial for the Easy No-Bake Mint Aero Traybake, as it will allow you to lift the traybake out intact once set.
Step 2: Crush Biscuits
Place the digestive biscuits in a ziplock bag and use a rolling pin to crush them into fine crumbs, leaving some larger chunks for added texture. This mixture will form the delicious base of your traybake, bringing together that crunchy foundation with a delectable chocolate layer.
Step 3: Melt Mixture
In a saucepan, combine butter and golden syrup over low-to-medium heat. Stir continually until fully melted and well blended, approximately 3-5 minutes. The mixture should be smooth and glossy—this luscious concoction will help bind the base together beautifully.
Step 4: Melt Chocolate
In a separate bowl, melt the dark and milk chocolate together in the microwave, using 30-second bursts and stirring in between until fully melted, which should take about 1-2 minutes. The chocolate needs to be silky and free of lumps for the perfect topping on your No-Bake Mint Aero Traybake.
Step 5: Combine Mixtures
Pour the melted chocolate into the butter and golden syrup mixture, stirring gently until fully incorporated. Then fold in the crushed biscuits until evenly distributed, ensuring each crumb is coated in that rich chocolate mixture, forming the decadent base of your traybake.
Step 6: Cool Base
Transfer the chocolate-biscuit mixture into the prepared tin, using a spoon to compact it evenly into the corners. Let the base cool at room temperature for about 30 minutes. It should set slightly but remain soft enough to press in the Aero Bubbles later.
Step 7: Add Aero Bubbles
Once the base has cooled, take the Mint Aero Bubbles and gently press them into the top of the mixture. Space them evenly for that delicious minty explosion in each bite; this step brings the signature mint flavor to your Easy No-Bake Mint Aero Traybake.
Step 8: Prepare Topping
Melt the milk chocolate and white chocolate in separate bowls, using the microwave method for convenience. If you desire a touch of color, mix green food coloring into the melted white chocolate. This optional step will enhance the visual appeal of your traybake.
Step 9: Decorate
Using a spoon, drizzle alternating stripes of the melted milk and white chocolate over the top of your traybake. Create a marbled effect by swirling with a skewer—this adds an artistic flair and reveals the delicious layers for your No-Bake Mint Aero Traybake.
Step 10: Rest
Refrigerate the decorated traybake for at least 2 hours to allow it to set completely. Once firm, remove it from the tin using the overhanging baking paper, and slice it into squares. The wait will be worth it when you indulge in this minty chocolate masterpiece!
No-Bake Mint Aero Traybake Variations
Feel free to unleash your creativity and personalize this delightful dessert to match your taste preferences!
- Dairy-Free: Substitute butter with coconut oil and use dairy-free dark and milk chocolate for a vegan twist.
- Flavor Boost: Add a teaspoon of peppermint extract to the melted chocolate mixture for an extra minty kick.
- Different Chocolates: Swap the Aero Bars for Crunchie Bars or Maltesers to create a new flavor experience.
- Decadent Layers: Layer in some crushed chocolate mint cookies between the biscuit base and chocolate layer for added texture.
- Spicy Twist: For those who love a little heat, add a pinch of cayenne or chili powder to the melted chocolate for a surprising flavor profile.
- Nutty Addition: Fold in chopped nuts such as walnuts or almonds into the biscuit base for a crunchy surprise.
- Topped Treat: Drizzle caramel sauce over the top before refrigerating for a sweet, sticky finish, reminiscent of your favorite chocolate bars.
- S’mores Style: Incorporate mini marshmallows into the mixture for a gooey twist on this classic traybake, much like my delicious S’more Bars!
These variations ensure that you can continually enjoy your No-Bake Mint Aero Traybake while keeping your taste buds excited!
Storage Tips for No-Bake Mint Aero Traybake
Fridge: Store your traybake in an airtight container in the refrigerator for up to 2 weeks to maintain freshness and texture.
Freezer: If you want to keep it longer, wrap the traybake tightly in plastic wrap and aluminum foil, then freeze for up to 3 months. Thaw in the fridge before serving.
Reheating: This traybake is best enjoyed cold; simply slice and serve without reheating for the perfect minty chocolate treat every time.
Cutting: For clean slices, use a sharp knife warmed in hot water before cutting, ensuring that each piece of your No-Bake Mint Aero Traybake looks as fabulous as it tastes.
What to Serve with Easy No-Bake Mint Aero Traybake
Indulging in a slice of minty goodness is always a delight, but pairing it with the right accompaniments elevates the entire experience.
-
Creamy Vanilla Ice Cream: The smoothness of ice cream contrasts beautifully with the fudgy texture of the traybake. Every bite becomes a creamy, dreamy treat!
-
Fresh Mint Leaves: Sprinkling a few fresh mint leaves on top adds a burst of herbaceous freshness, enhancing the minty flavor and giving a pop of color.
-
Coffee or Espresso: A rich cup of coffee offers a perfect balance to the sweetness, deepening the chocolatey experience. Sip while savoring each bite for a cozy moment.
-
Chocolate Dipped Strawberries: The sweet, juicy strawberries provide a delightful contrast in texture and taste. They’re a refreshing side that complements the rich chocolate wonderfully.
-
Whipped Cream: Light and airy whipped cream adds a creamy lightness to each slice, balancing the density of the traybake. It’s an easy touch that makes each serving feel extra special.
-
Dark Chocolate Mousse: For those who crave more chocolate, a velvety mousse is a luxurious addition. The rich flavor will amplify the overall chocolate experience, creating a heavenly dessert platter.
-
Fruit Salad: A refreshing fruit salad, bursting with seasonal fruits, brightens up your plate. The juiciness and acidity will provide a perfect contrast to the decadent traybake.
-
Mint Tea: A warm cup of mint tea ties in beautifully with the mint flavor in the traybake, creating a soothing, aromatic experience perfect for winding down after a meal.
With these delightful pairings, your No-Bake Mint Aero Traybake will surely be the star of any gathering!
Make Ahead Options
These Easy No-Bake Mint Aero Traybake bars are perfect for meal prep, saving you time on busy weeknights! You can prepare the base (steps 1-6) up to 24 hours in advance by compacting the biscuit mixture and leaving it in the fridge to set. Once ready to finish, simply press in the Aero Bubbles and proceed with steps 8-10 as usual. If you need even more flexibility, the entire traybake can be stored in an airtight container in the fridge for up to 3 days before serving. By keeping it chilled, you ensure just as delicious, fudgy results when it’s time to indulge! Enjoy the ease of having this delightful treat on hand for friends or family gatherings!
Expert Tips for No-Bake Mint Aero Traybake
Chill Time Matters: Allow the traybake to chill for at least 2 hours; rushing this step may result in a gooey texture instead of a firm slice.
Customize Wisely: Feel free to experiment with different Aero chocolates; just remember that the chocolate’s flavor will dominate your No-Bake Mint Aero Traybake.
Layer Smartly: Ensure your chocolate layers are fully melted before mixing; lumps can lead to an uneven texture and presentation.
Press Gently: When adding Aero Bubbles, press them in gently to avoid disturbing the base too much—this keeps your layers intact.
Storage for Freshness: For longevity, keep your traybake stored in an airtight container in the fridge; this will help maintain that delightful fudgy texture for up to two weeks.

No-Bake Mint Aero Traybake Recipe FAQs
What type of digestive biscuits should I use?
You should use plain digestive biscuits as they provide the perfect crunch for the base. If you can’t find them, graham crackers make a wonderful substitute, adding a slightly different sweetness without compromising the traybake’s structure.
How should I store the No-Bake Mint Aero Traybake?
To maintain its freshness, store the traybake in an airtight container in the fridge for up to 2 weeks. If you plan to keep it longer, wrap it tightly in plastic wrap and then in aluminum foil, placing it in the freezer where it can last for up to 3 months. When you’re ready to enjoy, simply thaw it in the fridge.
Can I freeze the No-Bake Mint Aero Traybake?
Yes, absolutely! Freezing is a great way to keep this delicious treat. After wrapping it tightly, place it in the freezer for up to 3 months. When you’re ready to enjoy, just move it to the fridge for a few hours to defrost. You’ll have a deliciously minty treat ready to go!
What should I do if my chocolate mixture is lumpy?
If your chocolate mixture ends up lumpy, don’t panic! Simply return it to the microwave in 10-15 second intervals, stirring in between, until it’s smooth again. Ensure you melt it at a low setting to prevent overheating, which can cause seizing. It’s all about patience here!
Is this traybake suitable for people with allergies?
This No-Bake Mint Aero Traybake contains common allergens like dairy and gluten. For those with gluten sensitivities, use gluten-free digestive biscuits or graham crackers. If you’re looking for a dairy-free version, swap the butter for a dairy-free alternative and ensure your chocolate is dairy-free as well.
Can I adjust the mint flavor in the traybake?
Of course! If you want a stronger mint flavor, you can add a teaspoon of mint essence to the chocolate mixture before combining with the biscuits. Alternatively, feel free to use different Aero variations; using Mint Aero Bars will enhance that refreshing taste. It’s all about how minty you’d like to go!

No-Bake Mint Aero Traybake: Your Ultimate Chocolate Indulgence
Ingredients
Equipment
Method
- Begin by greasing and lining an 8x8” square baking tin with baking paper, ensuring the edges hang over for easy removal later.
- Place the digestive biscuits in a ziplock bag and use a rolling pin to crush them into fine crumbs, leaving some larger chunks for added texture.
- In a saucepan, combine butter and golden syrup over low-to-medium heat. Stir continually until fully melted and well blended, approximately 3-5 minutes.
- In a separate bowl, melt the dark and milk chocolate together in the microwave, using 30-second bursts and stirring in between until fully melted, about 1-2 minutes.
- Pour the melted chocolate into the butter and golden syrup mixture, stirring gently until fully incorporated. Then fold in the crushed biscuits until evenly distributed.
- Transfer the chocolate-biscuit mixture into the prepared tin, using a spoon to compact it evenly into the corners. Let the base cool at room temperature for about 30 minutes.
- Once the base has cooled, take the Mint Aero Bubbles and gently press them into the top of the mixture.
- Melt the milk chocolate and white chocolate in separate bowls, using the microwave method for convenience.
- Using a spoon, drizzle alternating stripes of the melted milk and white chocolate over the top of your traybake.
- Refrigerate the decorated traybake for at least 2 hours to allow it to set completely. Once firm, remove it from the tin and slice it into squares.