
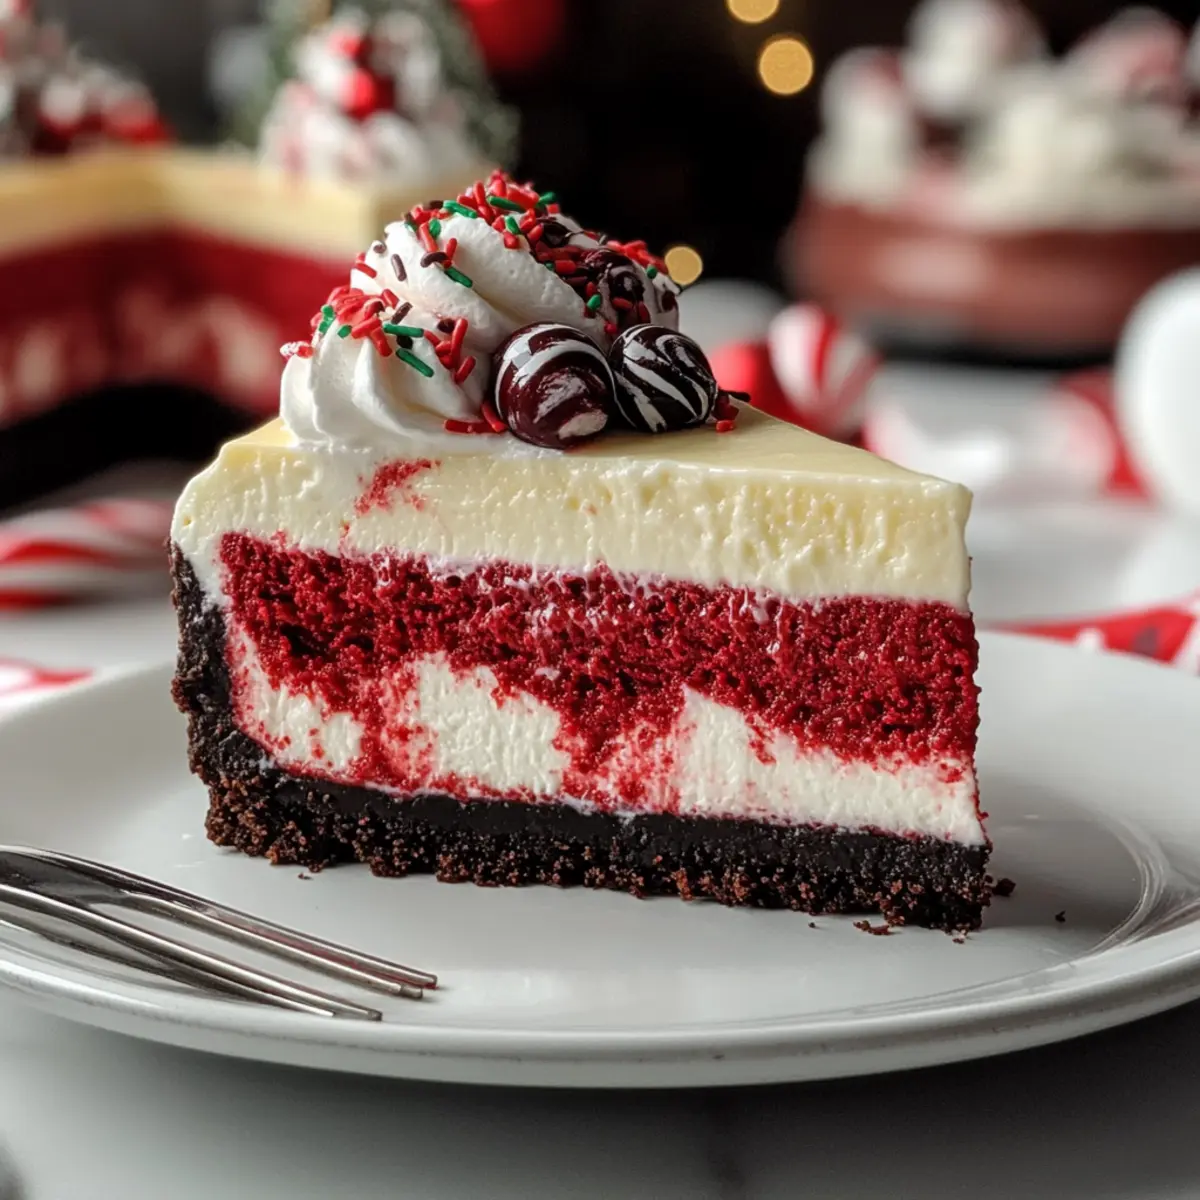
As the holiday season approaches, I find myself whispering to the oven, “Please work your magic!” There’s just something about the thrill of baking a show-stopping dessert. For me, the holiday spirit shines brightly with my Christmas Red Velvet Cheesecake, a festive dessert that layers the velvety richness of classic cheesecake with the enchanting allure of red velvet cake. Not only is it an eye-catching centerpiece for any gathering, but it also offers the perfect indulgence for those seeking a departure from the usual treats. Plus, it’s surprisingly straightforward, allowing you to whip up a delicious masterpiece without hours in the kitchen. Are you ready to sprinkle some joy into your holiday celebrations?
Why is this Cheesecake a Must-Make?
Festive Appeal: This Christmas Red Velvet Cheesecake is an eye-catching delight, boasting a vibrant red hue that instantly elevates your holiday gatherings.
Indulgent Flavors: Experience the best of both worlds with a rich cheesecake layered within classic red velvet cake flavors—chocolatey and creamy, perfect for satisfying all palates.
Easy to Create: The process is simple enough for bakers of all skill levels, making it an accessible treat for anyone looking to impress their guests.
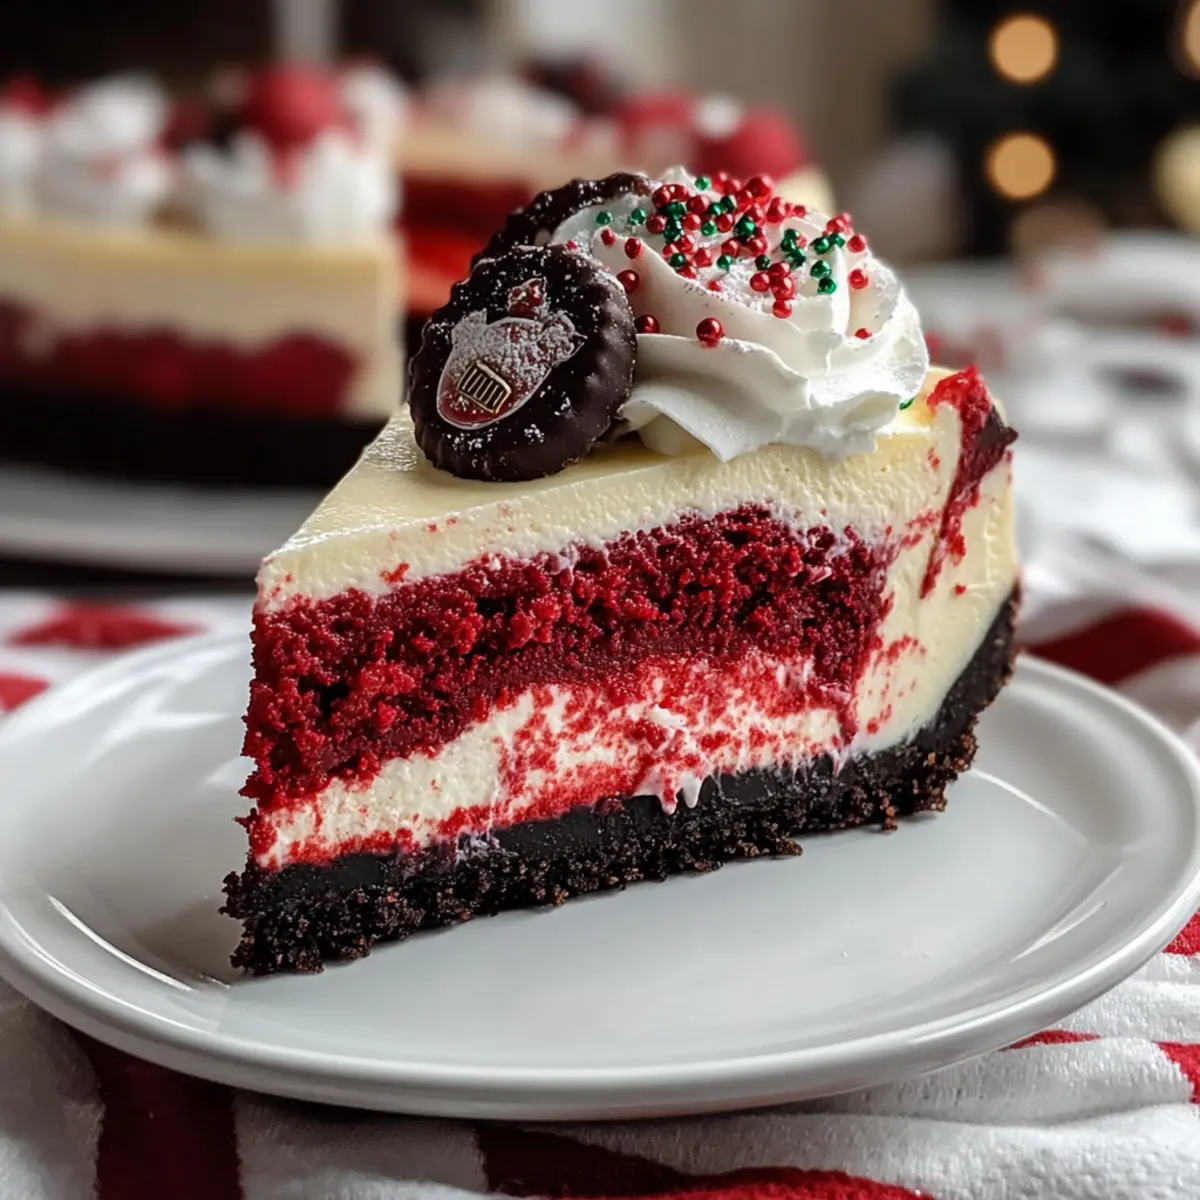
Crowd Favorite: Whether at festive dinners or holiday parties, this cheesecake is sure to wow everyone! For more festive inspiration, check out my Cheesecake Stuffed Chocolate cookies that are just as delightful.
Versatility: Don’t hesitate to get creative with your toppings—consider sugared cranberries or even a light citrus twist for a refreshing complement to the sweetness.
Christmas Red Velvet Cheesecake Ingredients
For the Crust
- Oreo Cookies – A crunchy base that adds a delightful chocolatey flavor; can be swapped with graham crackers if preferred.
- Butter – Binds the cookie crumbs together; use unsalted for better control over seasoning.
For the Cheesecake Filling
- Cream Cheese – The star ingredient providing richness; make sure it’s at room temperature for easy mixing.
- White Sugar – Sweetens the cheesecake; consider using a sugar substitute to lower calories.
- Heavy Whipping Cream – Adds creaminess to the filling and topping; non-dairy options can be used with some adjustments.
- Vanilla Extract – Boosts flavor; almond extract can be used for a unique twist.
- Cocoa Powder – Provides the classic chocolate flavor of red velvet; opt for unsweetened for best results.
- Red Food Coloring – Gives that signature red hue; gel food coloring is recommended for vibrant color.
- Christmas Sprinkles – Adds a festive touch for decoration; completely optional based on your preferences.
For the Topping
- Whipped Cream – Lightens up the dessert with a fluffy layer on top; alternatives include meringue for a different texture.
- Mini Oreos – A charming garnish to add fun; crushed candy canes or berries can be great substitutes for a festive look.
This delicious Christmas Red Velvet Cheesecake is not only a feast for the eyes but also a heavenly taste of the holidays!
Step‑by‑Step Instructions for Christmas Red Velvet Cheesecake
Step 1: Prepare the Pan & Oven
Begin by preheating your oven to 350°F (175°C). While the oven heats, wrap a 9-inch springform pan with aluminum foil to prevent water from seeping in later during the baking process. This ensures a perfectly baked Christmas Red Velvet Cheesecake without any unwanted moisture.
Step 2: Make the Red Velvet Crust
In a food processor, crush Oreo cookies into fine crumbs, then combine them with melted unsalted butter and a touch of sugar. Press this mixture firmly into the bottom of the prepared springform pan to form your crust. Bake the crust in the oven for 8-10 minutes until set, then allow it to cool completely before adding the cheesecake filling.
Step 3: Prepare Cheesecake Filling
In a large mixing bowl, beat the cream cheese and white sugar together until smooth and creamy, ensuring no lumps remain. Blend in the vanilla extract, cocoa powder, and red food coloring until the mixture is well combined and rich in color. For extra creaminess, whip one cup of heavy whipping cream to soft peaks, then gently fold it into the cheesecake mixture. Add in a handful of Christmas sprinkles for festive appeal.
Step 4: Bake the Cheesecake
Reduce the oven temperature to 325°F (160°C). Place the springform pan inside a larger baking dish filled with hot water to create a water bath, which helps prevent cracks. Bake for 1 hour to 1 hour and 15 minutes, or until the edges are set but the center still jiggles slightly. This step is key for achieving a luscious texture in your Christmas Red Velvet Cheesecake.
Step 5: Cool & Chill
Once the baking time is complete, turn off the oven and crack the oven door ajar. Let the cheesecake cool inside for an hour to gradually reduce the temperature, which helps avoid cracking. Then transfer the pan to a wire rack to cool for another 2-3 hours. For the best results, refrigerate overnight before serving to let the flavors meld beautifully.
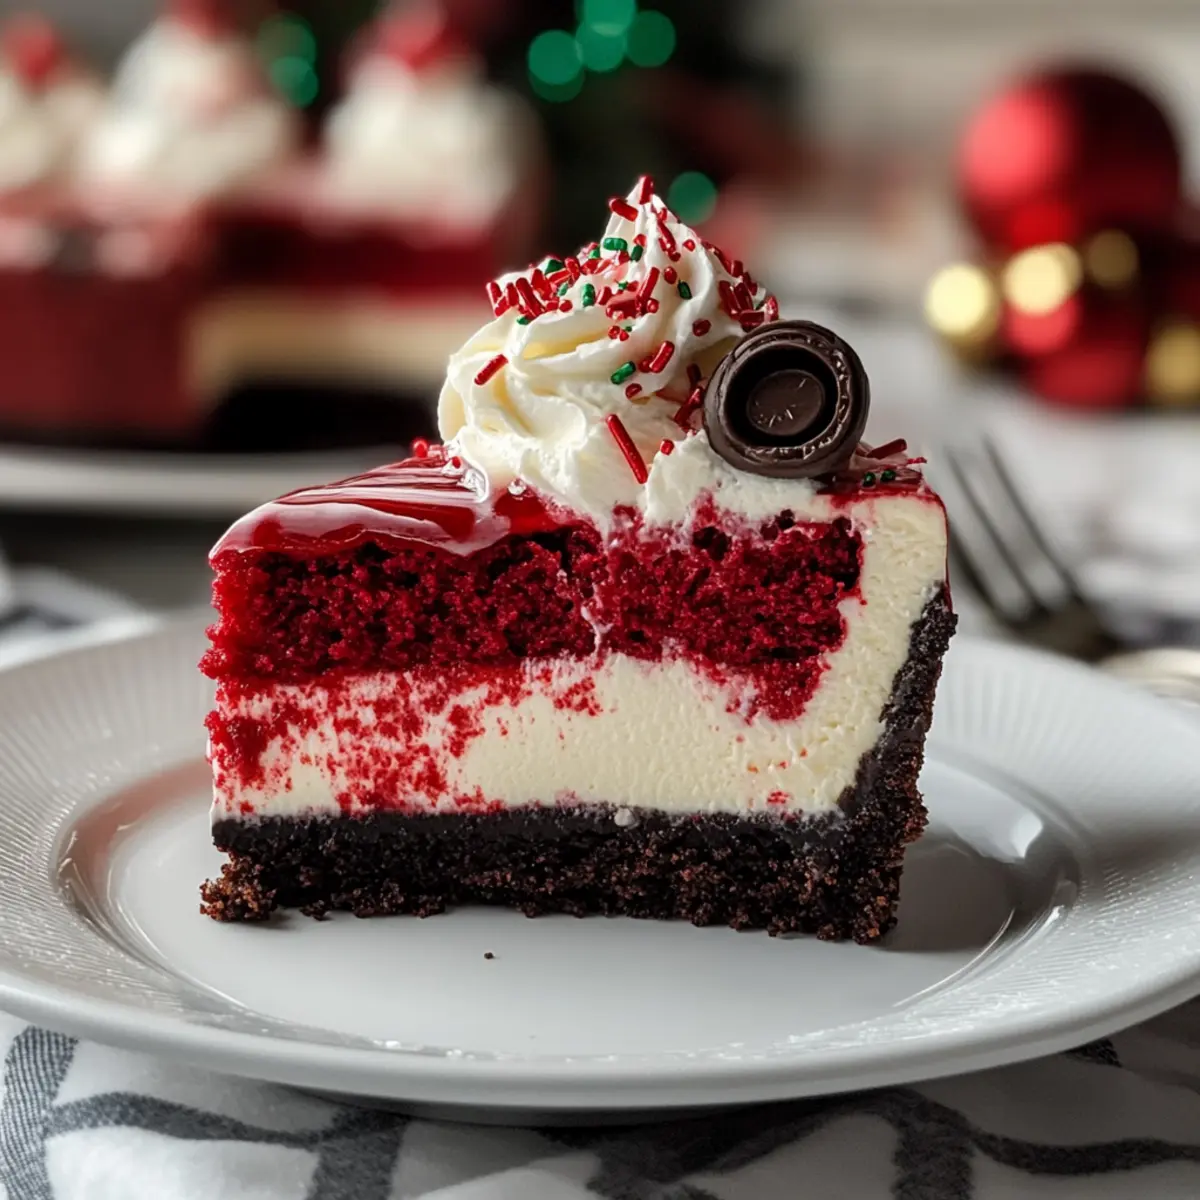
Step 6: Decorate & Serve
When ready to serve, carefully remove the cheesecake from the springform pan. Top with a generous layer of whipped cream, and for an added festive touch, garnish with mini Oreos and a sprinkle of Christmas sprinkles. For clean slices, run a knife under hot water before cutting each piece of your stunning Christmas Red Velvet Cheesecake.

What to Serve with Christmas Red Velvet Cheesecake
As you prepare to wow your guests with this stunning dessert, consider these delightful pairings that will enhance the festive vibes of your gathering.
-
Rich Coffee: A strong brew beautifully complements the richness of the cheesecake, balancing sweetness with bold flavors.
-
Nutty Ice Cream: A scoop of pistachio or hazelnut ice cream adds a creamy textural contrast, making every bite an indulgent experience. The nutty notes seamlessly marry with the chocolate hints of the cheesecake.
-
Fresh Berries: A side of mixed berries introduces a refreshing tartness that cuts through the creamy layers, adding a burst of color and flavor to your plate.
-
Chocolate Ganache: Drizzling warm chocolate ganache over each slice amplifies the decadent chocolate notes and offers an enticing visual element.
-
Spiced Hot Chocolate: Serve a cup of rich, spiced hot chocolate alongside for a cozy, festive drink that complements the cheesecake’s flavors.
-
Citrus Sorbet: For a lighter touch, a scoop of lemon or orange sorbet cleanses the palate and adds vibrancy to your dessert spread, enhancing the festive atmosphere.
These thoughtful accompaniments will not only elevate your Christmas Red Velvet Cheesecake but create a memorable dining experience for all!
How to Store and Freeze Christmas Red Velvet Cheesecake
Fridge: Store your Christmas Red Velvet Cheesecake in an airtight container for up to 3-4 days. Enjoy it chilled or let it sit at room temperature for 30 minutes before serving for a softer texture.
Freezer: If you want to store leftovers for a longer period, wrap individual slices tightly in plastic wrap and place them in a freezer-safe container. They can be frozen for up to 2 months without losing flavor.
Thawing: To thaw, simply transfer the cheesecake to the fridge for several hours or overnight. Avoid thawing at room temperature to maintain the structure and creaminess.
Reheating: If you prefer it warm, you can gently reheat slices in the microwave for about 15-20 seconds. Enjoy the festive magic of the Christmas Red Velvet Cheesecake even days after it’s made!
Expert Tips for Christmas Red Velvet Cheesecake
-
Room Temperature Cream Cheese: Ensure your cream cheese is at room temperature for a smooth filling. Cold cream cheese can lead to lumps that are difficult to mix.
-
Water Bath Importance: Always use a water bath for baking. This method prevents cracks and helps create a velvety texture in your Christmas Red Velvet Cheesecake.
-
Chill Time Matters: Don’t rush the cooling and chilling process. Allowing the cheesecake to chill overnight guarantees a firmer texture and better flavor development.
-
Decorating Wisely: When topping with whipped cream, go light for an elegant finish. Thick layers can overpower the cheesecake’s delicate flavor.
-
Slice with Care: To achieve clean, beautiful slices, dip your knife in hot water before cutting. This will help glide through the cheesecake smoothly.
Make Ahead Options
These delightful Christmas Red Velvet Cheesecake slices are perfect for those busy holiday days! You can prepare the crust up to 3 days in advance by making the Oreo base, pressing it into the springform pan, and storing it tightly wrapped in the refrigerator. Additionally, the cheesecake filling can be mixed and chilled in the fridge for up to 24 hours; just remember to add the whipped cream and sprinkles just before baking. To maintain quality and ensure it stays just as delicious, allow it to cool properly in the oven and refrigerate overnight as directed. When you’re ready to impress your guests, simply bake the cheesecake and follow the finishing touches for a festive masterpiece!
Christmas Red Velvet Cheesecake Variations
Feel free to make this stunning dessert your own—there are countless ways to enhance its charm and flavor!
-
Ginger Snap Crust: Swap the Oreo crust for a ginger snap cookie base for a delightful spicy kick. The warmth of ginger pairs beautifully with the creamy cheesecake.
-
Sugar-Free Option: Use sugar substitutes in place of white sugar for a lower-calorie treat. You can still enjoy that rich flavor without compromising on sweetness!
-
Citrus Zest: Add a teaspoon of orange or lemon zest to the cheesecake filling for a refreshing twist that brightens the overall flavor. Just a hint of citrus can elevate your dessert to new heights.
-
Nutty Addition: Mix in crushed nuts such as walnuts or pecans into the cheesecake batter for added texture and richness. It adds a nice crunch amid the creamy layers!
-
Chocolate Drizzle: Drizzle melted dark chocolate on top before serving for an indulgent finish. This decadent touch will have everyone reaching for seconds.
-
Festive Toppings: Instead of mini Oreos, consider topping your cheesecake with sugared cranberries or a sprinkle of pomegranate seeds for a pop of color and a unique flavor that sings holiday cheer.
-
Non-Dairy Alternative: For a dairy-free option, substitute cream cheese with a vegan cream cheese alternative and use coconut whipped cream on top. It’s a great way to share the joy with those who have dietary restrictions.
-
Extra Cocoa: Increase the cocoa powder to amplify the chocolate flavor. A tablespoon or two more can turn your cheesecake into a richer experience.
Whether you’re celebrating or just treating yourself, this Christmas Red Velvet Cheesecake is wonderfully flexible! If you’re in the mood for another chewy indulgence, you might also love my Oreo Cheesecake Cookies or try some of my Sugar Free Cheesecake Bars for a guilt-free option. Happy baking!
Christmas Red Velvet Cheesecake Recipe FAQs
How do I choose ripe ingredients for this cheesecake?
Absolutely! For the best results, ensure your cream cheese is at room temperature—this helps achieve a smooth, creamy filling. When selecting your heavy whipping cream, look for containers without any lumps and check the expiration date for freshness. Fresh eggs are also key. Choose eggs with clean, uncracked shells and vibrant yolks.
How should I store my Christmas Red Velvet Cheesecake?
To keep your cheesecake fresh, store it in an airtight container in the fridge for up to 3-4 days. It’s best enjoyed chilled, but you can let it sit at room temperature for about 30 minutes before serving for a softer texture. Just make sure it’s properly sealed to maintain its deliciousness!
Can I freeze leftover cheesecake?
Absolutely! To freeze your Christmas Red Velvet Cheesecake, first, wrap individual slices tightly in plastic wrap and then place them in a freezer-safe container. This can be stored for up to 2 months. When you’re ready to indulge again, simply thaw the slices in the refrigerator overnight. Avoid thawing them at room temperature to preserve their creamy texture.
What should I do if my cheesecake cracks while baking?
It’s very common! To prevent cracks, always use a water bath during baking as it provides moisture and regulates the temperature. If cracks do occur, don’t worry—just consider covering them with whipped cream or festive decorations. You can also try baking at a slightly lower temperature or reduce the baking time for your next try.
Are there any dietary considerations I should be aware of?
Yes! If you or your guests have dietary concerns, always check the ingredient labels for allergens. The cream cheese and heavy cream are dairy products, so if you’re looking for alternatives, use vegan cream cheese and coconut cream instead. For gluten-free options, substitute the Oreo crust with gluten-free cookies or a nut-based crust.
Can my pet have any of the ingredients in this cheesecake?
Be cautious! While some ingredients like cream cheese may seem okay, many components of this cheesecake—especially sugar and chocolate—can be harmful to pets. It’s best to keep this festive dessert out of their reach and offer them pet-safe treats instead.
Irresistible Christmas Red Velvet Cheesecake to Wow Your Guests
Ingredients
Equipment
Method
- Preheat your oven to 350°F (175°C) and wrap a 9-inch springform pan with aluminum foil.
- Crush Oreo cookies in a food processor, mix with melted butter, and press into the bottom of the pan. Bake for 8-10 minutes and let cool.
- In a mixing bowl, beat cream cheese and sugar until smooth. Blend in vanilla, cocoa powder, and food coloring. Whip heavy cream and fold into the mixture with sprinkles.
- Reduce oven to 325°F (160°C). Bake the cheesecake in a water bath for 1 hour to 1 hour and 15 minutes.
- Cool the cheesecake inside the oven for 1 hour. Then, cool on a wire rack for 2-3 hours and refrigerate overnight.
- Remove from the pan, top with whipped cream, and garnish with mini Oreos and sprinkles.