
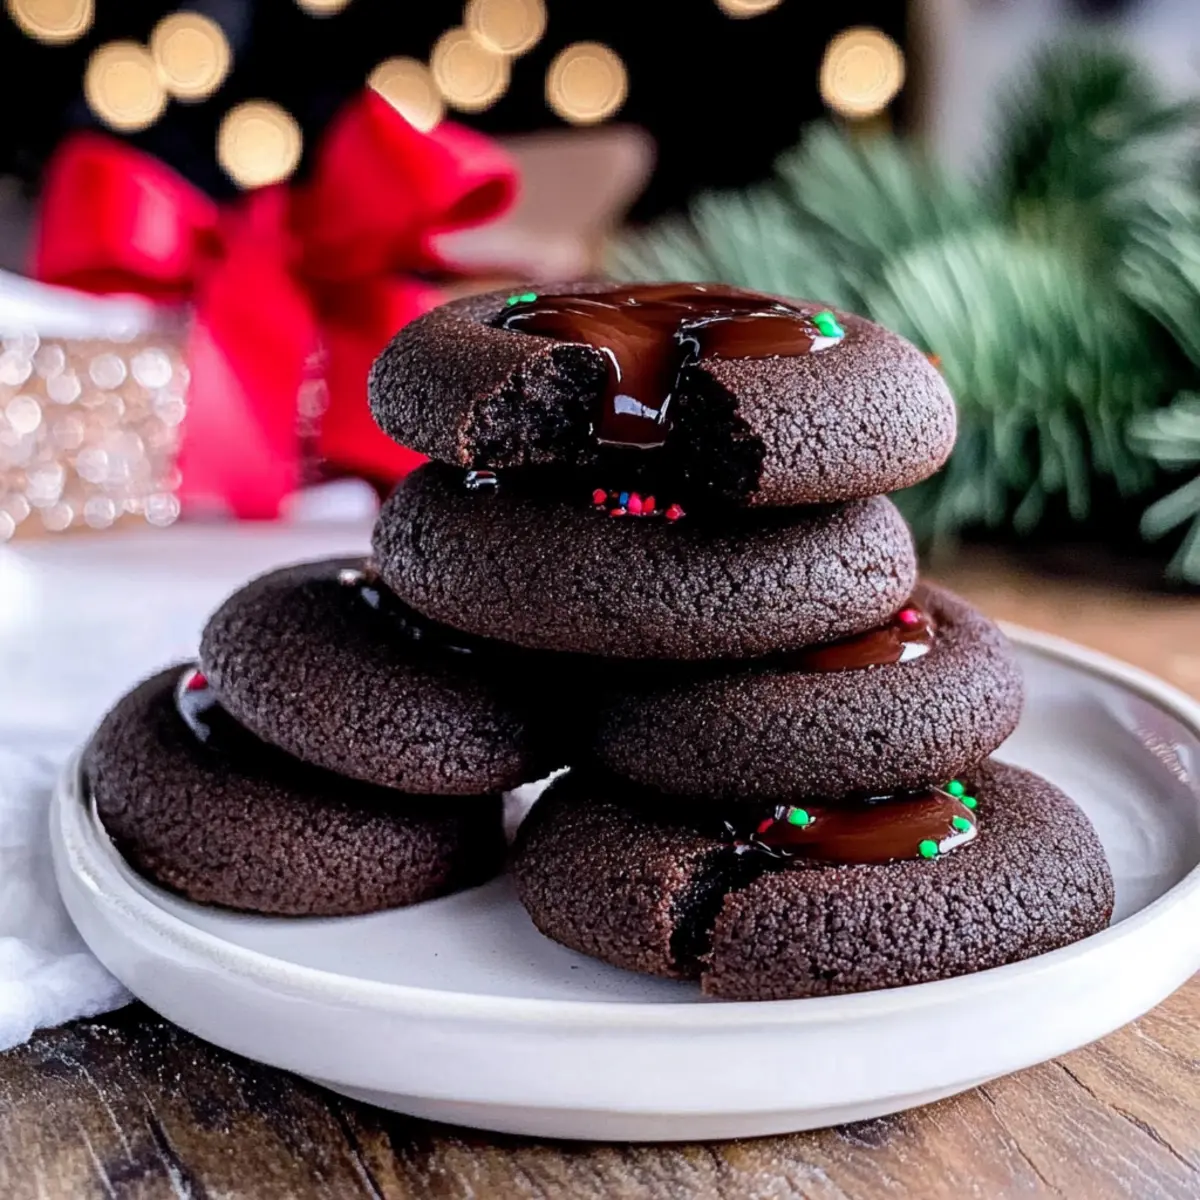
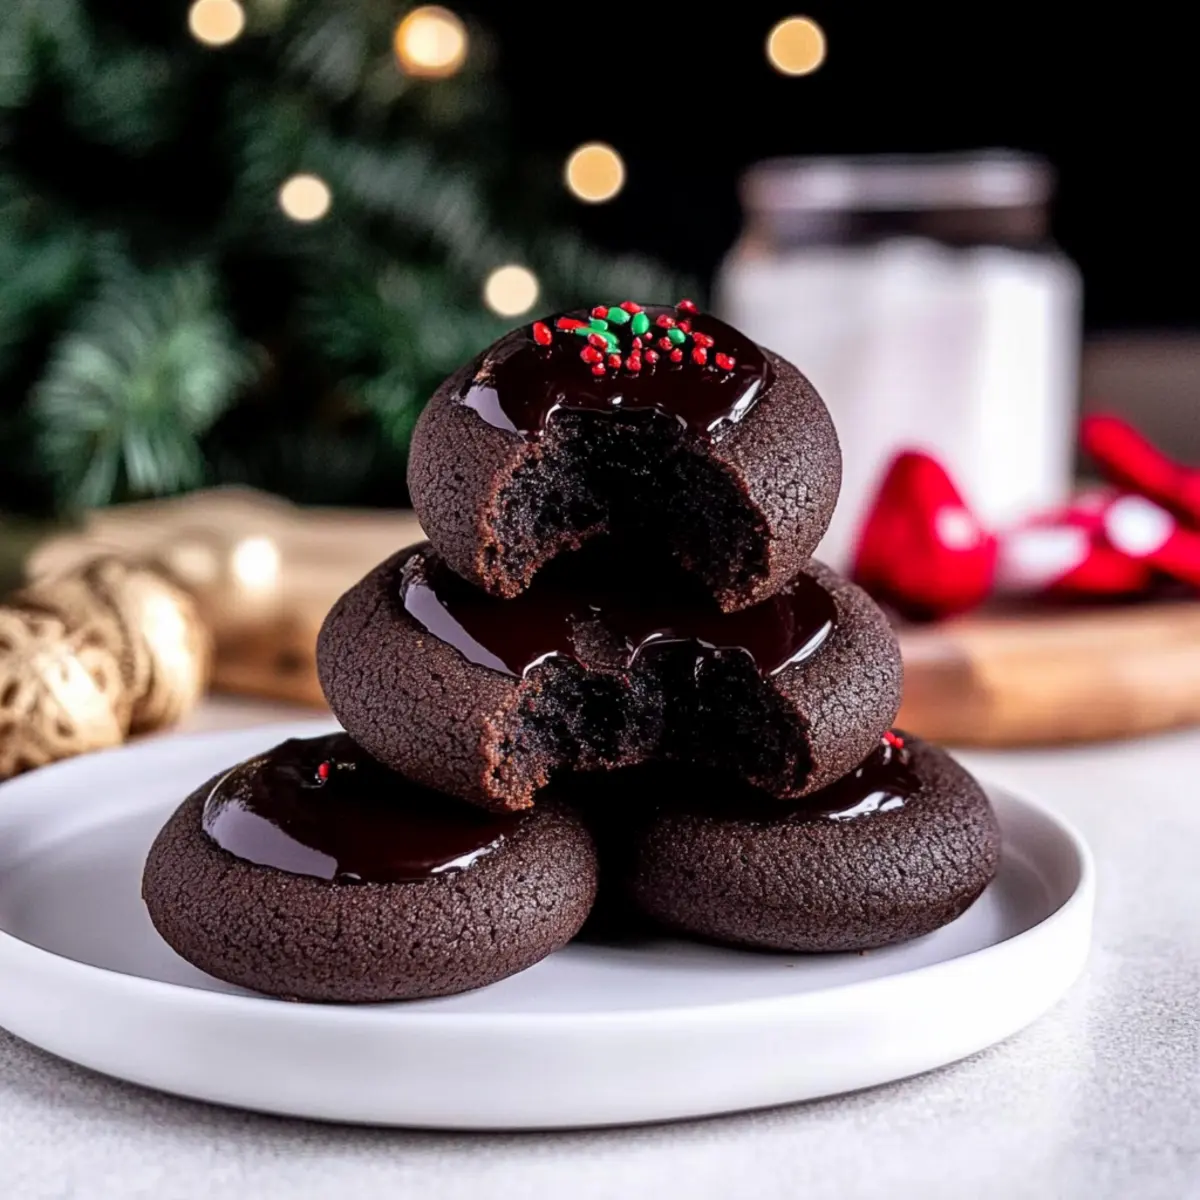
You know that magical moment when chocolate meets comfort? That’s exactly what you’ll experience with these Ultimate Chocolate Thumbprint Cookies featuring a luscious chocolate ganache filling. The combination of rich Dutch process cocoa and a meltingly soft texture creates an irresistible treat that’s perfect for both gatherings and cozy nights in. One of the best parts? They’re super simple to whip up with just a few pantry staples, making them a quick go-to for any occasion. Plus, they can easily adapt to be gluten-free if needed, ensuring everyone can indulge in this delightful dessert. Curious how to make these scrumptious cookies that will have your friends and family begging for more? Let’s dive in!

Why Are Chocolate Thumbprint Cookies Irresistible?
Mouthwatering Flavor: The deep chocolate flavor of Dutch process cocoa combined with a velvety ganache filling creates an indulgent treat you won’t be able to resist.
Easy to Make: With just a handful of ingredients, these cookies come together quickly, even for novice bakers.
Versatile Options: You can switch up the filling with flavored jams or even different types of chocolate, just like in my Twix Cookies Chewy recipe.
Crowd-Pleaser: There’s something universal about a chocolate cookie, making them a sure hit at any gathering or celebration!
Gluten-Free Friendly: A simple swap for gluten-free flour means everyone can enjoy them, just like my Panko Cookies Chewy.
Storage Made Simple: Keep your cookies fresh in an airtight container for days or pop them in the freezer to save for a later date—after all, who doesn’t love a sweet surprise?
Chocolate Thumbprint Cookies Ingredients
For the Cookies
• All-Purpose Flour – Provides structure to the cookies; substitute with gluten-free all-purpose flour for a gluten-free option.
• Dutch Process Cocoa Powder – Adds rich chocolate flavor; regular unsweetened cocoa can work, but the taste will differ slightly.
• Salt – Enhances and balances sweetness for the cookies.
• Baking Powder – Helps cookies rise and achieve a tender texture.
• Unsalted Butter – Adds richness and moisture; ensure it’s softened for easy mixing.
• Light Brown Sugar – Contributes moisture and caramel-like flavor; dark brown sugar can be used for a deeper taste.
• Granulated White Sugar – Adds sweetness and aids in browning.
• Egg Yolks – Provide richness and help bind the mixture; ensure they’re at room temperature for easy incorporation.
• Vanilla Bean Paste (or Extract) – Adds depth of flavor; pure vanilla extract is an effective substitute.
For the Ganache
• Semi-Sweet Chocolate Chips – The star of the ganache; provides a sweet, rich filling for the cookies.
• Heavy Whipping Cream – Creates a smooth ganache texture; can use a dairy-free cream for a non-dairy version.
Optional Toppings
• Nonpareils – Adds a festive touch to the cookies for that extra charm.
These Chocolate Thumbprint Cookies are sure to impress with their delightful texture and rich flavors, making them a perfect addition to your dessert repertoire!
Step‑by‑Step Instructions for Ultimate Chocolate Thumbprint Cookies with Ganache
Step 1: Prep Baking Sheets
Begin by preparing your baking surface—line two baking sheets with parchment paper to prevent sticking. This step is crucial for ensuring your Ultimate Chocolate Thumbprint Cookies bake evenly and slide off without hassle. Set them aside while you mix your ingredients, keeping everything organized and easy to access.
Step 2: Mix Dry Ingredients
In a medium bowl, whisk together the all-purpose flour, Dutch process cocoa powder, salt, and baking powder until well combined. This blend will provide the structure and rich chocolate flavor in your cookies. Make sure there are no lumps in the cocoa, as this ensures even distribution of flavors. Set this bowl aside for now.
Step 3: Cream Butter and Sugars
In a large mixing bowl, beat the softened unsalted butter along with light brown sugar and granulated white sugar using an electric mixer for about 2 minutes until the mixture is creamy and pale. The creaming process is essential for incorporating air, which makes your Chocolate Thumbprint Cookies wonderfully chewy.
Step 4: Add Wet Ingredients
Next, incorporate the egg yolks and vanilla bean paste into the creamy butter and sugar mixture. Continue mixing until the batter is fluffy and light in color—this usually takes about 1 minute. The richness from the egg yolks enhances the overall flavor of the cookies, making them truly delightful.
Step 5: Combine Ingredients
Gradually add the dry ingredients to the wet ingredients, mixing on low speed until just combined. Be careful not to overmix, as this can lead to denser cookies. The dough should start coming together into a soft, slightly sticky texture, which is perfect for forming your thumbprints later.
Step 6: Form Cookies
Using a tablespoon, scoop out portions of dough and roll them into balls, roughly 1 tablespoon each. Place the dough balls onto the prepared baking sheets, spacing them about 2 inches apart. Next, take a 1/4 teaspoon and press it gently into the center of each ball to create an indent—this is where the ganache will shine later!
Step 7: Chill Dough
Refrigerate the indented cookie dough for at least 1 hour. Chilling the dough is key to maintaining their shape during baking, allowing the cookies to puff just right without spreading too much. While you wait, it’s a great time to gather ingredients for the ganache.
Step 8: Bake Cookies
Preheat your oven to 350°F (175°C). Once the cookies have chilled, bake them for 9-11 minutes, until the edges are set but the centers remain soft. If needed, gently press the centers again with the 1/4 teaspoon immediately after taking them out of the oven to ensure a perfect thumbprint ready for filling.
Step 9: Cool Cookies
Allow the cookies to cool on the baking sheets for about 5 minutes. This brief cooling period will help them firm up before transferring them to a wire rack. Once on the rack, let them cool completely, allowing their soft, chewy texture to develop further before the ganache filling.
Step 10: Prepare Ganache
While the cookies cool, heat the heavy whipping cream in a small saucepan until it reaches a gentle boil. Pour the hot cream over the semi-sweet chocolate chips in a bowl and let it sit for 1 minute. Stir until the mixture is smooth and glossy, creating a beautifully rich ganache for your cookies.
Step 11: Fill Cookies
Finally, spoon the luscious chocolate ganache into the center of each cookie, filling the indented space generously. Allow the ganache to set briefly at room temperature or place the filled cookies in the fridge for a few minutes to firm up. Now, you have your decadent Ultimate Chocolate Thumbprint Cookies ready to be shared and savored!
What to Serve with Ultimate Chocolate Thumbprint Cookies
Indulging in these rich chocolate delights is a sweet moment best shared with companions, so let’s create the perfect pairing!
-
Fresh Berries: Pairing these cookies with a mix of raspberries and strawberries adds a burst of fruity freshness that lightens the rich chocolate.
-
Vanilla Ice Cream: A scoop of creamy vanilla ice cream offers a delightful contrast to the cookies’ chewy texture, creating a heavenly bite.
-
Coffee or Espresso: Serving with a strong brew cuts through the sweetness, enhancing the chocolate flavors for a sophisticated dessert experience.
-
Milk or Almond Milk: A classic pairing, a cold glass of milk or creamy almond milk complements the cookies perfectly, reminiscent of childhood comforts.
-
Whipped Cream: A dollop of light, fluffy whipped cream on top adds a silky smooth texture, making each bite even more decadent.
-
Chocolate Ganache Dip: For the ultimate chocolate lover, serve with extra ganache on the side for dipping, intensifying the chocolate experience.
-
Mint Tea: A warm cup of mint tea offers a refreshing finish, balancing the richness of the thumbprint cookies beautifully.
-
Chocolate Milkshake: For a fun twist, sip on a cold chocolate milkshake for a playful and indulgent match with the cookies.
Expert Tips for Chocolate Thumbprint Cookies
-
Perfect Flour Measurement: Measure your flour correctly—spoon it into the cup and level it off to avoid dry cookies.
-
Chill for Shape: Don’t skip chilling the dough! This helps the cookies maintain their shape and prevents excessive spreading during baking.
-
Reshape After Baking: If your thumbprints become less defined during baking, gently reshape them with a circular cutter while they’re still warm for a polished look.
-
Smooth Ganache: Ensure your heavy cream is hot enough before pouring it over the chocolate chips to achieve a perfectly smooth ganache for your Chocolate Thumbprint Cookies.
-
Switch It Up: Feel free to experiment with different fillings, like fruit preserves or flavored ganaches, to bring new life to your thumbprint cookies!
-
Storage Tip: Keep your cookies in an airtight container at room temperature for up to three days, or freeze them for later enjoyment.
Make Ahead Options
These Ultimate Chocolate Thumbprint Cookies are perfect for meal prep, saving you time during busy moments! You can prepare the cookie dough and refrigerate it for up to 24 hours. Just follow the steps to mix and shape the dough, then pop it in the fridge to chill until you’re ready to bake. Additionally, you can fully bake the cookies and store them in an airtight container for up to 3 days before filling. To maintain their delicious texture, allow them to cool completely before storing. When ready to serve, prepare your ganache filling, and spoon it into the indents. Enjoy the comforting delight of these Chocolate Thumbprint Cookies without the last-minute rush!
Chocolate Thumbprint Cookies Variations
Feel free to get creative and tailor the recipe to your taste buds with these delicious tweaks!
-
Gluten-Free: Substitute all-purpose flour with gluten-free all-purpose flour for a gluten-free delight without sacrificing flavor.
-
Jam-Filled Joy: Replace the chocolate ganache with your favorite flavored jams or fruit preserves for a fruity twist that adds a pop of color and sweetness.
-
Chocolate Variety: Experiment with different types of chocolate for the ganache—think white, milk, or even dark chocolate for a unique flavor experience!
-
Minty Freshness: Add a hint of peppermint extract to the ganache for a festive, mint-chocolate combination that brings holiday cheer, just like in my Oreo Cheesecake Cookies.
-
Nuts Galore: Incorporate finely chopped nuts like walnuts or pecans into the dough for a delightful crunch alongside the chewy texture.
-
Spicy Kick: For adventurous eaters, add a pinch of cayenne pepper or chili powder to the cookie dough for a surprising heat that complements the chocolate beautifully.
-
Fruity Zest: Toss in some zest from an orange or lemon into the cookie dough to brighten up the rich flavors—citrus always brings joy!
-
Holiday Cheer: Swap the nonpareils for festive sprinkles, seasonal colored sugar, or even edible glitter to make them a centerpiece for any holiday table, much like my family-favorite Cheesecake Stuffed Chocolate cookies.
Let your imagination run wild with these variations, and remember, the best recipes are the ones tailored to your family’s taste!
Storage Tips for Chocolate Thumbprint Cookies
Room Temperature: Store cookies in an airtight container at room temperature for up to 3 days to maintain their chewy texture and rich flavor.
Fridge: If you prefer, you can keep the cookies in the refrigerator for up to 5 days; just let them come to room temperature before enjoying for the best taste.
Freezer: Freeze the cookies in a single layer on a baking sheet before transferring them to a zip-top freezer bag for up to 2 weeks. Thaw before serving.
Reheating: For a warm treat, gently reheat frozen cookies by placing them in a preheated oven at 325°F (160°C) for about 5-7 minutes. Enjoy your delightful Chocolate Thumbprint Cookies!
Chocolate Thumbprint Cookies Recipe FAQs
How do I choose the right cocoa powder for these cookies?
When making Chocolate Thumbprint Cookies, using Dutch process cocoa powder enhances the overall chocolate flavor, giving your cookies a richer and deeper taste. If you only have unsweetened cocoa powder on hand, it can be used as a substitute, but do note that the flavor will be slightly different, which is fine for a unique twist on the classic recipe.
What’s the best way to store my Chocolate Thumbprint Cookies?
To keep your cookies fresh, store them in an airtight container at room temperature for up to 3 days. If you want to extend their life, place them in the fridge where they can last up to 5 days. For longer storage, freeze them in a single layer on a baking sheet, then transfer to a zip-top freezer bag where they will keep well for up to 2 weeks. When ready to enjoy, simply thaw and savor!
Can I freeze these cookies?
Absolutely! To freeze your Chocolate Thumbprint Cookies, first let them cool completely. Next, lay them out in a single layer on a baking sheet and place them in the freezer for about 1 hour. Once frozen, transfer them to a zip-top freezer bag and store in the freezer for up to 2 weeks. For best results, reheat them at 325°F (160°C) for 5-7 minutes before serving to bring back that fresh-baked softness.
What should I do if my cookies spread too much during baking?
If you find your Chocolate Thumbprint Cookies spread excessively, it usually means that the dough was either too warm or not chilled long enough. To fix this, try refrigerating your dough for at least 1 hour before baking. If they’ve already baked, you can reshape the indents with a circular cutter immediately after baking, while they’re still warm, to ensure they have that classic thumbprint appearance.
Are there any dietary considerations I should keep in mind?
If you’re looking to cater to dietary needs, feel free to substitute the all-purpose flour with a gluten-free all-purpose blend to create gluten-free Chocolate Thumbprint Cookies. Additionally, you can swap out the heavy whipping cream in the ganache for a non-dairy cream if necessary. Always ensure to double-check ingredient labels for allergy concerns.
Can I use different fillings for the thumbprint?
Yes, the filling for your thumbprint cookies is very adaptable! Instead of the classic chocolate ganache, consider using fruit preserves, flavored jams, or even different types of chocolate, such as white chocolate or caramel. This way, you can customize your cookies to suit various tastes and occasions.

Decadent Chocolate Thumbprint Cookies with Rich Ganache
Ingredients
Equipment
Method
- Prep Baking Sheets: Line two baking sheets with parchment paper.
- Mix Dry Ingredients: Whisk together flour, cocoa powder, salt, and baking powder.
- Cream Butter and Sugars: Beat butter with brown and white sugars until creamy.
- Add Wet Ingredients: Mix in egg yolks and vanilla until fluffy.
- Combine Ingredients: Gradually mix dry ingredients into wet until just combined.
- Form Cookies: Roll dough into balls and make an indent in the center.
- Chill Dough: Refrigerate dough for at least 1 hour.
- Bake Cookies: Bake at 350°F (175°C) for 9-11 minutes.
- Cool Cookies: Let cool on the baking sheets for 5 minutes.
- Prepare Ganache: Heat cream and pour over chocolate chips, stir until smooth.
- Fill Cookies: Spoon ganache into the center of each cookie.