
As the leaves begin to change and the air turns crisp, there’s nothing like a sweet little treat to welcome the fall season. These No-Bake Pumpkin Cheesecake Truffles are a delightful escape from the ordinary, offering a creamy pumpkin filling wrapped in a sugary coat that’s as charming as it is delicious. Perfect for busy home chefs, you’ll absolutely love how easy they are to whip up—no oven required! From Halloween parties to Thanksgiving gatherings, these indulgent bites make for a great centerpiece on any dessert table, allowing you to enjoy the warmth of your favorite flavors. Curious about how to create these autumn gems? Let’s dive into the recipe!
Why are Pumpkin Cheesecake Truffles irresistible?
Creamy Bliss: Each truffle delivers a velvety pumpkin cheesecake filling that melts in your mouth, perfectly capturing fall’s essence.
No-Bake Convenience: Skip the oven! These truffles are incredibly easy to make, allowing you to savor homemade sweetness without the hassle.
Versatile Treat: Perfect for Halloween, Thanksgiving, or simply a cozy night in, they are an elegant yet delightful addition to any occasion.
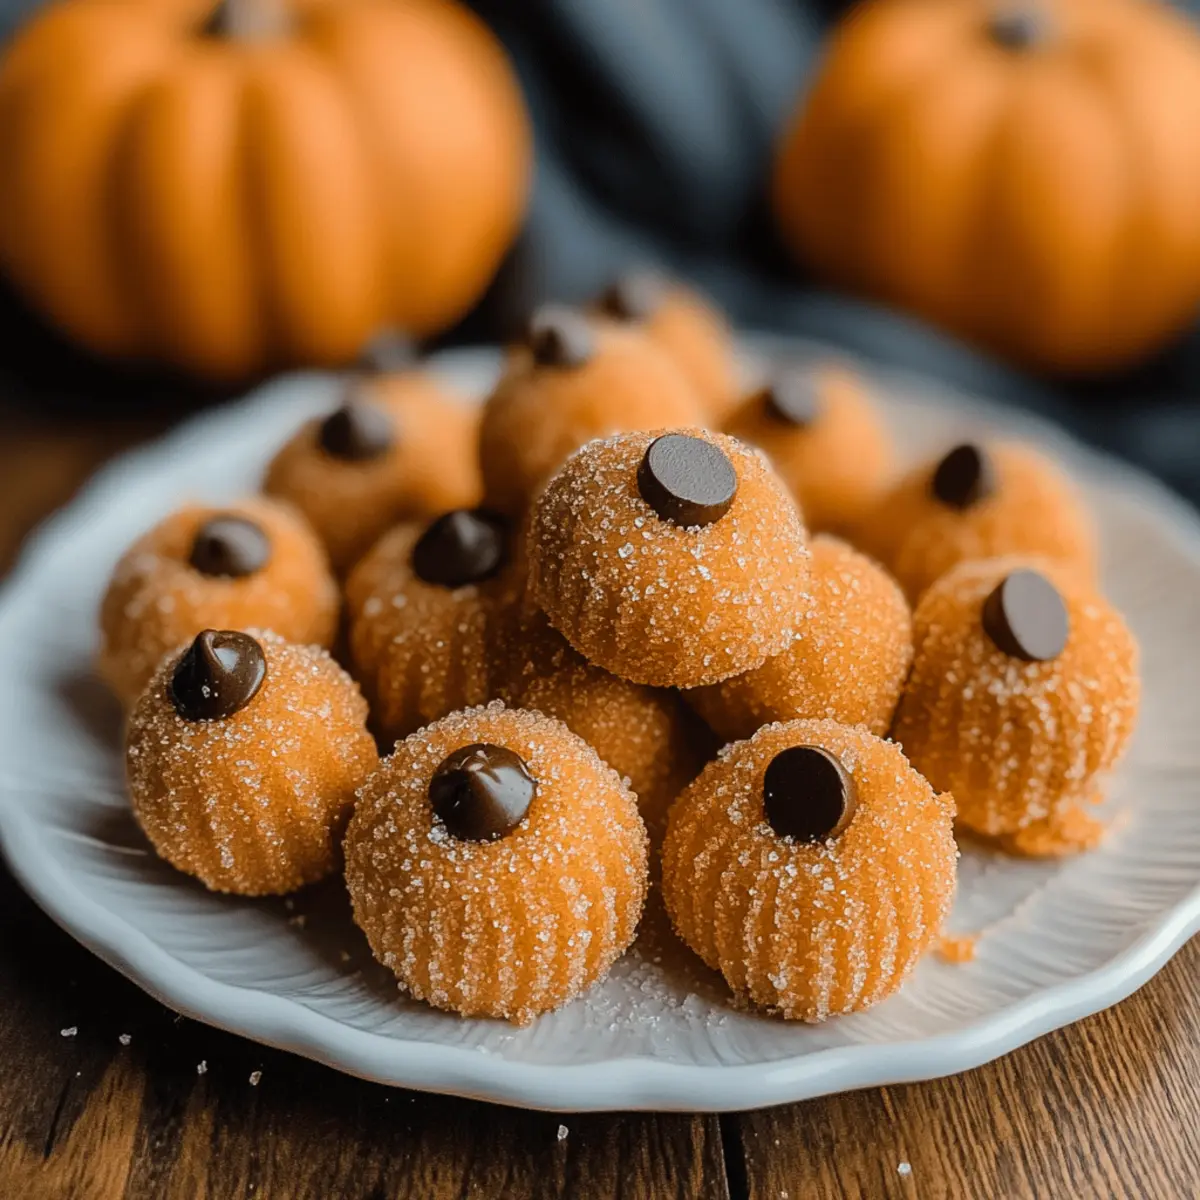
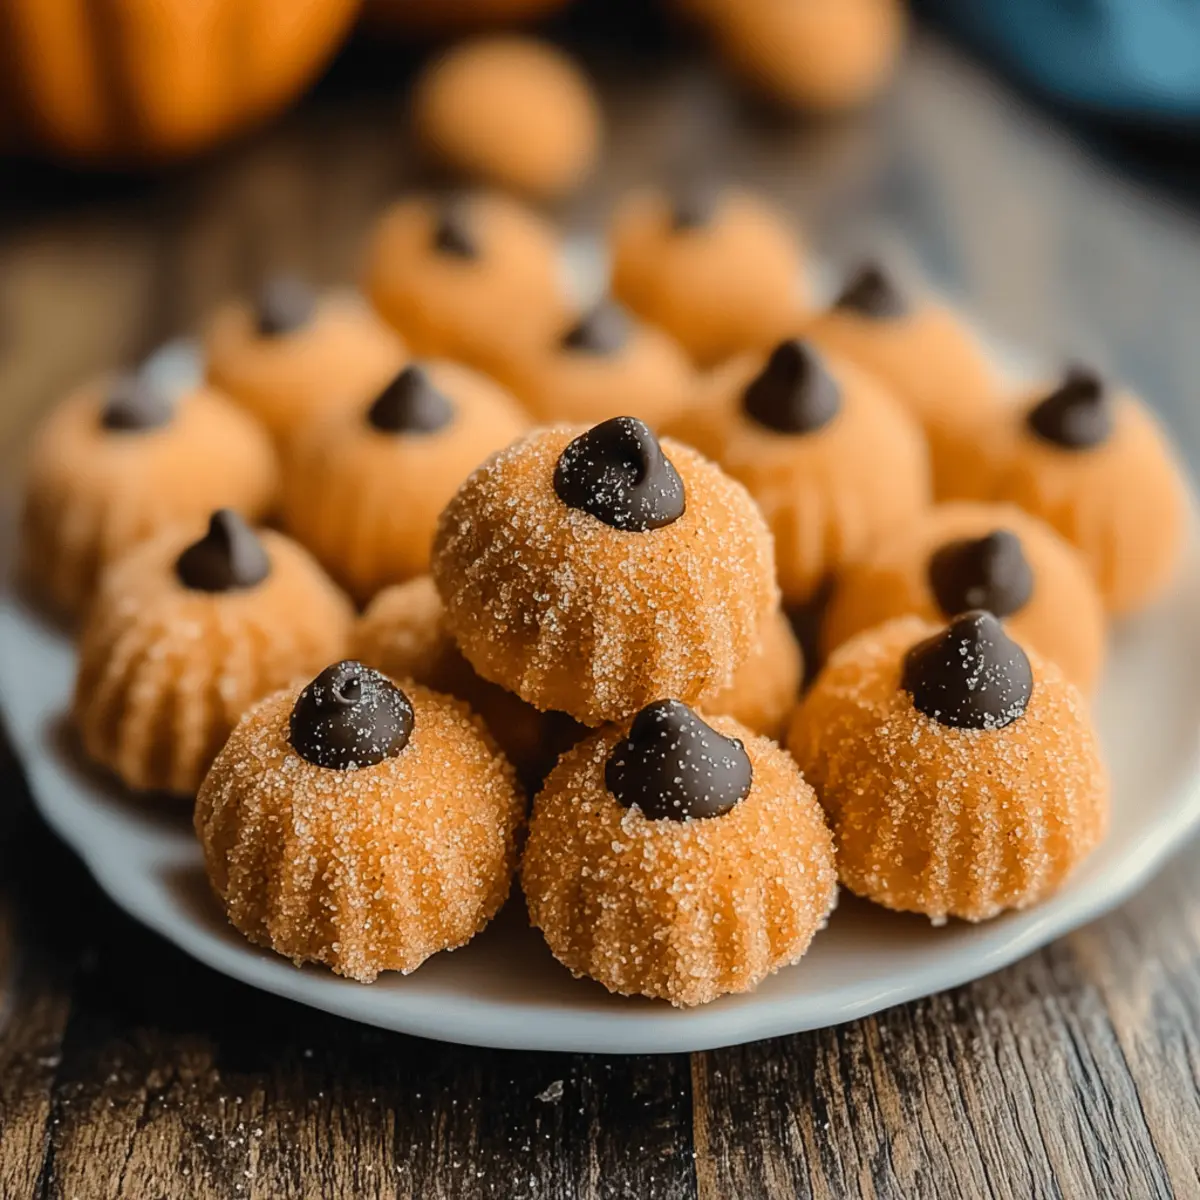
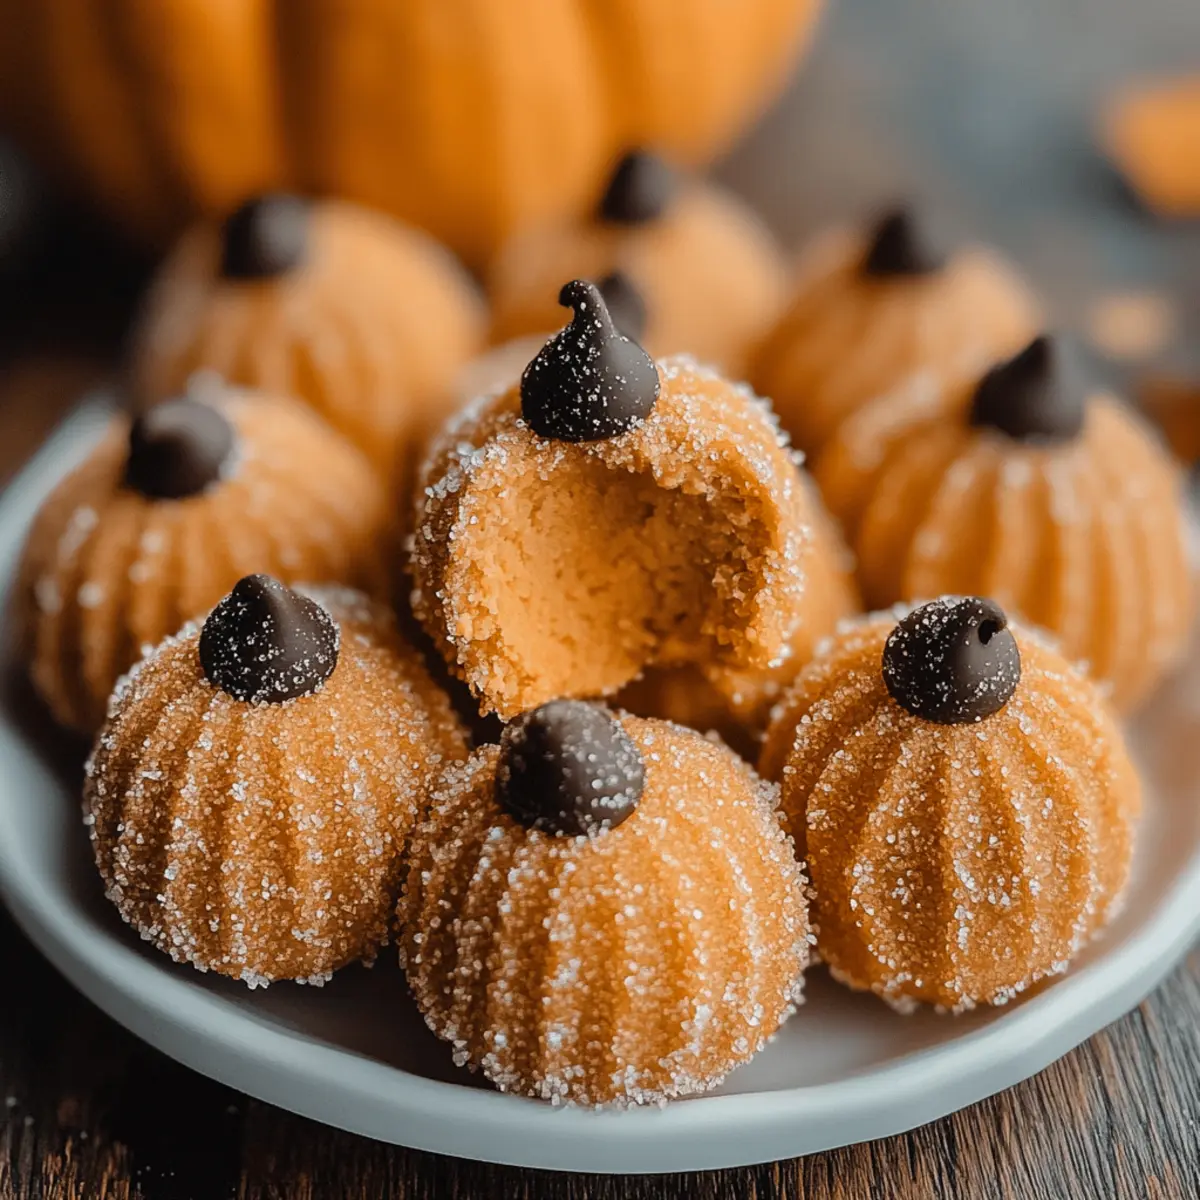
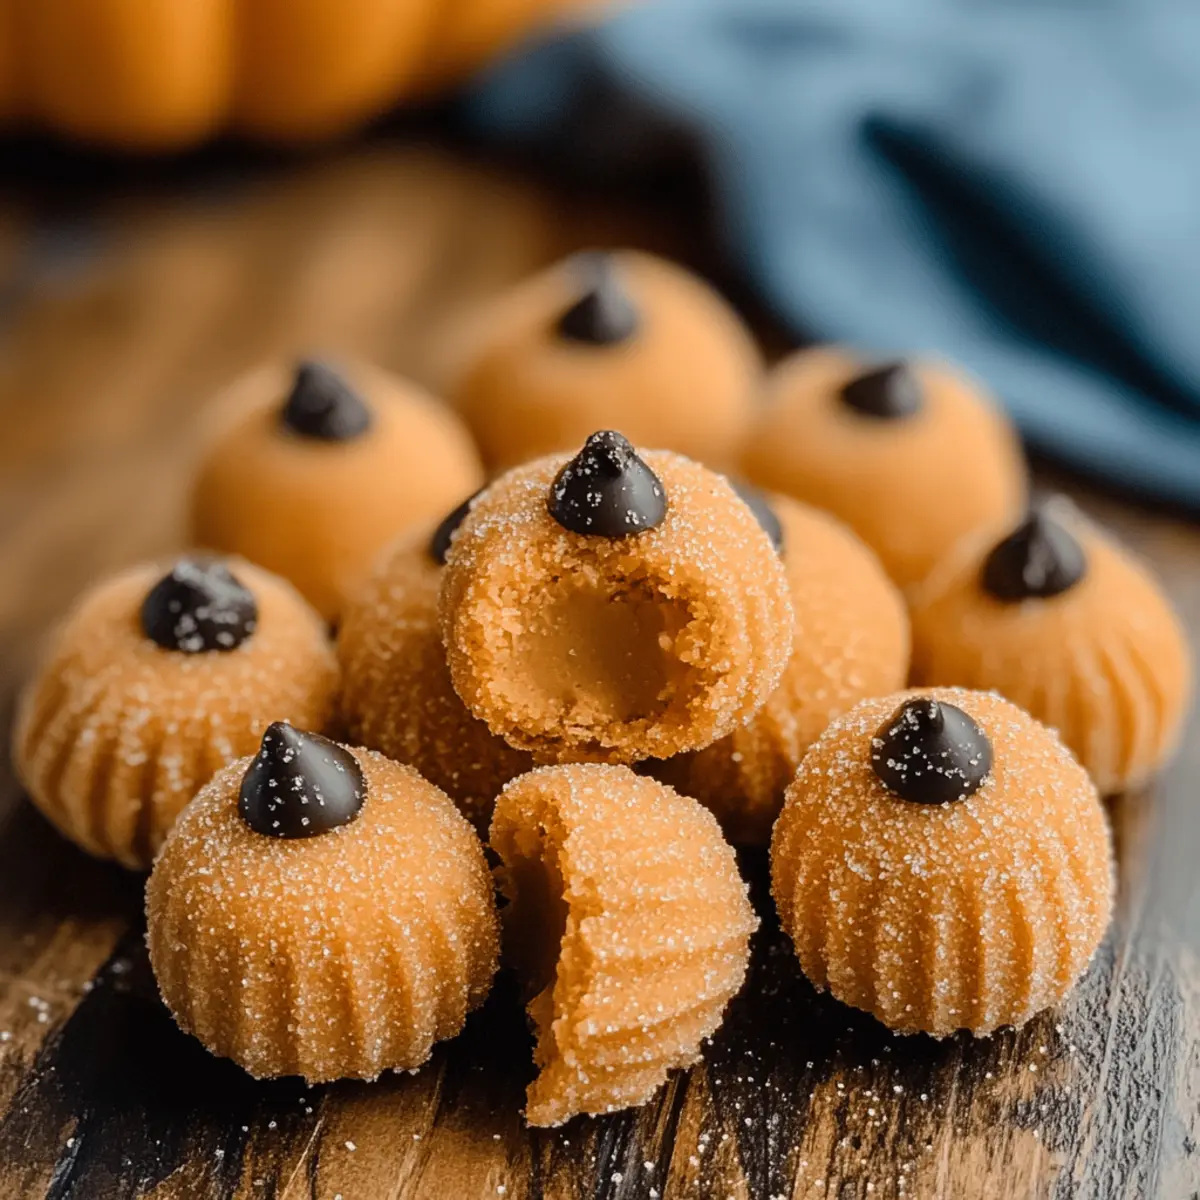
Beautiful Presentation: With a sparkly coating and chocolate chip stems, these truffles are as visually appealing as they are delicious—making them a showstopper at gatherings.
Make-Ahead Magic: Prepare them a day in advance and store in the fridge for a stress-free dessert option that maintains freshness!
Get ready to indulge in these delightful bites and elevate your fall dessert game!
Pumpkin Cheesecake Truffles Ingredients
For the Truffle Filling
- Butter – Adds richness and helps smooth the mixture; use unsalted for better flavor control.
- Cream Cheese – Provides a creamy, tangy base; ensure it’s softened for easy mixing.
- Canned Pumpkin Puree – Infuses natural sweetness and moisture; fresh pumpkin can be substituted, just ensure it’s well-mashed.
- Sweetened Condensed Milk – Adds sweetness and helps achieve a smooth texture; a dairy-free version can be used if needed.
- Pumpkin Pie Spice – Blends traditional autumn spices for flavor; cinnamon alone can work in a pinch.
For the Structure
- Graham Cracker Crumbs – Creates structure and adds a hint of crunch; substitute with crushed digestive biscuits or gluten-free crumbs.
- White Chocolate Chips – Enhances sweetness and creaminess in the filling; dark chocolate chips provide a richer taste.
For Decoration
- Orange Food Coloring (optional) – Enhances color but can be omitted for a more natural look.
- Granulated Sugar (for rolling) – Coats the truffles for added sweetness and sparkle.
- Chocolate Chips (for topping) – Use to decorate as pumpkin stems; mini chocolate chips also fit the bill.
These Pumpkin Cheesecake Truffles truly encapsulate the flavors of fall in a delectable bite-sized treat!
Step‑by‑Step Instructions for Pumpkin Cheesecake Truffles
Step 1: Combine Ingredients
In a medium skillet over medium heat, melt ¼ cup of unsalted butter together with 8 oz of softened cream cheese, 1 cup of canned pumpkin puree, 14 oz of sweetened condensed milk, and 1 teaspoon of pumpkin pie spice. Stir continuously until the mixture is smooth and starts to thicken slightly, about 5–7 minutes. Remove from heat and set aside to cool for a moment.
Step 2: Incorporate Dry Ingredients
Add 1 cup of graham cracker crumbs and ½ cup of white chocolate chips to the cooled pumpkin mixture. Mix thoroughly with a spatula until combined, ensuring there are no dry bits remaining. The mixture should be creamy and slightly sticky, perfect for shaping into truffles.
Step 3: Chill Mixture
Spread the pumpkin mixture onto a greased baking sheet, leveling it in an even layer. Cover with plastic wrap and refrigerate for at least 2 hours, or until firm enough to handle. This chilling step is crucial for shaping your Pumpkin Cheesecake Truffles into delightful balls.
Step 4: Shape the Truffles
Once chilled, rub a bit of softened butter on your hands to prevent sticking. Scoop out golf ball-sized portions of the mixture and roll them gently between your palms until smooth. Place each truffle on a clean baking sheet lined with parchment paper, continuing until all the mixture is rolled out.
Step 5: Coat & Decorate
Pour ½ cup of granulated sugar into a shallow bowl. Roll each truffle in the sugar, coating them evenly for a beautiful sparkly finish. Use a toothpick to create little ridges on top of each truffle, then press a chocolate chip into the top for a cute pumpkin stem.
Step 6: Serve or Store
Your Pumpkin Cheesecake Truffles are now ready to enjoy! You can serve them immediately or cover and refrigerate until you’re ready to present them. These delightful bites stay fresh for up to a week, making them the perfect make-ahead treat for gatherings or cozy evenings at home.
Expert Tips for Pumpkin Cheesecake Truffles
• Softened Cream Cheese: Ensure your cream cheese is fully softened for a smooth truffle filling; cold cream cheese can lead to lumps.
• Prevent Sticking: Rub softened butter on your hands when shaping the truffles to prevent the mixture from sticking and to keep your hands clean.
• Chill for Flavor: Allow the truffles to chill overnight for the best flavor; this resting time helps the spices meld beautifully in the Pumpkin Cheesecake Truffles.
• Creative Coatings: Experiment with different toppings, like crushed nuts or drizzled chocolate, for a fun twist on presentation!
• Uniform Size: Use a cookie scoop for evenly sized truffles, ensuring they cook evenly and look great on your dessert table.
Make Ahead Options
These delightful Pumpkin Cheesecake Truffles are perfect for busy home cooks looking to save time without sacrificing flavor. You can prepare the truffle filling up to 24 hours in advance by following the initial steps, then chilling the mixture as directed. Once firm, roll the truffles just before serving; this keeps them fresh and prevents them from drying out. When ready to enjoy, roll the chilled truffles in granulated sugar and add the chocolate chip stems for finishing touches. These steps ensure you’ll have delicious, ready-to-serve Pumpkin Cheesecake Truffles that maintain their creamy texture and festive charm, making your fall gatherings stress-free!
What to Serve with Pumpkin Cheesecake Truffles
As you delight in these sweet bites, why not create a full-flavored feast that highlights the flavors of fall?
- Spiced Apple Cider: Warm and comforting, this beverage enhances the cozy autumn experience, pairing beautifully with the creamy truffles.
- Classic Vanilla Ice Cream: A scoop of rich and creamy vanilla adds an indulgent touch, balancing the flavors with its cool sweetness.
- Ginger Snap Cookies: The spicy crunch of ginger snaps complements the pumpkin flavor, creating a delightful textural contrast.
- Pecan Pie Bars: Their nutty richness and buttery crust bring a traditional fall dessert twist, making the dessert spread even more inviting.
- Chocolate Covered Pretzels: The sweet and salty combo adds unexpected crunchiness, perfectly contrasting with the soft and creamy truffles.
- Pumpkin Spice Latte: Embrace the flavor of fall! This drink mirrors the truffle’s pumpkin essence, making it a festive pairing choice.
Treat yourself to an autumn-inspired feast that brings warmth to your gatherings and sweetens your everyday moments!
How to Store and Freeze Pumpkin Cheesecake Truffles
Fridge: Keep your Pumpkin Cheesecake Truffles in an airtight container; they stay fresh for up to 7 days. This way, you can enjoy them all week!
Freezer: For longer storage, place the truffles in a freezer-safe container, separated by parchment paper. They can be frozen for up to 3 months; just thaw in the fridge before serving.
Reheating: These truffles are best served chilled. If you prefer, let them sit at room temperature for about 10 minutes before enjoying for optimal texture.
Pumpkin Cheesecake Truffles Customization Ideas
Feel free to get creative with these Pumpkin Cheesecake Truffles and make them uniquely yours!
-
Dairy-Free: Swap cream cheese and sweetened condensed milk with dairy-free alternatives like coconut cream for a versatile option. Your truffles will remain creamy without sacrificing flavor!
-
Gluten-Free: Use gluten-free graham cracker crumbs or even crushed almond flour cookies to craft a gluten-free version of these delightful treats. They’ll be just as delicious!
-
Caramel Swirl: Add a swirl of caramel to the filling before chilling to introduce a sweet, gooey layer that elevates each bite. This luscious twist brings an extra layer of indulgence.
-
Nutty Crunch: Incorporate finely chopped pecans or walnuts into the mixture for a satisfying crunch. They add delightful texture and a nutty richness that pairs beautifully with the pumpkin flavor.
-
Spiced Just Right: Increase the warmth of your truffles by adding a pinch of ground cloves or allspice to the pumpkin mixture. This will make each truffle a true autumn delight, bursting with spice!
-
Chocolate Drizzle: Drizzle melted dark or white chocolate over the finished truffles for a gorgeous and decadent presentation. Not only do they look stunning, but the chocolate enhances the sweetness too.
-
Pumpkin Pie Spice Variations: Experiment with other spices like ginger or cardamom for a unique twist on traditional pumpkin pie flavors. Each combination will give your truffles a refreshing spin.
-
Mini Cheesecake Bites: Instead of rolling into truffles, press the mixture into mini muffin tins for bite-sized cheesecake bites. They’ll have the same great flavor but in a new form!
If you’re in the mood for more pumpkin-inspired indulgences, try making Cheesecake Stuffed Chocolate or even Sugar Free Cheesecake Bars. These variations will surely keep your fall flavors exciting!
Pumpkin Cheesecake Truffles Recipe FAQs
How do I select the right pumpkin puree?
Absolutely! When choosing pumpkin puree, opt for canned puree with a smooth texture and vibrant color. If you prefer fresh, select a small sugar pumpkin; ensure it’s well-mashed to avoid lumps in your truffles.
What is the best way to store Pumpkin Cheesecake Truffles?
To keep your truffles fresh, store them in an airtight container in the fridge. They’ll maintain their deliciousness for up to 7 days! Just be sure to keep them covered to prevent them from drying out.
Can I freeze Pumpkin Cheesecake Truffles?
Yes, you can! Place your truffles in a freezer-safe container, ensuring you separate layers with parchment paper. They can be frozen for up to 3 months. To enjoy them, simply thaw in the fridge for several hours before serving.
What if my truffle mixture is too soft to shape?
No worries! If your mixture is too soft, it’s likely not been chilled long enough. Spread it out again and refrigerate for an additional 1-2 hours until firm. Also, don’t forget to use butter on your hands when shaping to prevent sticking!
Can I make these truffles dairy-free?
Very much! You can replace the cream cheese and sweetened condensed milk with vegan alternatives. Be sure to check labels for dairy-free options to ensure they suit your dietary needs while still capturing that creamy texture.
Are these Pumpkin Cheesecake Truffles safe for pets?
No, it’s best to keep these truffles away from pets. Ingredients like chocolate and cream cheese can be harmful to dogs and cats, so make sure they enjoy their treats meant for them while you indulge in these festive truffles!
Creamy Pumpkin Cheesecake Truffles for Effortless Fall Indulgence
Ingredients
Equipment
Method
- In a medium skillet over medium heat, melt the butter with cream cheese, pumpkin puree, sweetened condensed milk, and pumpkin pie spice. Stir until smooth, about 5-7 minutes.
- Add graham cracker crumbs and white chocolate chips to the cooled mixture and mix until creamy and thoroughly combined.
- Spread the mixture onto a greased baking sheet, cover with plastic wrap, and refrigerate for at least 2 hours until firm.
- Rub softened butter on your hands, scoop out portions of the mixture, and roll them into smooth balls.
- Roll each truffle in granulated sugar for a sparkly finish, create ridges with a toothpick, and press a chocolate chip on top for decoration.
- Serve immediately or refrigerate until ready. These truffles stay fresh for up to a week.