
As I stood in the kitchen, craving a creamy, sweet indulgence, I stumbled upon a delightful solution: a No-Bake Cheesecake with Condensed Milk. This dreamy dessert not only saves you from the heat of the oven but also whips up in no time, making it the perfect treat when you’re busy or just not feeling the cooking vibe. With a luscious blend of cream cheese and sweetened condensed milk, the result is a silky filling that strikes the perfect balance between rich and light. Plus, it’s incredibly versatile; you can customize it to suit your taste by swapping out crusts, adding your favorite toppings, or folding in fresh fruits. Ready to impress your family and friends with this fuss-free dessert? Let me guide you through the simple steps!
Why is this cheesecake so irresistible?
Creamy Delight: The luxurious texture of the filling makes every bite melt in your mouth—no oven required!
Quick and Easy: With simple instructions and minimal prep time, this recipe is a lifesaver for busy days.
Customizable Options: Feel free to switch up crusts or toppings to suit your mood; the possibilities are endless! Try topping with fresh berries or a drizzle of chocolate for an extra touch.
Crowd-Pleasing: This No-Bake Cheesecake with Condensed Milk is sure to impress at gatherings, making it a perfect dessert for any occasion. Pair it with a cup of herbal tea for a delightful end to your meal.
Storage Friendly: Leftovers? No problem! This cheesecake keeps well in the fridge for days, so you can savor the goodness all week long.
Whether you’re celebrating or simply satisfying a sweet tooth, this cheesecake delivers a truly blissful experience! Don’t forget to check out my other delicious recipes like the Bake Blueberry Cheesecake for more no-bake inspiration!
No-Bake Cheesecake with Condensed Milk Ingredients
For the Crust
• Vanilla Wafer Crumbs – This sweet base provides a delightful crunch and structure; you can swap for Graham crackers or Oreo cookies for different flavors.
• Salted Butter – Binds the crust together while adding richness to each bite; unsalted butter works too; just adjust the added salt.
For the Filling
• Cream Cheese – The star of the show, delivering that creamy, luxurious texture; be sure to use full-fat block-style cream cheese for the best results.
• Sweetened Condensed Milk – Essential for the smooth filling, bringing sweetness and moisture; lower-fat versions can be used, but the taste and texture may vary.
• Fresh Lemon Juice – This brightens the flavor and helps the filling set properly; it’s optional, but I highly recommend it for that extra depth of taste.
Optional Toppings
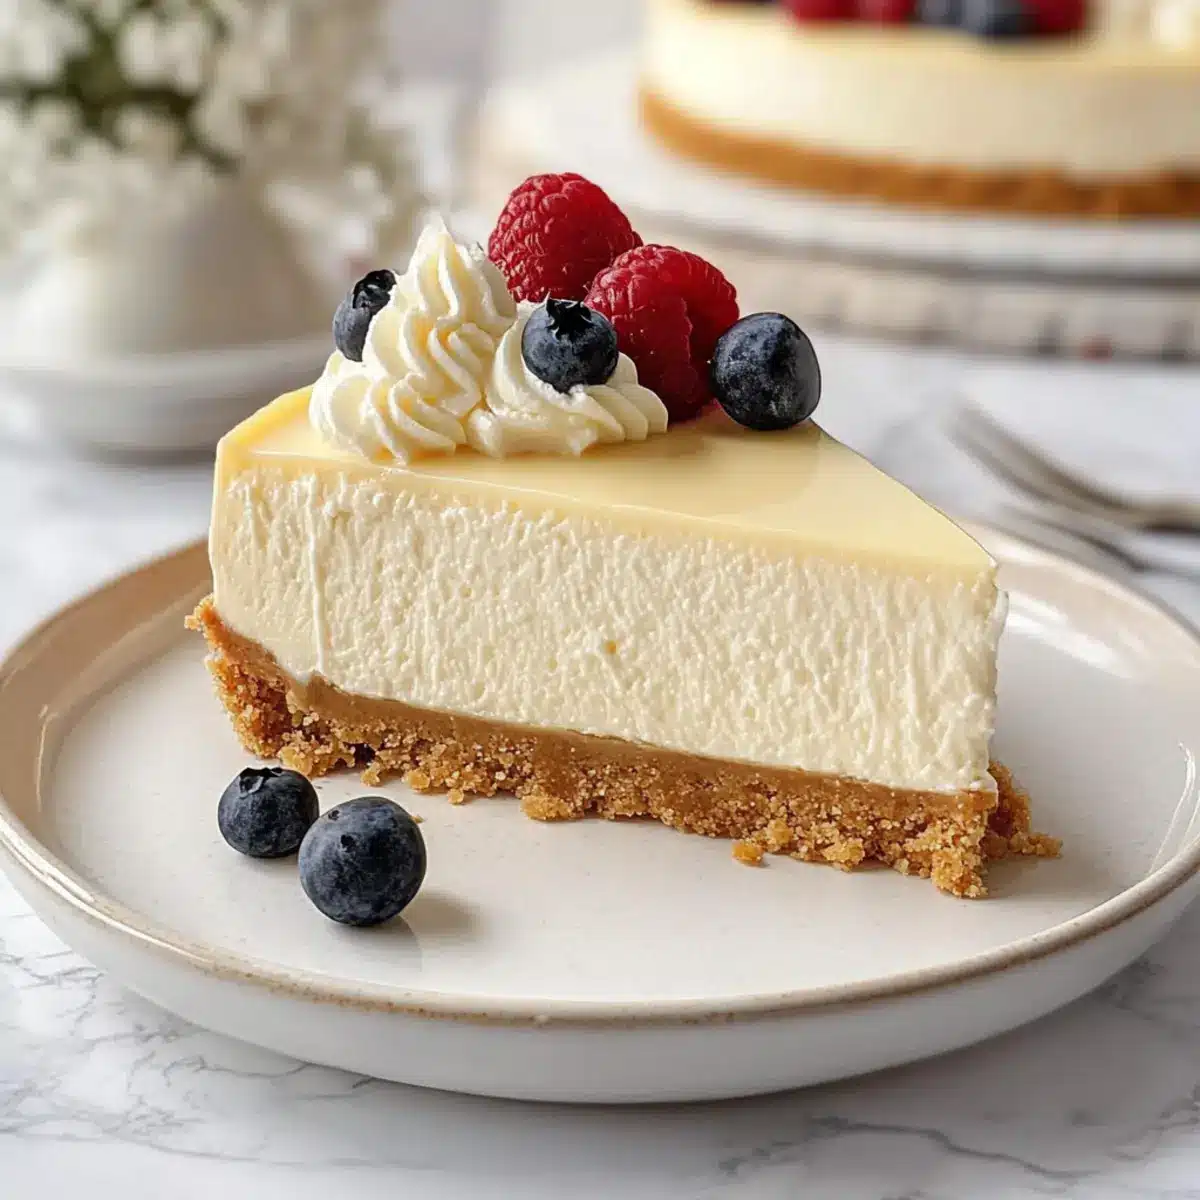
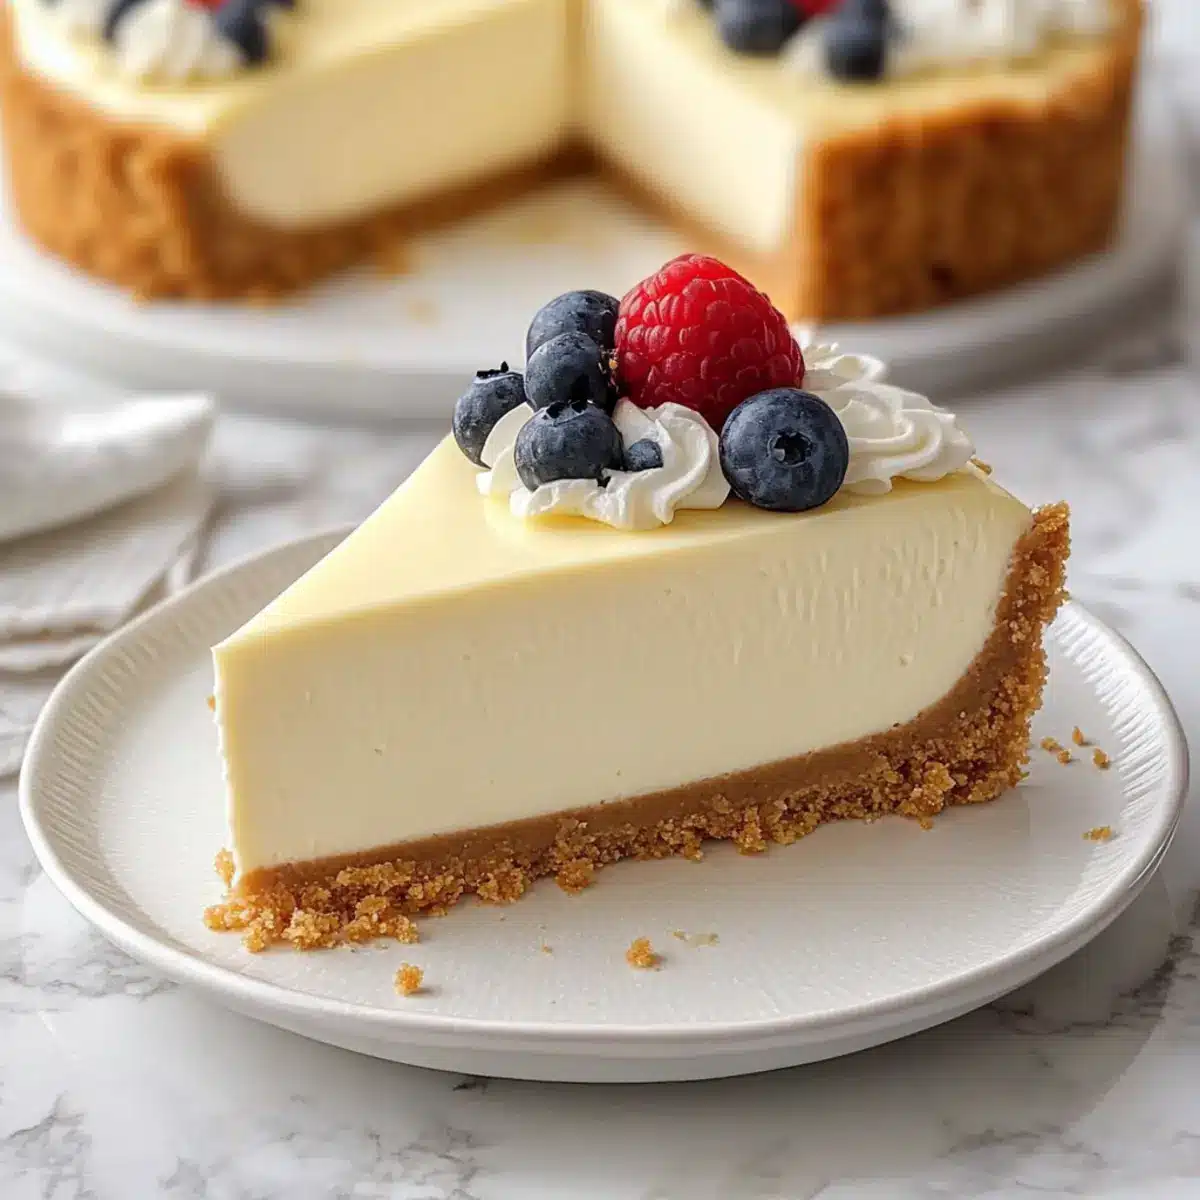
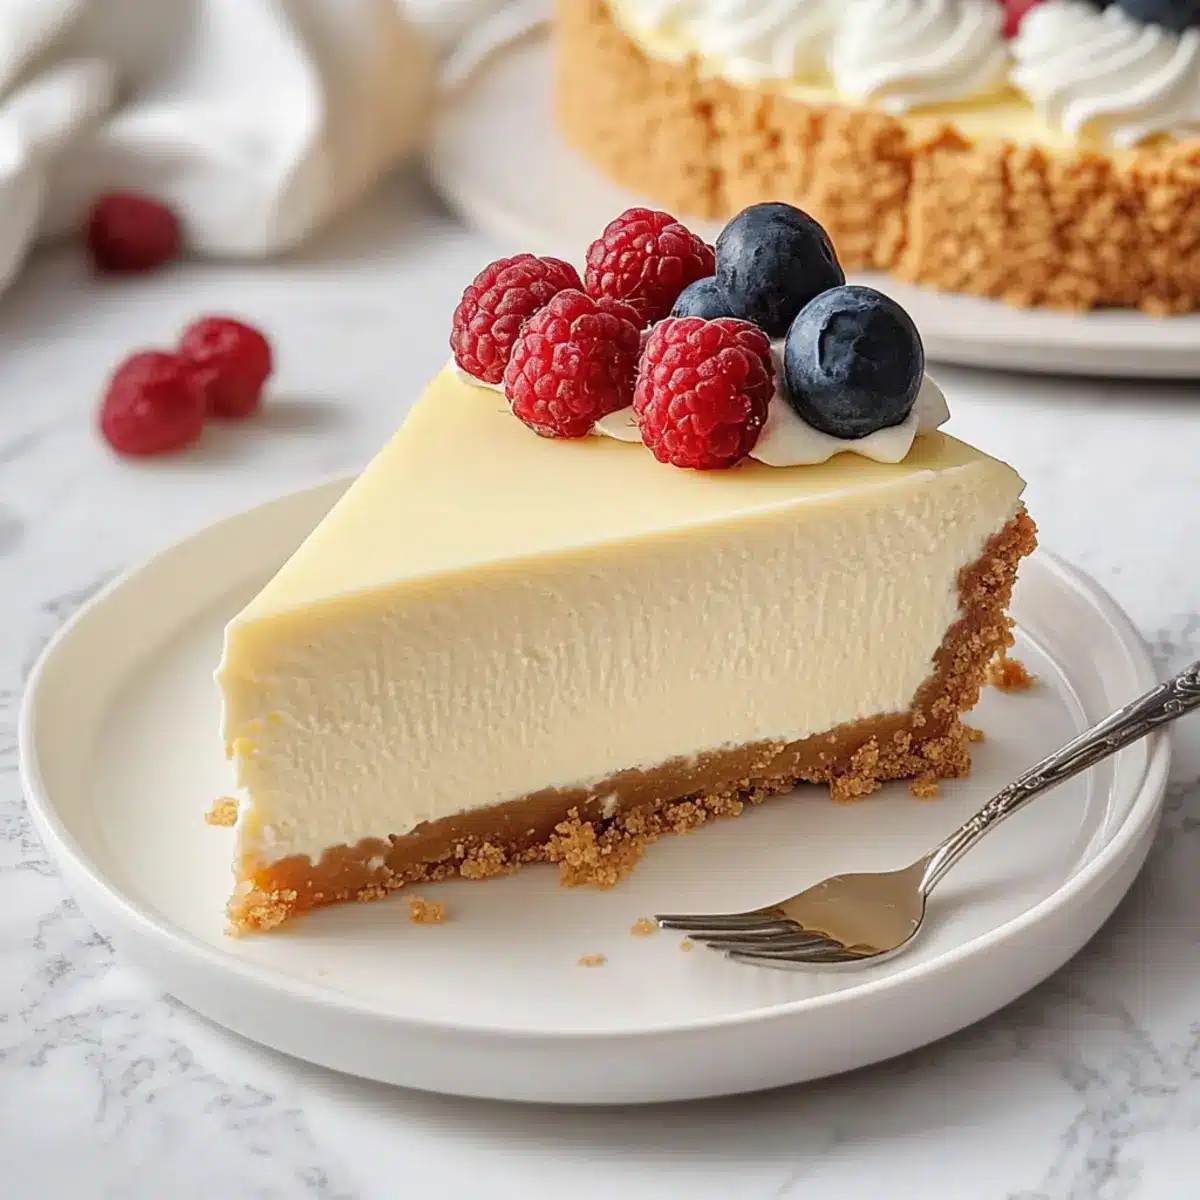
• Fresh Berries – Add a refreshing touch and beautiful color on top of your cheesecake; strawberries or raspberries work wonderfully!
• Whipped Cream – For a light and airy finish that complements the richness of the cheesecake.
• Chocolate Drizzle – A decadent addition that elevates every bite; go for dark or milk chocolate based on your preference.
Now you’re all set with the essentials for making this delectable No-Bake Cheesecake with Condensed Milk—get ready to indulge!
Step‑by‑Step Instructions for No-Bake Cheesecake with Condensed Milk
Step 1: Prepare the Crust
Begin by crushing the vanilla wafers into fine crumbs using a food processor or a zip-top bag with a rolling pin. In a bowl, mix the crumbs with melted salted butter until fully combined. Press this mixture firmly into the bottom of a 9-inch springform pan. Chill the crust in the refrigerator for at least 30 minutes to ensure it sets properly.
Step 2: Soften the Cream Cheese
While the crust is chilling, take your cream cheese out of the fridge and let it soften at room temperature for about 15-20 minutes, ensuring it reaches a smooth and spreadable consistency. This step is crucial for creating a silky texture in the filling of the No-Bake Cheesecake with Condensed Milk.
Step 3: Make the Filling
Once the cream cheese is soft, use a hand mixer or stand mixer to beat it in a large mixing bowl until it’s completely smooth and creamy. Gradually add in the sweetened condensed milk and fresh lemon juice. Continue mixing until the filling is velvety and well combined, with no lumps remaining, which should take around 2-3 minutes.
Step 4: Assemble the Cheesecake
Pour the luscious filling over the chilled crust in the springform pan. Use an offset spatula to smooth the top for an even, beautiful surface. It’s key to ensure the filling is distributed evenly, creating a lovely base for the eventual toppings.
Step 5: Chill to Set
Cover the cheesecake tightly with plastic wrap and place it in the refrigerator to chill for at least 5-6 hours, although overnight is preferred. This allows the No-Bake Cheesecake with Condensed Milk to firm up properly, resulting in a slice that holds its shape beautifully when cut.
Step 6: Prepare to Serve
When you’re ready to serve, take the cheesecake out of the fridge and remove the springform pan carefully. Use a warm knife for slicing to achieve clean edges—simply dip it in hot water and wipe it dry between cuts for best results.
Step 7: Garnish and Enjoy
Top your cheesecake with fresh berries, a dollop of whipped cream, or a drizzle of chocolate to elevate both its flavor and presentation. Each topping adds a unique touch, making your No-Bake Cheesecake with Condensed Milk a delightful centerpiece for any gathering.
No-Bake Cheesecake with Condensed Milk Variations
Feel free to explore these delightful twists that will make this cheesecake uniquely yours!
-
Chocolate Crust: Use chocolate cookie crumbs instead of vanilla for a rich, chocolatey base. This variation brings a lovely depth to the dessert.
-
Fruit-Infused Filling: Add pureed strawberries, blueberries, or passion fruit to the filling for a fruity burst of flavor. Swirling in your favorite fruit before pouring the mixture onto the crust creates a stunning effect!
-
Nutty Crunch: Stir in finely chopped nuts like pecans or almonds to the crust for an extra layer of texture. The nutty flavor adds a delicious contrast to the creamy filling.
-
Citrus Twist: Substitute lemon juice with lime or orange juice for zesty brightness. This refreshing change elevates the flavor profile and adds a delightful tang.
-
Spiced Up: Mix in a pinch of cinnamon or nutmeg to your filling for a warm, spicy touch. This twist can evoke cozy memories and add a depth that surprises the palate.
-
Dairy-Free Option: Swap cream cheese with dairy-free cream cheese and sweetened condensed milk with a non-dairy alternative. This makes the cheesecake accessible for lactose-intolerant friends without compromising flavor.
-
Vegan-Friendly: Use a plant-based cream cheese and replace sweetened condensed milk with coconut cream for a delectable vegan version. It’s an excellent way to cater to dietary preferences while keeping it indulgent.
Whether you’re in the mood for a chocolatey delight or a bright, fruity version, each of these ideas invites you to make the No-Bake Cheesecake with Condensed Milk your own. Why not pair your scrumptious creation with a warm cup of herbal tea or try out the Cheesecake Stuffed Chocolate for an exciting dessert lineup? The options are limitless!
Expert Tips for No-Bake Cheesecake
Use Room Temperature Cream Cheese: Ensure your cream cheese is softened at room temperature for a smooth and creamy filling. Cold cream cheese will create lumps in your No-Bake Cheesecake with Condensed Milk.
Chill Longer for Best Results: While a quick chill of 5-6 hours is acceptable, allowing the cheesecake to set overnight develops richer flavors and a firmer texture.
Hot Knife for Clean Slices: To achieve perfectly clean slices, use a hot knife. Dip it in hot water, wipe it dry, and make your cuts for that pristine presentation.
Experiment with Flavors: Don’t hesitate to customize! Add extracts like vanilla or almond to the filling for extra depth, or fold in fruits for a refreshing twist.
Watch the Storage: Keep leftovers in an airtight container in the refrigerator for up to 3-4 days. This cheesecake maintains its deliciousness and won’t dry out, making it perfect for enjoying throughout the week.
What to Serve with Creamy No-Bake Cheesecake with Sweetened Condensed Milk
Elevate your dessert experience by pairing this luscious cheesecake with delightful side dishes and drinks that complement its creamy richness.
-
Fresh Fruit Salad: A vibrant mix of berries and citrus provides a refreshing contrast to the cheesecake’s sweetness, enhancing each bite. The burst of flavor from the fruits brightens your dessert table beautifully.
-
Decadent Chocolate Sauce: Drizzling warm chocolate sauce over each slice adds an indulgent touch, creating a delightful contrast in flavors. This rich layer pairs beautifully with the smoothness of the cheesecake, making it richer and more satisfying.
-
Coffee or Espresso: A cup of robust coffee or espresso serves as the perfect accompaniment to your cheesecake. The bold flavors cut through the richness, providing a beautiful balance for a well-rounded dessert experience.
-
Whipped Cream Topping: A light dollop of freshly whipped cream not only adds a touch of elegance but also brings an airy texture that complements your cheesecake’s creamy filling magnificently.
-
Herbal Tea: Calming herbal teas like chamomile or mint are perfect for a soothing end to your meal. The subtle flavors enhance the indulgence while keeping it light and refreshing.
-
Chocolate Dipped Strawberries: These sweet, juicy treats add a touch of romance and fun to any gathering. Their fresh, vibrant taste contrasts wonderfully with the cheesecake’s creamy texture.
-
Coconut Macaroons: These chewy, sweet bites are a delightful pairing that adds a crunchy texture and introduces a tropical flair, making your dessert spread feel extra special.
-
Sparkling Water with Lemon: A refreshing drink that cleanses the palate, sparkling water infused with lemon adds a zesty touch that brightens the overall dessert experience.
By thoughtfully choosing your accompaniments, your No-Bake Cheesecake with Condensed Milk transforms into an unforgettable treat for any occasion.
Make Ahead Options
These No-Bake Cheesecake with Condensed Milk can be a real time-saver for busy home cooks! You can prepare the crust up to 24 hours in advance by pressing the vanilla wafer mixture into the springform pan and keeping it wrapped in the refrigerator. Additionally, make the filling and pour it over the chilled crust—this can be done up to 3 days ahead. Just cover it tightly with plastic wrap to prevent any absorption of odors from the fridge, ensuring it stays just as delicious. When you’re ready to serve, simply add your desired toppings, and you’ll have a creamy dessert ready to impress with minimal effort!
How to Store and Freeze No-Bake Cheesecake with Condensed Milk
Fridge: Store leftovers in an airtight container for up to 3-4 days, keeping the cheesecake fresh and creamy for your enjoyment.
Freezer: Wrap individual slices tightly in plastic wrap and store them in a freezer-safe container for up to 1 month. Thaw in the refrigerator overnight before serving.
Reheating: This cheesecake is best served chilled and doesn’t require reheating. Allow slices to sit at room temperature briefly before enjoying for the best flavor and texture.
Wrapping Tips: If freezing whole, wrap the cheesecake tightly with plastic wrap, followed by aluminum foil to prevent freezer burn and preserve the No-Bake Cheesecake with Condensed Milk’s delightful flavor.
No-Bake Cheesecake with Condensed Milk Recipe FAQs
How do I select the right ripeness of cream cheese for this recipe?
Absolutely! When selecting cream cheese, opt for full-fat block-style cream cheese rather than whipped varieties, which can lead to a grainy texture in your cheesecake. The cream cheese should be at room temperature for about 15-20 minutes before you start. It should be soft and spreadable, without any lumps, ensuring a smooth, creamy filling that’s essential for a perfect No-Bake Cheesecake with Condensed Milk.
How should I store leftovers of my cheesecake?
Very! To store your No-Bake Cheesecake, place it in an airtight container in the refrigerator. It will stay fresh for up to 3-4 days, allowing you to savor that creamy goodness throughout the week. If you find yourself with more cheesecake than you can handle, don’t worry! It freezes wonderfully too.
Can I freeze slices of the cheesecake? If so, how?
Absolutely! To freeze your cheesecake slices, wrap each piece tightly in plastic wrap and store them in a freezer-safe container. This method protects the cheesecake from freezer burn for up to 1 month. When you’re ready to enjoy, simply thaw the slice in the refrigerator overnight. This gradual thawing helps maintain the creamy texture and flavor.
What if my cheesecake doesn’t set properly?
No worries! If your cheesecake isn’t setting well, it may need longer in the refrigerator. Try refrigerating it overnight for the best firmness. More common causes can be insufficient mixing or not using enough cream cheese; ensure the cream cheese is fully softened and blended smoothly into the filling. Lastly, fresh lemon juice is key for proper setting, so don’t skip it!
Are there any ingredient substitutions I should be aware of?
Definitely! If you have dietary restrictions or preferences, there are plenty of substitutions. You can use Graham crackers or Oreo cookies instead of vanilla wafer crumbs for the crust. If you want a dairy-free version, look for vegan cream cheese and sweetened condensed milk alternatives. Just be mindful that using lower-fat or non-fat ingredients may affect the creaminess of the cheesecake.
Can I include fruits in the filling or as toppings?
Very much! You can absolutely fold in fresh fruits like raspberries or strawberries into the filling or sprinkle them on top before serving for a refreshing twist. This not only adds vibrant color but gives a delightful taste contrast, elevating your No-Bake Cheesecake with Condensed Milk from delicious to extraordinary!

Creamy No-Bake Cheesecake with Condensed Milk Bliss
Ingredients
Equipment
Method
- Begin by crushing the vanilla wafers into fine crumbs using a food processor or a zip-top bag with a rolling pin. In a bowl, mix the crumbs with melted salted butter until fully combined. Press this mixture firmly into the bottom of a 9-inch springform pan. Chill the crust in the refrigerator for at least 30 minutes to ensure it sets properly.
- While the crust is chilling, take your cream cheese out of the fridge and let it soften at room temperature for about 15-20 minutes, ensuring it reaches a smooth and spreadable consistency.
- Once the cream cheese is soft, use a hand mixer or stand mixer to beat it in a large mixing bowl until it's completely smooth and creamy. Gradually add in the sweetened condensed milk and fresh lemon juice. Continue mixing until the filling is velvety and well combined, which should take around 2-3 minutes.
- Pour the filling over the chilled crust in the springform pan. Use an offset spatula to smooth the top for an even surface.
- Cover the cheesecake tightly with plastic wrap and place it in the refrigerator to chill for at least 5-6 hours, although overnight is preferred for better firmness.
- When you’re ready to serve, take the cheesecake out of the fridge and remove the springform pan carefully. Use a warm knife for slicing to achieve clean edges.
- Top your cheesecake with fresh berries, a dollop of whipped cream, or a drizzle of chocolate to elevate its flavor and presentation.